It's just come to my attention that it's now fairly trivial to split a drive into two differently formatted partitions, one of which could be used for the Mac while the other could be used for Windows. This is not necessarily new, but there are a number of things that make it of particular interest to me. Before I detail the process of creating this dual-platform drive, I want to talk a bit about some of the reasons you might want to do this and some of the challenges I've faced over the years with regards to the issue of cross-platform drives.
Some History
In the very cross-platform lab where I used to work we were continually on the hunt for the best filesystem solution for users of multiple platforms when they were using external firewire or USB drives. That is, some folks wanted their drives to be accessible from both the Mac OS and Windows. On the surface this can seem like an easy problem to solve — Fat32 (or "MS-DOS" as it's called in Disk Utility) is readable and writable on both platforms. But it's not so cut and dry.
The biggest problem for me was video. See, I taught — and continue to teach — a video class in that very same department. We use Final Cut Pro as our editing software, for a variety of reasons, not the least of which is the fact that I prefer to work on the Mac. I require my students to have a firewire drive appropriate to showing in-progress video work in class. But Fat32 has a 4GB file size limit, and video captures can often exceed that limit. What happens when this limit is exceeded is interesting from a systems standpoint, but devastating from a user standpoint.
Video and Fat32
When capturing video in Final Cut Pro to a Fat32 volume, what happens is that the video file gets segmented. That is, the capture file gets written in 4GB chunks. Initially, Final Cut will see these chunks and understand what they are. But after saving the project and quitting the app Final Cut will no longer be able to locate the captured media because it's in multiple files with different names. The path to the media that FCP relies on is now, essentially, broken. This actually happened to a student of mine some time ago, and we were able to use the cat command to reconstruct the single movie file onto an HFS+ volume and then point FCP at the reconstructed file. Boy was that fun.
NTFS
We've often looked to the ever-popular NTFS file system as a possible future solution. It does not have such small file size limits, and it's readable on Mac and Windows. But the Mac has never been able to write to NTFS. So, in the past, our solution in the lab — our recommendation for users who really needed a dual-format drive with read/write capabilities on Mac and Windows — was to use the HFS+ filesystem on the drive and use MacDrive on Windows to read and write to that drive. Inelegant? Yes. But it mostly worked.
Mac and Windows Partitions
Another potentially attractive alternative to a single, dual-platform volume was the idea of splitting the drive into two partitions and dedicating each partition to a platform/filesystem. This way, even if all your Mac and Windows data wasn't all mushed together in one volume, you could at least keep it all on one device. This solution would likely work for the vast majority of users. Unfortunately, there was never a particularly straightforward way of doing this. Sure, it was doable. But it wasn't easy, and it wasn't something you could tell new students to do. In fact, it was likely to require admin access and command-line heroics, and so just wasn't a viable solution to anyone but the most die-hard user. Until now.
Without too much mucking around, it's now possible to create a dual-format external drive that contains a mac-formatted partition and a Windows-formatted one.
MacFUSE and NTFS for Mac OS X
The first step is the only really tricky part, and it's not even that tricky. If you have need for a dual-format drive, this should be pretty easy for you. You're going to need to install the MacFUSE and NTFS packages. In a nutshell, MacFUSE is an experimental set of tools for doing unsupported things with filesystems like SSH, FTP and, of course, NTFS on your Mac. And, experimental though it may be, I've been using it for quite a while and have not had any problems to speak of. Installing MacFUSE and the NTFS drivers will allow you to mount NTFS volumes with read-write access.
So, if NTFS can be mounted read-write on the Mac with MacFUSE, and it's obviously read-write on Windows, and it doesn't suffer from the file size limitations of Fat32, why not just use NTFS as your über-filesystem and format the whole drive with it? That's a great question, and I'm glad I asked it!
The thing about getting NTFS read-write access on a Mac with MaFUSE is that it's very much a hack. Yes, it works, but it has its problems. First and foremost among them is the fact that Final Cut Pro is really not a fan. In fact, FCP might just be the best barometer of a good cross-platform solution as it seems to be so picky about filesystems. So far, the only filesystem I've seen work consistently well with Final Cut is HFS+. No surprise there. And on NTFS it gets downright crazy. Files sometimes won't open. Sometimes they won't save. It's a scary mess, and I wouldn't trust my FCP data on NTFS for any amount of money.
But, what the MacFUSE NTFS package does get you is a relatively easy way to format your drive with separate Mac and Windows partitions, and this, at least in my tests seems to work just fine.
The easiest way to get everything you need is to go to the NTFS-3G for Mac OS X website and download the latest package. This package will install the most recent non-beta version of MacFUSE as well as the latest NTFS libraries, and contains everything you need. Once you've installed this bundle, you'll need to reboot your system.
Creating the Dual-Partition Drive
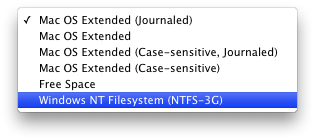
After the reboot you'll see a new filesystem option when you go to format drives in Disk Utility.
Moreover, that option will be available to individual partitions of drives that are otherwise formatted. And that's what's new (to me) and what allows the magic to happen. Here's how you do it.
- First, if you have any data on the drive that you need to preserve, back it up. This process WILL ERASE YOUR HARD DRIVE.
- Next, select the drive you want to dual-format and choose the Partition tab.
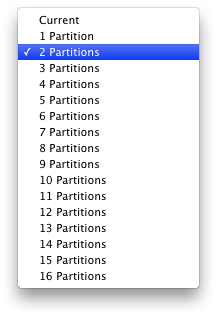
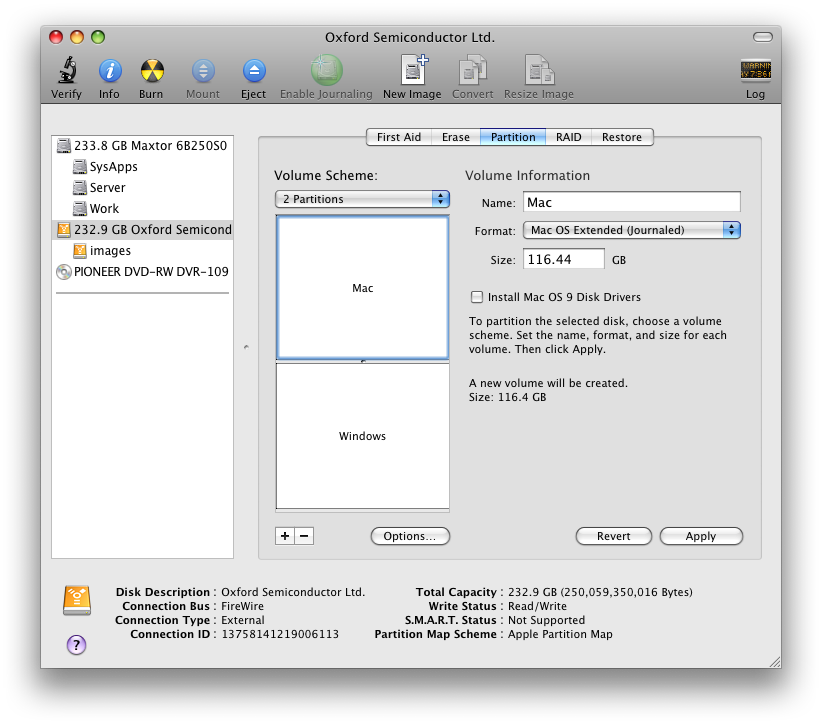
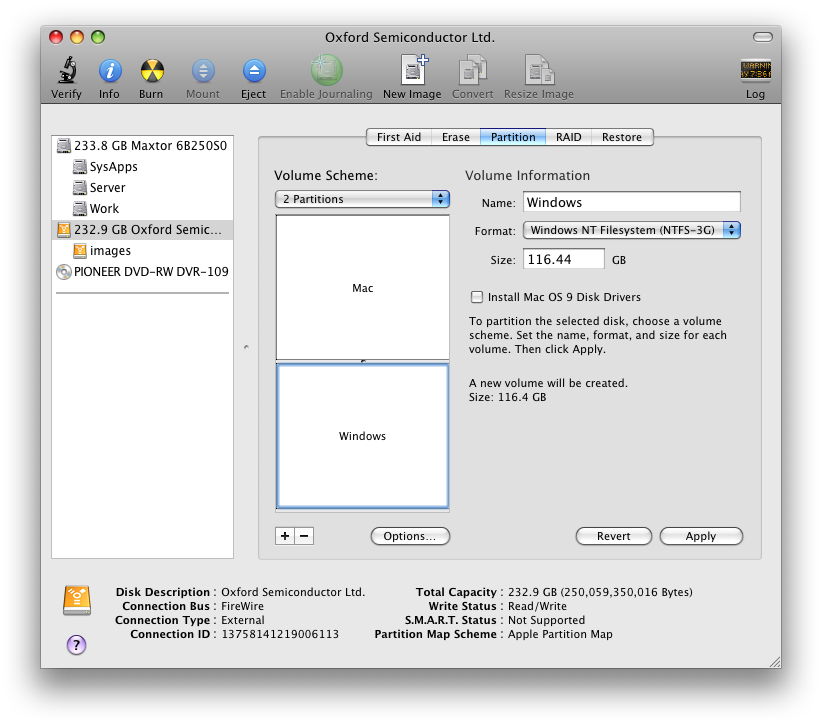
- Select a Volume Scheme. I'm just doing the simplest, two-partition scheme, with one Mac and one Windows partition, but you can certainly get more Byzantine with it if you'd like.
- Set the Format for the partition you want to use on the Mac to "Mac OS Extended (Journaled)," give it a name and a size.
- Set the Format for the partition you want to use on Windows to "Windows NT Filesystem (NTFS-3G)," give it a name and size.
- Under the Options... set the partition scheme to "Master Boot Record." This is needed for Windows to see your drive.
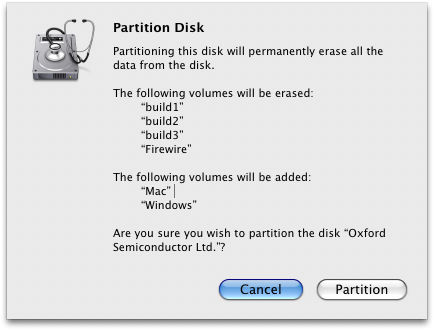
- Finally, hit the Apply button. You'll be warned that everything is about to be deleted. Click through, and after a few seconds you will have completed the formatting process and your dual-format drive will be ready for use on Mac and Windows.
Caveats
As I said, so far this has been working really well for my class. You may still want to file it under "experimental" for the time being, at least until you're sure it's working safely. But I'm confident enough in this method to recommend it to my video students who also need some external Windows drive love.
It's also important to keep in mind here that I am not endorsing using the NTFS partition for Mac data of any kind. Doing so is surely unsupported by Apple, and by all reports is fraught with problems.
The other thing to keep in mind is that, unlike with a GUID partition table, you will not be able to resize or split partitions without completely erasing the drive.
Conclusion
Lastly, I realize that this process is hardly new, nor am I the first to discover it. It was pointed out to me by one of my video students, and I have a feeling the new admins at my old job have been using it for some time. But it's new to me. This is the first I've heard of this and it's exciting to me from an academic standpoint, in the context of my old job, in the context of my class, as a new option I can offer to whomever might need it, and as a symbol of progress — however small or kludgy — towards cross-platform filesystem solutions. This is just another of the very cool advances made possible by the existence of the MacFUSE (and the original Linux FUSE) effort. It's very cool to see this sort of thing coming to fruition at last!
Another intriguing extension of the MacFUSE project — and one that I've used a bit myself — is MacFusion, which allows for mounting of data over network protocols such as FTP and SSH. I'm sure there are tons of others. I highly recommend folks — particularly SysAdmins — check out and familiarize themselves with MacFUSE in general, as well. As much as has been done since the last time I looked at it, there is still a ton of future potential in the project, and I see it increasingly becoming a part of the admin's toolbox.

