Mac OS X Server 10.4.8 Breaks Windows Quotas

It's great to finally have something systems-related to post about amidst the endless bureaucracy that fills my days lately. Of course that means that — yup, you guessed it — something broke. But hey, that's what it's all about. Well, that and the fixing of said brokeness, of course.

So we recently discovered that our Windows clients were suddenly, and without explanation, able to greatly exceed their roaming profile quotas. In fact, looking at the roaming profile drive showed users with upwards of 25 GBs in their roaming profiles, which have quota limits of 50 MB. Not only that, but further testing revealed that Windows client machines wouldn't even complain if they went over quota. Any SMB connection to the roaming profile drive could exceed the quota limit without so much as a complaint from server or client. AFP worked. UNIX worked. But quotas were ignored over SMB. What the fuck?

For three days I've been trying to track this problem down, testing all sorts of quota scenarios and SMB configurations in between meetings and meetings and more meetings. Eventually, when I can't make headway on a problem, I start thinking it might just be a bug. So I started poking around in the Apple Discussions, and I found one and only one complaint of a similar nature: 10.4.8 Server with broken quotas on Windows. Had I recently done a system update that perhaps broke quotas?

So I started thinking about what in a system update could break such a thing. How do quotas work? There is no daemon. A colleague suggested that they were part of the kernel. Had I done anything that would have replaced the kernel in the last month or two?

The answer was yes. Over the winter break I had decided to update the server to version 10.4.8. Upon realizing this I began to strongly suspect that Mac OS X Server 10.4.8 contained a bug that broke quotas over SMB. Fortunately, as is often my practice, I'd made a clone of my 10.4.7 server to a portable firewire drive before upgrading. Testing my theory would be a simple matter of booting off the clone.

Sure enough, after booting from the clone, quotas began behaving properly on Windows clients again. Because I had the clone, reverting the 10.4.8 server back to 10.4.7 was a simple matter of cloning the contents of the firewire to the server's internal drive and rebooting. Voilà! Problem solved!

From now on I think I'll hold off on server updates unless I really, really need them. When it comes to servers, I think the old adage is best: If it ain't broke, don't fix it.

Backing Up with RsyncX

In an earlier post I talked generally about my backup procedure for large amounts of data. In the post I discussed using RsyncX to back up staff Work drives over a network, as well as my own personal Work drive data, to a spare hard drive. Today I'd like to get a bit more specific.

Installing RsyncX

I do not use, nor do I recommend the version of rsync that ships with Mac OS X 10.4. I've found it, in my own personal tests, to be extremely unreliable, and unreliability is the last thing you want in a backup program. Instead I use — and have been using without issue for years now — RsyncX. RsyncX is a GUI wrapper for a custom-built version of the rsync command that's made to properly deal with HFS+ resource forks. So the first thing you need to do is get RsyncX, which you can do here. To install RsyncX, simply run the installer. This will place the resource-fork-aware version of rsync in /usr/local/bin/. If all you want to do is run rsync from the RsyncX GUI, then you're done, but if you want to run it non-interactively from the command-line — which ultimately we do — you should put the newly installed rsync command in the standard location, which is /usr/bin/.¹ Before you do this, it's always a good idea to make a backup of the OS X version. So:

sudo cp /usr/bin/rsync /usr/bin/rsync-ORIG

sudo cp /usr/local/bin/rsync /usr/bin/rsync

Ah! Much better! Okay. We're ready to roll with local backups.²

Local Backups

Creating local backups with rsync is pretty straightforward. The RsyncX version of the command acts almost exactly like the standard *NIX version, except that it has an option to preserve HFS+ resource forks. This option must be provided if you're interested in preserving said resource forks. Let's take a look at a simple rsync command:

/usr/bin/rsync -a -vv /Volumes/Work/ /Volumes/Backup --eahfs

This command will backup the contents of the Work volume to another volume called Backup. The -a flag stands for "archive" and will simply backup everything that's changed while leaving files that may have been deleted from the source. It's usually what you want. The -vv flag specifies "verbosity" and will print what rsync is doing to standard output. The level of verbosity is variable, so "-v" will give you only basic information, "-vvvv" will give you everything it can. I like "-vv." That's just the right amount of info for me. The next two entries are the source and target directories, Work and Backup. The --eahfs flag is used to tell rsync that you want to preserve resource forks. It only exists in the RsyncX version. Finally, pay close attention to the trailing slash in your source and target paths. The source path contains a trailing slash — meaning we want the command to act on the drive's contents, not the drive itself — whereas the target path contains no trailing slash. Without the trailing slash on the source, a folder called "Work" will be created inside the WorkBackup drive. This trailing slash behavior is standard in *NIX, but it's important to be aware of when writing rsync commands.

That's pretty much it for simple local backups. There are numerous other options to choose from, and you can find out about them by reading the rsync man page.

Network Backups

One of the great things about rsync is its ability to perform operations over a network. This is a big reason I use it at work to back up staff machines. The rsync command can perform network backups over a variety of protocols, most notably SSH. It also can reduce the network traffic these backups require by only copying the changes to files, rather than whole changed files, as well as using compression for network data transfers.

The version of rsync used by the host machine and the client machine must match exactly. So before we proceed, copy rsync to its default location on your client machine. You may want to back up the Mac OS X version on your client as well. If you have root on both machines you can do this remotely on the command line:

ssh -t root@mac01.systemsboy.com 'cp /usr/bin/rsync /usr/bin/rsync-ORIG'

scp /usr/bin/rsync root@mac01.systemsboy.com:/usr/bin/

Backing up over the network isn't too much different or harder than backing up locally. There are just a few more flags you need to supply. But the basic idea is the same. Here's an example:

/usr/bin/rsync -az -vv -e SSH mac01.systemsboy.com:/Volumes/Work/ /Volumes/Backups/mac01 --eahfs

This is pretty similar to our local command. The -a flag is still there, and we've added the -z flag as well, which specifies to use compression for the data (to ease network traffic). We now also have an -e flag which tells rsync that we're running over a network, and an SSH option that specifies the protocol to use for this network connection. Next we have the source, as usual, but this time our source is a computer on our network, which we specify just like we would with any SSH connection — hostname:/Path/To/Volume. Finally, we have the --eahfs flag for preserving resource forks. The easiest thing to do here is to run this as root (either directly or with sudo), which will allow you to sync data owned by users other than yourself.

Unattended Network Backups

Running backups over the network can also be

completely automated and can run transparently in the background even on systems where no user is logged in to the Mac OS X GUI. Doing this over SSH, of course, requires an SSH connection that does not interactively prompt for a password. This can be accomplished by establishing authorized key pairs between host and client. The best resource I've found for learning how to do this is Mike Bombich's page on the subject. He does a better job explaining it than I ever could, so I'll just direct you there for setting up SSH authentication keys. Incidentally, that article is written with rsync in mind, so there are lots of good rsync resources there as well. Go read it now, if you haven't already. Then come back here and I'll tell you what I do.

I'd like to note, at this point, that enabling SSH authentication keys, root accounts and unattended SSH access is a minor security risk. Bombich discusses this on his page to some extent, and I want to reiterate it here. Suffice to say, I would only use this procedure on a trusted, firewalled (or at least NATed) network. Please bear this in mind if you proceed with the following steps. If you're uncomfortable with any of this, or don't fully understand the implications, skip it and stick with local backups, or just run rsync over the network by hand and provide passwords as needed. But this is what I do on our network. It works, and it's not terribly insecure.

Okay, once you have authentication keys set up, you should be able to log into your client machine from your server, as root, without being prompted for a password. If you can't, reread the Bombich article and try again until you get it working. Otherwise, unattended backups will fail. Got it? Great!

I enable the root account on both the host and client systems, which can be done with the NetInfo Manger application in /Applications/Utilities/. I do this because I'm backing up data that is not owned by my admin account, and using root gives me the unfettered access I need. Depending on your situation, this may or may not be necessary. For the following steps, though, it will simplify things immensely if you are root:

su - root

Now, as root, we can run our rsync command, minus the verbosity, since we'll be doing this unattended, and if the keys are set up properly, we should never be prompted for a password:

/usr/bin/rsync -az -e SSH mac01.systemsboy.com:/Volumes/Work/ /Volumes/Backups/mac01 --eahfs

This command can be run either directly from cron on a periodic basis, or it can be placed in a cron-run script. For instance, I have a script that pipes verbose output to a log of all rsync activity for each staff machine I back up. This is handy to check for errors and whatnot, every so often, or if there's ever a problem. Also, my rsync commands are getting a bit unwieldy (as they tend to do) for direct inclusion in a crontab, so having the scripts keeps my crontab clean and readable. Here's a variant, for instance, that directs the output of rsync to a text file, and that uses an exclude flag to prevent certain folders from being backed up:

/usr/bin/rsync -az -vv -e SSH --exclude "Archive" mac01.systemsboy.com:/Volumes/Work/ /Volumes/Backups/mac01 --eahfs > ~/Log/mac01-backup-log.txt

This exclusion flag will prevent backup of anything called "Archive" on the top level of mac01's Work drive. Exclusion in rsync is relative to the source directory being synced. For instance, if I wanted to exclude a folder called "Do Not Backup" inside the "Archive" folder on mac01's Work drive, my rsync command would look like this:

/usr/bin/rsync -az -vv -e SSH --exclude "Archive/Do Not Backup" mac01.systemsboy.com:/Volumes/Work/ /Volumes/Backups/mac01 --eahfs > ~/Log/mac01-backup-log.txt

Mirroring

The above uses of rsync, as I mentioned before, will not delete files from the target that have been deleted from the source. They will only propagate changes that have occurred on the existing files, but will leave deleted files alone. They are semi-non-destuctive in this way, and this is often useful and desirable. Eventually, though, rsync backups will begin to consume a great deal of space, and after a while you may begin to run out. My solution to this is to periodically mirror my sources and targets, which can be easily accomplished with the --delete option. This option will delete any file from the target not found on the source. It does this after all other syncing is complete, so it's fairly safe to use, but it will require enough drive space to do a full sync before it does its thing. Here's our network command from above, only this time using the --delete flag:

/usr/bin/rsync -az -vv -e SSH --exclude "Archive/Do Not Backup" mac01.systemsboy.com:/Volumes/Work//Volumes/Backups/mac01 --delete --eahfs > ~/Log/mac01-backup-log.txt

Typically, I run the straight rsync command every other day or so (though I could probably get away with running it daily). I create the mirror at the end of each month to clear space. I back up about a half dozen machines this way, all from two simple shell scripts (daily and weekly) called by cron.

Conclusion

I realize that this is not a perfect backup solution. But it's pretty good for our needs, given what we can afford. And so far it hasn't failed me yet in four years. That's not a bad track record. Ideally, we'd have more drives and we'd stagger backups in such a way that we always had at least a few days backup available for retrieval. We'd also probably have some sort of backup to a more archival medium, like tape, for more permanent or semi-permanent backups. We'd also probably keep a copy of all this in some offsite, fireproof lock box. I know, I know. But we don't. And we won't. And thank god, 'cause what a pain in the

ass that must be. It'd be a full time job all its own, and not a very fun one. What this solution does offer is a cheap, decent, short-term backup procedure for emergency recovery of catastrophic data loss. Hard drive fails? No trouble. We've got you covered.

Hopefully, though, this all becomes a thing of the past when Leopard's Time Machine debuts. Won't that be the shit?

1. According to the RsyncX documentation, you should not need to do this, because the RsyncX installer changes the command path to its custom location. But if you'll be running the command over the network or as root, you'll either have to change that command path for the root account and on every client, or network backups will fail. It's much easier to simply put the modified version in the default location on each machine.

2. Updates to Mac OS X will almost always overwrite this custom version of rsync. So it's important to remember to replace it whenever you update the system software.

Using SSH to Send Variables in Scripts

In July I posted an article about sending commands remotely via ssh. This has been immensely useful, but one thing I really wanted to use it for did not work. Sending an ssh command that contained a variable, via a script for instance, would always fail for me, because, of course, the remote machine didn't know what the variable was.

Let me give an example. I have a script that creates user accounts. At the beginning of the script it asks me to supply a username, among other things, and assigns this to a variable in the script called $username. Kinda like this:

echo "Please enter the username for the new user:"read username

Later in the script that variable gets called to set the new user's username, and a whole bunch of other parameters. Still later in the script, I need to send a command to a remote machine via ssh, and the command I'm sending contains the $username variable:

ssh root@home.account.server 'edquota -p systemsboy $username'

This command would set the quota of the new user $username on the remote machine to that of the user systemsboy. But every time I've tried to include this command in the script, it fails, which, if you think about it, makes a whole lot of sense. See, 'cause the remote machine doesn't know squat about my script, and when that command gets to the remote machine, the remote machine has no idea who in the hell $username is. The remote machine reads $username literally, and the command fails.

The solution to this is probably obvious to hard-core scripters, but it took me a bit of thinkin' to figure it out. The solution is to create a new variable that is comprised of the ssh command calling the $username variable, and then call the new variable (the entire command) in the script. Which looks a little something like this:

quota=`ssh -t root@home.account.server "edquota -p systemsboy $username"`echo "$quota"

So we've created a variable, called $quota, which is the entire ssh command, and then we've simply called that variable in the script. That $quota variable will have the $username variable already filled in, and the command will now succeed on the remote machine. One thing that's important to note here: generally the command being sent over ssh is enclosed in single-quotes. In this instance, however, it must be enclosed in double-quotes for the command to work. I also used the -t option in this example (which tells ssh that the session is interactive, and to wait until it's told to return to the local machine) but I don't actually think it's necessary in this case. Still, it shouldn't hurt to have it there, just in case something goes funky.

But so far nothing has gone funky. This seems to work great.

Directory Access Via the Command Line

I recently finally had occasion to learn some incredibly handy new command-line tricks I've been wanting to figure out for some time. Namely, controlling Directory Access parameters. I've long hoped for and wondered if there was a way to do this, and some of my more ingenious readers finally confirmed that there was, in the comments to a recent article. And now, with initiative and time, I've figured it all out and want to post it here for both your and my benefit, and for the ages (or at least until Apple decides to change it).

The occasion for learning all this was a wee little problem I had with my Mac OS X clients. For some reason, which I've yet to determine, a batch of them became hopelessly unbound from the Open Directory master on our network.

Weird Client Problem: "Some" Accounts Available? Huh?

(click image for larger view)

The solution for this was to trash their DirectoryService preferences folder, and then to rebind them to the server. This was always something I'd done exclusively from the GUI, so doing it on numerous clients has always been a pain: log into the client machine, trash the prefs, navigate to and open the Directory Access application, authenticate to the DA app, enter the OD server name, authenticate for directory binding, and finally log back out. Lather, rinse, repeat per client. Blech! The command-line approach offers numerous advantages, the most obvious being that this can all be scripted and sent to multiple machines via Apple Remote Desktop. No login required, no GUI needed, and you can do every machine at once.

The command-line tools for doing all this are not exactly the most straightforward set of commands I've ever seen. But they exist, and they work, and they're quite flexible once you parse them out. The first basic thing you need to understand is that there are two tools for accomplishing the above: dscl and dsconfigldap. The dsconfigldap command is used to add an LDAP server configuration to Directory Access. The dscl command adds that server to the Authentication and Contacts lists in Directory Access, and is used to configure the options for service access.

So typically, your first step in binding a client to an OD master in Directory Access is to add it to the list of LDAPv3 servers. This can be done via the command-line with dsconfigldap, like so:

sudo dsconfigldap -s -a systemsboy.com -n "systemsboy"

We like to use directory binding in our configuration, and this can be accomplished too:

sudo dsconfigldap -u diradmin -i -s -f -a systemsboy.com -c systemsboy -n "systemsboy"

The above command requires a directory administrator username and interactively requests a password for said user. But if you want to use ARD for all of this, you'll need to supply the password in the command itself:

sudo dsconfigldap -u diradmin -p 'DirectoryAdmin_Password' -s -f -a systemsboy.com -c systemsboy -n "systemsboy"

Directory Access: Adding an OD Server Configuration

(click image for larger view)

So, there you have it. You've now added your OD master to your list of LDAPv3 servers. You can see this reflected immediately in the Directory Access application. But, unlike in DA, the command does not automatically populate the Authentication and Contacts fields. Your client will not authenticate to the OD master until you have added the OD server as an authentication source. To do this you use dscl. You'll need a custom Search Path for this to work. You may already have one, but if you don't you can add one first:

dscl -q localhost -create /Search SearchPolicy dsAttrTypeStandard:CSPSearchPath

And now add the OD master to the Authentication search path you just created:

sudo dscl -q localhost -merge /Search CSPSearchPath /LDAPv3/systemsboy.com

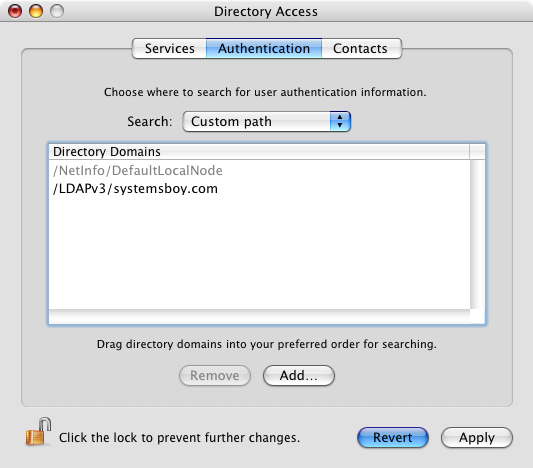
Directory Access: Adding an OD Authentication Source

(click image for larger view)

If you want your OD server as a Contacts source as well, run:

sudo dscl -q localhost -merge /Contact CSPSearchPath /LDAPv3/systemsboy.com

Again, this change will be reflected immediately in the DA application. You may now want to restart Directory Services to make sure the changes get picked up, like so:

sudo killall DirectoryService

And that's really all there is to it. You should now be able to log on as a network user. To test, simply id a know network-only user:

id spaz

/>If you get this error:

id: spaz: no such user

Something's wrong. Try again.

If all is well, though, you'll get the user information for that user:

uid=503(spaz) gid=503(spaz) groups=503(spaz)

You should be good to go.

And, if you want to view all this via the command-line as well, here are some commands to get you started.

To list the servers in the configuration:

dscl localhost -list /LDAPv3

To list Authentication sources:

dscl -q localhost -read /Search

To list Contacts sources:

dscl -q localhost -read /Contact

A few things before I wind up. First, some notes on the syntax of these commands. For a full list of options, you should most definitely turn to the man pages for any of these commands. But I wanted to briefly talk about the basic syntax, because to my eye it's a bit confusing. Let's pick apart this command, which adds the OD master to the configuration with directory binding and a supplied directory admin username and password:

sudo dsconfigldap -u diradmin -p 'DirectoryAdmin_Password' -s -f -a systemsboy.com -c systemsboy -n "systemsboy"

The command is being run as root (sudo) and is called dsconfigldap. The -u option tells the command that we'll be supplying the name of the directory admin to be used for binding to the OD master (required for such binding). Next we supply that name, in this case diradmin. The -p option allows you to specify the password for that user, which you do next in single quotes. The -s option will set up secure authentication between server and client, which is the default in DA. The -f option turns on ("forces") directory binding. The -a option specifies that you are adding the server (as opposed to removing it). The next entry is the name of the OD server (you can use the Fully Qualified Domain Name or the IP address here, but I prefer FQDN). The -c option specifies the computer ID or name to be used for directory binding to the server, and this will add the computer to the server's Computers list. And finally, the -n option allows you to specify the configuration name in the list of servers in DA.

Now let's look at this particular use of dscl:

sudo dscl -q localhost -merge /Search CSPSearchPath /LDAPv3/systemsboy.com

Again, dscl is the command and it's being run as root. The -q option runs the command in quiet mode, with no interactive prompt. (The dscl command can also be run interactively.) The localhost field specifies the client machine to run the command on, in this case, the machine I'm on right now. The -merge flag tells dscl that we want to add this data without affecting any of the other entries in the path. The /Search string specifies the path to the Directory Service datasource to operate on, in this case the "Search" path, and the CSPSearchPath is our custom search path key to which we want to add our OD server, which is named in the last string in the command.

Whew! It's a lot, I know. But the beauty is that dscl and dsconfigldap are extremely flexible and powerful tools that allow you to manipulate every parameter in the Directory Access application. Wonderful!

Next, to be thorough, I thought I'd provide the commands to reverse all this — to remove the OD master from DA entirely. So, working backwards, to remove the server from the list of Authentication sources, run:

sudo dscl -q localhost -delete /Search CSPSearchPath /LDAPv3/systemsboy.com

To remove it from the from the Contacts source list:

sudo dscl -q localhost -delete /Contact CSPSearchPath /LDAPv3/systemsboy.com

And to remove a directory-bound configuration non-interactively (i.e. supplying the directory admin name and password):

sudo dsconfigldap -u diradmin -p 'DirectoryAdmin_Password' -s -f -r systemsboy.com -c systemsboy -n "systemsboy"

If that's your only server, you should be back to spec. Just to be safe, restart DirectoryService again:

sudo killall DirectoryService

If you have a bunch of servers in your Directory Access list, you could script a method for removing them all with the above commands, but it's probably easier to just trash the DirectoryService prefs (in /Library/Preferences) and restart DirectoryService.

Lastly, I'd like to end this article with thanks. Learning all this was kind of tricky for me, and I had a lot of help from a few sources. Faithful readers MatX and Nigel (of mind the expla

natory gap fame) both pointed out the availability of all this command-line goodness. And nigel got me started down the road to understanding it all. Most of the information in this article was also directly gleaned from another site hosted in my home state of Ohio, on a page written by a Jeff McCune. With the exception of a minor tweak here and there (particularly when adding Contacts sources), Jeff's instructions were my key to truly understanding all this, and I must thank him profusely. He made the learning curve on all this tolerable.

So thanks guys! It's help like this that makes having this site so damn useful sometimes, and it's much appreciated.

And now I'm off to go bind some clients command-line style!

UPDATE:

Got to test all this out real-world style today. Our server got hung up again, and we had the same problem I described at the head of this article. No one could log in. So I started trying to use the command-line to reset the machines. I had one major snag that caused it all to fail until I figured out what was going on. Seems I could not bind my machines to the server using the -s flag (secure binding). I had thought that this was the default, and that I was using it before, but now I'm not so sure. In any case, if you're having trouble binding or unbinding clients to a server, try the dsconfigldap command without the -s flag if you can, like so:

sudo dsconfigldap -u diradmin -p 'DirectoryAdmin_Password' -f -a systemsboy.com -c systemsboy -n "systemsboy"

That's what worked for me. I'm a little concerned that this is indicative of a problem on my server, but now's not really the time to go screwing with stuff, so I'll leave it alone for the time being.

This update brought to you by the little letter -s.

External Network Unification Part 4: The CMS Goes Live

NOTE: This is the latest article in the External Network Unification project series. It was actually penned, and was meant to be posted several weeks ago, but somehow got lost in the shuffle. In any case, it's still relavant, and rather than rewrite it accounting for the time lapse, I present it here in it's original form, with a follow-up at the end.
-systemsboy

Last Thursday, August 10th, 2006 marked a milestone in the External Network Unification project: We've migrated our CMS to Joomla and are using external authentication for the site. Though it was accomplished somewhat differently than I had anticipated, accomplished it was, nonetheless, and boy we're happy. Here's the scoop.

Last time I mentioned I'd built a test site — a copy of our CMS on a different machine — and had some success, and that the next step was to build a test site on the web server itself and test the LDAP Hack on the live server authenticating to a real live, non-Mac OSX LDAP server. Which is what I did.

Building the Joomla port on the web server was about as easy as it was on the test server. I just followed the same set of steps and was done in no time. Easy. And this time I didn't have to worry about recreating any of the MySQL databases since, on the web server, they were already in place as we want them and were working perfectly. So the live Joomla port was exceedingly simple.

LDAP, on the other hand, is not. I've been spoiled by Mac OS X's presentation of LDAP in its server software. Apple has done a fantastic job of simplifying what, I recently discovered, is a very complicated, and at times almost primitive, database system. Red Hat has also made ambitious forays into the LDAP server arena, and I look forward to trying out their offerings. This time out my LDAP server was built by another staff systems admin. He did a great job in a short space of time on what I can only imagine was, at times, a trying chore. The LDAP server he built, though, worked and was, by all standards, quite secure. Maybe too secure.

When trying to authenticate our Joomla CMS port with the LDAP hack, nothing I did worked. And I tried everything. Our LDAP server does everything over TLS for security, and requires all transactions to be encrypted, and I'm guessing that the LDAP Hack we were using for the CMS just couldn't handle that. In some configurations login information was actually printed directly to the browser window. Not cool!

Near the point of giving up, I thought I'd just try some other stuff while I had this port on hand. The LDAP Hack can authenticate via two other sources, actually: IMAP and POP. Got a mail server? The LDAP Hack can authenticate to it just like your mail client does. I figured it was worth a shot, so I tried it. And it worked! Perfectly! And this gave me ideas.

The more I thought about it, the more I realized that our LDAP solution is nowhere near ready for prime-time. I still believe LDAP will ultimately be the way to go for our user databases. But for now what we want to do with it is just too complicated. The mere act of user creation on the LDAP server, as it's built now anyway, will require some kind of scripting solution. I also now realize that we will most likely need a custom schema for the LDAP server, as it will be hosting authentication and user info for a variety of other servers. For instance, we have a Quicktime Streaming Server, and home accounts reside in a specific directory on that machine. But on our mail server, the home account location is different. This, if I am thinking about it correctly, will need to be handled by some sort of custom LDAP schema that can supply variable data with regards to home account locations based on the machine that is connecting to it. There are other problems too. Ones that are so abstract to me right now I can't even begin to think about writing about them. Suffice to say, with about two-and-a-half solid weeks before school starts, and a whole list of other projects that must get done in that time frame, I just know we won't have time to build and test specialized LDAP schemas. To do this right, we need more time.

By the same token, I'm still stuck — fixated, even — on the idea of reducing as many of the authentication servers and databases, and thus a good deal of the confusion, as I possibly can. Authenticating to our mail server may just be the ticket, if only temporarily.

The mail server, it turns out, already hosts authentication for a couple other servers. And it can — and is now — hosting authentication for our CMS. That leaves only two other systems independently hosting user data on the external network: the reservations system (running on it's own MySQL user database) and the Quicktime Streaming server, which hosts local Netinfo accounts. Reservations is a foregone conclusion for now. It's a custom system, and we won't have time to change it before the semester starts. (Though it occurs to me that it might be possible for Reservations to piggyback on the CMS and use the CMS's MySQL database for authentication — which of course now uses the mail server to build itself — rather than the separate MySQL database it currently uses. But this will take some effort.) But if I can get the Quicktime Streaming Server to authenticate to the mail server — and I'm pretty hopeful here — I can reduce the number of authentication systems by one more. This would effectively reduce by more than half the total number of authentication systems (both internal ones — which are now all hosted by a Mac OS X server — and external ones) currently in use.

Right now — as of Thursday, August 10th, 2006 — we've gone live with the new CMS, and that brings our total number from eight authentication systems down to four. That's half what we had. That awesome. If I can get it down to three, I'll be pleased as punch. If I can get it down to two, I'll feel like a super hero. So in the next couple weeks I'll be looking at authenticating our Quicktime server via NIS. I've never done it, but I think it's possible, either through the NIS plugin in Directory Access, or by using a cron-activated shell script. But if not, we're still in better shape than we were.

Presenting the new system to the users this year should be far simpler than it's ever been, and new user creation should be a comparative cakewalk to years past. And hopefully by next year we can make it even simpler.

FOLLOW-UP:
It's been several weeks since I wrote this article, and I'm happy to report that all is well with our Joomla port and the hack that allows us to use our mail server for authentication. It's been running fine, and has given us no problems whatsoever. With the start of the semester slamming us like a sumo wrestler on crack, I have not had a chance to test any other servers against alternative authentication methods. There's been way too much going on, from heat waves to air conditioning and power failures. It's been a madhouse around here, I tell ya. A madhouse! So for now, this project is on hold until we can get some free time. Hopefully we can pick up with it again when things settle, but that may not be until next summer. In any case, the system we have now is worlds better than what we had just a few short months ago. And presenting it to the users was clearer than it's ever been. I have to say, I'm pretty pleased with how it's turing out.