NetBoot Part 4

So this is going great. I have a really solid Base OS Install, and a whole buttload of packages now. Packages that set everything from network settings to custom and specialized users. I can build a typical system in about 45 minutes, and I can do most of the building from my office (or any other computer in the lab that has ARD installed).

I'm also getting fairly adept at making packages. A good many of my packages are just scripts that make settings to the system, so I'm getting pretty handy with the bash and quite intimate with dscl. But, perhaps most importantly, I'm learning how to make all sorts of settings in Leopard via the command-line that I never knew how to do.

The toughest one so far has been file sharing. In our lab we share all our Work partitions to the entire internal network over AFP and SMB. In the past we used SharePoints to modify the NetInfo database to do so, but this functionality has all been moved over to Directory Services. To complicate matters, SAMBA no longer relies simply on standard SMB configuration files in standard locations, and the starting and stopping of the SMB daemon is handled completely by launchd. So figuring this all out has been a headache. But I think I've got it!

Setting Up AFP

Our first step in this process is setting up the share point for AFP (AppleFileshareProtocol) sharing. This wasn't terribly difficult to figure out, especially now that I've been using Directory Services to create new users. To create an AFP share in Leopard, you use dscl. Once you grok the syntax of dscl it's fairly easy to use. It basically goes like this:

command node -action Data/Source value

The "Data Source" is the thing you're actually operating on. I like to think of it as a plist entry in the database — like a hierarchically structured file — which it basically is, or sometimes I envision the old-style NetInfo structures. To get the needed values for my new share, I used dscl to look at a test share I'd created in the Sharing Preferences:

dscl . -read SharePoints/TEST

The output looked like this:

dsAttrTypeNative:afp_guestaccess: 1

dsAttrTypeNative:afp_name: TEST

dsAttrTypeNative:afp_shared: 1

dsAttrTypeNative:directory_path: /Volumes/TEST

dsAttrTypeNative:ftp_name: TEST

dsAttrTypeNative:sharepoint_group_id: XXXXXXXX-XXXX-XXXX-XXXX-XXXXXXXXXXX

dsAttrTypeNative:smb_createmask: 644

dsAttrTypeNative:smb_directorymask: 755

dsAttrTypeNative:smb_guestaccess: 1

dsAttrTypeNative:smb_name: TEST

dsAttrTypeNative:smb_shared: 1

AppleMetaNodeLocation: /Local/Default

RecordName: TEST

RecordType: dsRecTypeStandard:SharePoints

Okay. So I needed to use dscl to create a record in the SharePoints data source with all these values. Fortunately, the "sharepoint_group_id" is not required for the share to work, because I'm not yet sure how to generate that number. But create the share with all the other values and you should be okay:

sudo dscl . -create SharePoints/my-share

sudo dscl . -create SharePoints/my-share afp_guestaccess 1

sudo dscl . -create SharePoints/my-share afp_name My-Share

sudo dscl . -create SharePoints/my-share afp_shared 1

sudo dscl . -create SharePoints/my-share directory_path /Volumes/HardDrive

sudo dscl . -create SharePoints/my-share ftp_name my-share

sudo dscl . -create SharePoints/my-share smb_createmask 644

sudo dscl . -create SharePoints/my-share smb_directorymask 755

sudo dscl . -create SharePoints/my-share smb_guestaccess 1

sudo dscl . -create SharePoints/my-share smb_name my-share

sudo dscl . -create SharePoints/my-share smb_shared 1

This series of commands will create a share called "My-Share" out of the drive called "HardDrive."

After modifying the Directory Services database, it's always smart to restart it:

sudo killall DirectoryService

And we need to make sure AFP is running by starting the daemon and reloading the associated Launch Daemons:

sudo AppleFileServer

sudo launchctl unload /System/Library/LaunchDaemons/com.apple.AppleFileServer.plist

sudo launchctl load -F /System/Library/LaunchDaemons/com.apple.AppleFileServer.plist

Not the easiest process, but not too bad. SMB was much tougher to figure out.

Setting Up SMB

Setting up SMB works similarly, but everything is in a completely different and not-necessarily standard place. To wit, Leopard has two different smb.conf files: one that's auto-generated (and which you should not touch) in /var/db, and one in the standard /etc location. Fortunately, it turned out, I didn't have to modify either of these. But still, it led to some confusion. The way SMB is managed in Leopard is rather roundabout and interdependent. Information about SMB share is stored in flat files — one per share — in /var/samba/shares. So, to create our "my-share" share, we need a file named for the share (but all lower-case):

sudo touch /var/samba/shares/my-share

And in that file we need some basic SMB info to describe the share:

#VERSION 3

path=/Volumes/HardDrive

comment=HardDrive

usershare_acl=S-1-1-0:F

guest ok=yes

directory mask=755

create mask=644

Next — and this was the tough part to figure out — we need to modify one, single, very important preference file that basically informs Launch Services that SMB should now be running:

sudo defaults write /Library/Preferences/SystemConfiguration/com.apple.smb.server "EnabledServices" '(disk)'

This command modifies the file com.apple.smb.server.plist in our /Library/Preferences/SystemConfiguration folder. That file is watched by launchd such that when it is modified thusly, launchd knows to start and run the smbd daemon in the appropriate fashion. Still, for good measure, I like to reload the LaunchDaemon for the SMB server by hand. Don't need to, but it's a nice idea:

sudo launchctl unload /System/Library/LaunchDaemons/com.apple.smb.server.preferences.plist

sudo launchctl load -F /System/Library/LaunchDaemons/com.apple.smb.server.preferences.plist

That's pretty much it! There are a few oddities: For one, the new share will not initially appear in the Sharing Preferences pane, nor will the Finder show it as a Shared Folder when you open the window.

Shared Folder: This Won't Show Without a Reboot

(click image for larger view)

But the share will be active, and all will be right with the world after a simple reboot. (Isn't it always!) Also, if you haven't done it already, you may have to set permissions on your share using chmod in order for anyone to see it.

I was kind of surprised at how hard it was to set up file sharing via the command-line. But I'm glad I stuck with it and figured it out. It's good knowledge to have.

Hopefully someone else will find it useful as well.

NetBoot Part 3

I've become quite the package whiz, if I do say so myself. Actually, I'm probably doing something ass-backwards, but still, I wanted to share some of my working methods as they seem to be, well... Um... Working...

One of the things I'm doing is using packages to run shell scripts that make computer settings (like network settings and user-creation) rather than actually installing files.

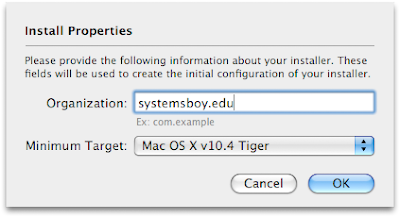
PackageMaker: I Prefer the 10.4 Version of Packages
(click image for larger view)

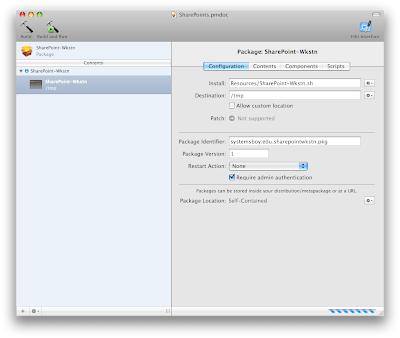
This can be done in PackageMaker by taking some creative liberties with preflight and/or postflight scripts. The only hitch is that PackageMaker insists that you install at least some files onto the target system.

PackageMaker: Installing Scripts to /tmp
(click image for larger view)

So the majority of my packages contain only a single script. That script first gets installed to /tmp, thus fulfilling PackageMaker's "must install files" directive.

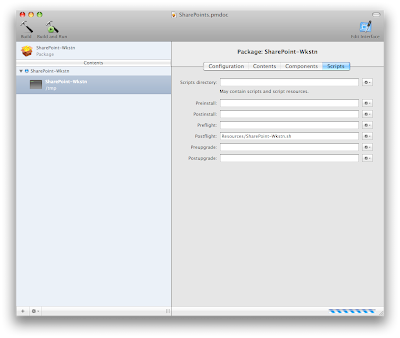
PackageMaker: A Postflight Script
(click image for larger view)

The script then runs as a posflight script, and the last line of the script deletes the instance of the script in /tmp, just for good measure.

Shell Script: Removing the Script from /tmp
(click image for larger view)

It could be argued that there's no reason to create packages from scripts, that you could just as easily run the scripts directly in ASR, but packages offer a couple of advantages. For one, packages leave receipts, so it's easy to check and see if something's been set on a computer. For two, packages are easy to deal with; assistants and other SysAdmins know how they work and can easily understand how to use them. Need to change a machine's settings? Don't run a script. Hell, don't even bother opening System Preferences. Just open and run a package. What could be easier (and less error-prone, I might add)? From an ease-of-use perspective, packages have a huge advantage. And ease-of-use adds efficiency. Which is why I not-so-suddenly find myself in the envious position of being able to build systems in about half the time (or less!) it used to take. That's a huge improvement!

Using this method (and sound DNS) I've been able to write packages that configure network settings, create computer-specific users, set custom disk and file permissions, set up autofs, bind to our authentication server and set up SSH for password-less login.

Next on the list: File Sharing!

Should be fun.

Secondary DNS Configuration

I recently had occasion to do some Mac OS X DNS configuration. Primary DNS setup is pretty straightforward, but I always get stuck on the secondary DNS config, and this week I had the (not so) rare privilege of discovering I'd been doing it wrong all along. I thought I'd post some quickie instructions for next time this comes up.

So, to set up your Mac OS X Server as a secondary DNS server (that is, if the primary goes down, this one will act as a failover), you'll need to open Server Admin and navigate to the DNS section (we'll use the 10.4 version, but the basic gist is the same in 10.5). Next, add a secondary zone under "Secondary Zones." This first one will be for your forward lookups. In the first field add the full name of your zone. In the second field add the IP address of your primary DNS server. It should look like this:


Secondary DNS: Forward Lookups
(click image for larger view)

Now add another secondary zone for the reverse lookups. This is exactly the same except that instead of the zone name in the first field, you'll use the reverse zone information. It looks like this:


Secondary DNS: Reverse Lookups
(click image for larger view)

Note that the reverse IP in the field should cover the zone IP range. That is, if your primary DNS server covers "192.168.1" zone, you'll enter the reverse info for that range. If your primary DNS covers all of "192.168" (notice the truncated IP number) then you should enter that. All together it should look like this:


Secondary DNS: All Together Now
(click image for larger view)

Once this is all set up and saved, you can start the service. You can tell it worked by listing the contents of /var/named. You should see two new files, one called your.domain.com.bak and one called your.IP.in-addr.arpa.bak. And these should be populated with the same DNS info as your primary.

And that's it! Enter the new secondary DNS server info in your Network System Preferences, just after the primary, and if your main DNS fails you'll be covered.

Oh, almost forgot, thanks to this dude for helping me figure all this out.

NetBoot Part 2

So here's the plan, as it stands right now. (Yes, I have a plan already! Yes, that was quick.) First, build an image that's good for all workstations (laptops, staff machines, standard workstations, etc.) throughout the lab with:

  • Base OS (Mac OS X Leopard 10.5)
  • A DHCP network connection
  • Apple applications
  • Adobe applications
  • Drag-and-drop applications
  • Other third-party applications
  • One admin user
  • ARD active

IMAGE THIS SYSTEM
This becomes the base system build, the Master Image — the replacement system if a machine ever needs rebuilding. It is the only full system image. There is only one.

Everything else that is machine-type specific — that is, users, applications, application components, crontabs, anything — gets turned into and installed via either a downloaded or hand-rolled package. So far I've been using Apple's PackageMaker, which has matured a great deal since last I tried it. It's pretty nice. I'm also taking a look at Iceberg, which also looks to be pretty full-featured and nifty.


Iceberg: by White Box
(click image for larger view)


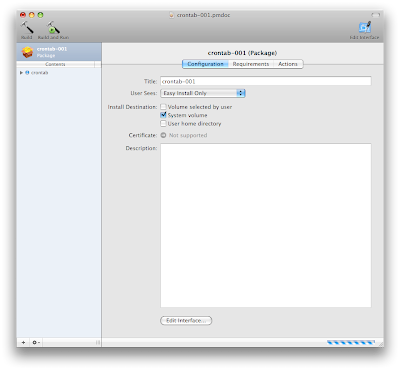
PackageMaker: by Apple
(click image for larger view)

These packages can be machine-type specific and stored in a simple folder hierarchy by machine type — laptop packages in the laptops folder, etc. — for organizational purposes. In addition to being machine-type specific, packages can also, I believe, be machine specific. That is, I think we can make settings like computer name and network settings using packages as well. So what we're talking about here is a system of computer building that happens completely over the network, and that can be directed almost entirely from one ARD-toting computer, that computer being mine, of course. (I've always said, the sign of a good SysAdmin is that he never leaves his chair.)

I've gotten pretty good at making application packages, at this point (not that it's terribly hard, mind you). My next step will be to learn how to make system settings with packages as well. My other next step is going to be, of course, creating the Master Build. None of this building happens 'til summer. But still, something tells me it's going to be smart to start this process now and see what crops up over the next couple of months.

As usual, I'll be reporting any new and/or interesting developments.

Oh, and thanks to everyone who commented on the last post. The comments were extremely useful!

NetBoot Part 1

My big, fat, self-assigned new project — or, as I like to call it, the bug up my butt — is system roll-outs. That is, I realized at some point two things. One, I am managing way more computers than ever before, and way more than I realized; and two, the scope and variety of these various systems has become increasingly wide. These realizations inevitably brought me crashing, headlong (yes, headlong) into a third and final revelation: I need to come up with a better system for managing machine builds and systems roll-outs.

Enter: NetBoot.

Actually, let me first explain how we've handled this in the past. When I began this job we had maybe 15-20 Macs running OS 9 briefly, and then OS X since about its inception. Mac OS 9 was notoriously easy to build. Just copy that shit and be done with it. But Mac OS X was a different beast entirely. Mac OS X was complicated. Moody. A tougher nut to crack. Mac OS X required me to delve into the dark arts of system cloning.

Cue thunder clap, scary music.

The process that eventually evolved was cloning over firewire. We'd build our master machine — a basic Mac OS install with all the latest updates and our requisite software — and then clone that to the other machines over firewire, with clients booted into our Master via firewire target disk mode. This was a quick and dirty way to build a bunch of systems. Once the group was built we could customize machines or groups of machines as we saw fit. For a lab of 15-20 Macs this has worked swimmingly. But our lab has grown slowly and steadily, and completely without my realizing it.

My latest count shows our lab at more like 50 Macs now. We've added a bunch of stuff: laptops, servers, more A/Vmachines of various configurations, a render farm, and of course more workstations. Using our old system of firewire cloning is becoming increasingly clumsy, slow and error-prone. We need a better way of doing things.

Okay, now. Enter: NetBoot!

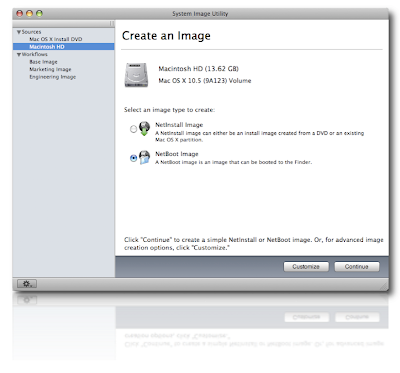
Leopard's NetBoot Interface<
(click image for larger view)

NetBoot is Mac OS X Server technology that allows for centralized storage of and access to system images for installation over the network. The way it works is this: You build a system, trick it out, make it perfect — this is your Master System. Put it on a firewire drive or something transportable, because you can't be booted from your Master System for the next series of steps — imaging. Run the application called System Image Utility, that comes with Mac OS X Server's server tools, and create a NetInstall image from your Master System. Load that image onto your server and enable it in the NetBoot settings in Server Admin. And what happens next is something akin to magic (unless you use Linux, and then it's pretty par for the course, I guess.)


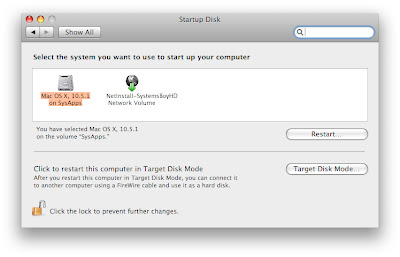
The Network Boot Volume: So That's What It's For!>
(click image for larger view)

With your NetInstall image enabled on your server, go to any client system and open the Startup Disk Preferences. Where you'd normally see the "Network Startup" icon (I'll bet you always wondered what that was for), you'll now get something a bit more descriptive. You should now be given the opportunity to boot from your master image. Choosing to do so will incur further magical results. Your system will now boot... Over the network! What's even cooler is that you'll be booted into the same basic installer environment you'd see if you were booted off a Mac OS X install disc, and you'll be walked through the steps required to install your Master System onto your computer. Um... OVER THE NETWORK!

There are some immediate advantages to a system such as this. First off, you can have a bunch of different Master System images for various build configurations in your lab. For instance, we can have a separate build for laptops and desktop machines. Cool! Also, this can all be automated (thanks to Automator integration) to make the process run almost entirely unattended. Sweet! And since the whole thing sits on the server and is available at all times, if a machines needs a rebuild, you just set it and forget it. Awesome!

But NetBoot has its drawbacks as well. Images — particularly large images — take for-freaking-ever to build. To give you an idea of how long, my near-36GB boot drive took an hour or so to clone to firewire, then 3-4 hours to be imaged by System Image Utility. So each build will take several hours to create. And God help you if you make a mistake on one of your images: the NetInstall images are read-only and can't (to my knowledge) be modified once they're built. NetInstall technology can't be used for non-package installers or updates either (again, to my knowledge), so you'll have to run all your Adobe and Microsoft updates by hand as usual. Also, one minor caveat that threw me at the outset: Mac OS X 10.5 server can only serve Mac OS X 10.5 builds. So you'll either be needing to update everything to Leopard or wait until your server and client OSes match.

I think I'm right on the crux of really needing this. I could probably live without it. Keep doing what I'm doing. But I do think I'm at a point where the benefits of using NetBoot outweigh its limitations. And I have enough resources now (like the required massive drive space and robust stable servers) that it's not impractical on the physical level. So, this summer I plan to use NetBoot to build my lab.

I mean, imagine this: you get your new systems over the summer, you unbox them, plug them into your network, set them to NetBoot (everybody say "command-n"! Good!) and go home for the night. You come in the next day and everything's basically done. You've just built your lab. Overnight. In your sleep. I don't know. Sounds pretty cool to me.

I'll let you know how it goes.

Oh, and by the way, in case you can't tell, I'm just now learning all this. It's still very new to me and there is a lot about it I don't know. So if anyone has any experiences or insights into using NetBoot (or if I get any of the facts wrong), I would absolutely love to hear about it. Please feel free to share your experiences in the comments.