Portable Home Directories Part 1: What a Mess!

Now that I've tried it myself, I've very much enjoyed the advantages that having a network home account has offered. I've also rather disliked some of the disadvantages. Ultimately, the biggest drawback has been that when our production crew is doing a lot of rendering, my home account slows to a crawl and I can't get work done. Okay, I can, but not without a lot of swearing, and the fellas in the other cubicles just ain't digging that, believe me.

After some water-cooler-side conversation, and some excellent comments by my excellent readers, I've decided I might be just be a perfect candidate for something that may offer the best of both worlds.

Portable Home Accounts

Portable Home Directories (PHDs), as they're called by Apple, essentially allow a user to keep and work from a local copy of his network home account. The local account is synced up with the network account using various strategies, which I'll talk about in a bit. It's essentially an intelligent implementation of Windows' crappy Roaming Profiles. The big difference is those strategies I mentioned.

Windows' Roaming Profiles are problematic, particularly in production environments where users store a lot of data, because Windows simply hard syncs those profiles at login and logout. This means that if you've generated a lot of data in any given session, you're in for a long wait when you log out — and another long wait if you log into another machine — while Windows syncs your local and network profiles. It's a nice idea — giving you the centrality of a network account and the responsiveness of a local one — but it fails in practice because it is, essentially, dumb, causing the sync process to ruin the experience.

The experience we're going for here is, of course, seamlessness. Or as close to it as possible. So: I want to be able to log in to my workstation and have the responsiveness and normalcy of a local account, but I then want to be able to log in to another workstation and have my documents follow me throughout a given facility. Moreover, I want the synchronization of said documents to be as invisible as possible to the user. It should "just work." With as little waiting and confusion as possible.

This is, of course, easier said than done.

Apple takes a noble stab at this with its Portable Home Directory settings. See, where Microsoft simply syncs account data at login and logout, Apple affords some granularity in what gets synced and at what times. Apple gives you precise control over what gets synced, as well as allowing for not just login and logout syncing, but periodic syncing as well. Smart! And it could make all the difference.

But I'm getting ahead of myself again. Let's actually step through the process of creating a Portable Home Account. I'll show where it shines and where it falls apart for me.

Activate Mobility Preferences

  • This all starts in Workgroup Manager. So fire that up and navigate to the user you want on Portable Homes.
  • Make sure that user's current home account is a Network Home Account (i.e., it lives on a server somewhere).
  • Click the "Preferences" button from the toolbar, and then open the "Mobility" pane. This is where all the action happens.

    Mobility Preferences

Set Account Creation Options

  • The first thing to set up is how and when the local portable account is created. Click on the Account Creation tab and set Manage: to Always.
  • Since I already have a network home account that I've been using from an NFS share (on a non-Apple server), I set my user to "Create mobile account when user logs in" using the "default sync settings." I assumed this would copy everything over from the network account to the local drive and start the ball rolling fresh, but that's not what happened. More on that in a bit.

    Account Creation

  • Under Account Creation's Options tab I set a custom path that pointed to a folder that contained a local version of my home account that I'd rsynced previously. Again, I did this thinking it would speed the initial sync process, but that turned out to not be the case.

    Account Creation Options

Set Sync Rules

  • Finally it's time to define how the syncing between local and network homes will behave. This is the real genius behind the Portable Home Directory system, and what distinguishes it from Roaming Profiles.
  • First under the Rules tab you have "Login & Logout Sync." This allows you to set specific items to sync only at login and logout. The suggested defaults for this are mainly your account settings, i.e. your entire ~/Library folder. This is quite sane, and I stuck with this setting.

    Login & Logout Rules

  • Note the "Merge with user's settings" checkbox. I initially checked this, but later found it problematic. It was useful on my first sync, but it doesn't appear to track deletions and such, so I ended up disabling it.
  • Also of note is the "Skip items" section. This allows for what rsync users would call exclusions. This also greatly speeds syncing as you can exclude unneeded items such as cache and trash. I stuck with the sane defaults here as well.
  • Next up are your Background Sync settings. Again, very sane defaults are provided: We back up your entire home account, periodically, in the background. Skip the usual suspects and don't merge.

    Background Sync Rules

  • Finally, under Options, we can set the frequency with which the server will run the background sync.

    Background Frequency

  • I also set the option to "Show status in menu bar." This, as you'll see, becomes quite useful for the way I ultimately ended up using this feature.

Some Disclaimers

Portable Home Directories are actually not specifically intended for the sort of use-case we're applying them to here. PHDs are actually designed for users with laptops that come and go onto a network that is also populated with stationary workstations. It's really made to be used in conjunction with network home accounts, allowing laptop users to use network home accounts without being completely tethered to the network.

So to be clear, this is an experiment. I'm doing things a bit outside the norm. (I mean, what fun would it be if I weren't.) And any problems I had were likely because of this fact. Still, it's hinted at in the documentation that PHDs can be used for users of non-portable machines to some advantage, so I wanted to see how we could apply them to our (okay, my) particular situation.

I started off a bit outside the realm of the typical first time setup. I had two things at the outset that essentially represented a test of how we might migrate to a PHD-style system: I had a network home account already populated with data, and I had a copy of that data on a local hard drive. This represents our typical user. But I was also hoping that I'd be able to use these to get the Portable Homes process underway more speedily. This was not the case at all.

Initial Experiences

The first thing that happened when I logged into my newly Portable Homes-activated account was that I was greeted with a prompt asking me if I wanted to create a portable home.

Initial Prompt

I chose to do so ("Yes"), since that was pretty much what I was here to do. And upon login I was greeted, not with my previously set up network home account nor my rsynced local account, but rather with the standard boilerplate skel account you see when creating a new user. Worse, the server seemed to get confused as to where my home account should be placed on the local drive. Though I had defined it on my server as a custom path, it seemed to want to go in a folder called "User" on the specified drive, no matter what I entered for the custom path. Apparently, for me anyway, the custom path — and my hopes of speeding the sync process — just plain old didn't work.

Default Login Environment

After this I decided to try again. I moved my custom folder off the local drive and, in Mobility Preferences, simply defined the drive I wanted to use for my Portable Home. I also chose to "Merge with user's settings" for this go 'round under the Rules section of the Mobility prefs. The thought was that this should pull down my network home account and create a local version from it. And this is exactly what happened. And for a time life was good and I thought I was done. I thought I'd found my magic settings. But the next day I logged in to find that once again my account had reverted back to the default, first-login settings. Yikes!

Portable Homes Weirdness

(Here I'd just like to point out the benefits of having a backup of your entire home account if you're going to play around with this. Or just use a spare, dummy account. I actually did lose data numerous times during my testing, as you'll see in Part 2.)

After poking around a bit I discovered that my machine had logged me into my network home. Or at least that's where the Finder went when I hit Command-Shift-H. But my home account settings were the defaults, not my network home account settings. WTF? Logging out and logging back in I found myself in what I considered to be the right local location, and all my custom settings had returned. But this was clearly getting weird and flaky. And no matter how I configured things, the weirdness persisted. The biggest problem, though, was the fact that my local and network home accounts never synced in the background. And that was sort of the most important part.

Manual Sync

For a time I used Portable Home Directories the only way I could get it to work for me. Remember that tickbox to "Show status in menu bar?" Well, it turns out that you can use this menubar widget to manually sync your local and network home accounts. And manual syncing actually worked okay for me. In fact, it was the only way I could get my network and local data in sync.

Menubar Icon

During this time I pretty much using the default Mobility settings, but my account was on my Work drive. Portable Homes had placed it at:

/Volumes/Work/systemsboy.xahomes

for some strange reason, but I could live with that. Every so often — particularly if I thought I might be going to another machine and logging in as myself — I'd hit "Sync Home Now" in the Menubar pulldown.

Sync Now

This would begin the Home Sync process. The process is far from immediate, but it's not too slow. It takes a few minutes. Once it's done I can verify that my network and local homes are synced up.

Home Sync Status

Conflicts that the service couldn't resolve were handled similarly to iPhone-to-AddressBook conflicts, though, with the usual PHD flakiness: often conflicts occurred where they shouldn't have.

PHD Conflict Resolution

But the biggest problem with Manual Sync was that logging in to another computer failed. A popup alert appeared telling me I was unable to log in at this time because "an error occurred." Great.

I was really hoping for this to be seamless, of course. But it just may not be possible with this particular setup. The best I can get out of Portable Homes so far is not much better than a glorified rsync script with a pretty GUI for running it and some semblance of conflict resolution. And it completely breaks my ability to log into other computers.

Conclusion (For Now)

In the end I decided that my troubles were likely due to the fact that I was not working in the typical Mac OS X idiom. It's my guess that Portable Homes failed for me in this instance mainly because my network home account is on a completely different, non-Apple server, one that my Mac Server is not set up to share as a network home location. I would venture that if you set Portable Homes up just like it says in the manual, using Apple kit and AFP and the like (possibly AFP reshares would work), Portable Homes works like a charm. But if you don't you'll get some strangeness like I did. Ah, the joys of the bleeding edge!

On my first shot at Portable Homes I experienced a number of surprises and inconsistencies. While Portable Homes is a great idea, and in theory looks to be perfect for someone like me, there are major pitfalls in a complex, multi-platform environment that prevent it from being usable for much of anything. But Portable Homes has potential and I plan to delve more into how to get it working for us in our complex environment. In our next installment I'll be trying a setup more closely aligned with the Apple-sanctioned method for implementing PHDs. We'll see how it goes.

More Data Recovery

It's been a bad couple of weeks for data loss in the Systems Boy household. Fortunately, it's been a fairly good week for data recovery, so we've mostly broken even, minus the time lost recovering data, of course.

Most recently, something seems to have taken a large (by which I mean everything) bite out of a very important CSS file. See, we tend to use Coda to build sites at our house, and we tend to work over the network as the most expedient means to that end. Now, working on a website over the network is not without its perils, as I'm sure you're aware. Particularly if you're working wirelessly, and particularly if you're working on a server of unknown reliability. So, a very awesome someone I know (okay, yes! I have a girlfriend!) was doing exactly that when all of a sudden her CSS file appeared to be completely empty. Mind you, she was not working on the file. She merely had it open while she worked on another document in another tab. But after switching to the CSS tab, the CSS file — which she'd been working on obsessively for about a week — appeared to be empty.

Now I've had the same thing happen to me after a network dropout — or, more likely, a server disconnect — and the solution in my case was to simply shut down and restart Coda. Mine was largely a cosmetic issue brought on, I assume, by Coda's inability to reconnect to the documents after a disconnect. So I told her to simply restart Coda, confident that the problem would correct itself. But it didn't. Even after restarting Coda, still no CSS joy. The file was there, but it was completely empty!

This is the point at which panic generally sets in. (And no, that is not a reference to the makers of Coda.)

Panic

If there's anything I've learned in my near-ten years of professional systems work, it's that data is rarely ever completely wiped out in a single stroke. And if there's anything else I've learned, it's not to panic. So I coolly, calmly set about the task of recovering the file while my exhausted and infuriated sweetheart went to bed.

The first thing I did was to check the server to see if any backups had been made. I know that her provider, and some of the software she uses, make automatic backups from time to time. So I downloaded anything and everything I could find from the server that might prove useful, including a backup of the entire site for safekeeping. I soon discovered that there was nothing even remotely recent enough to contain the missing CSS file. So I started looking in the local home account, first by grepping for anything with "css" in the name. Some Coda cache files came up, some of which were fairly recent, but none failed to yield the data I was searching for. I searched /tmp as well, to no avail.

Finally, after a couple of hours of downloading and grepping and searching and hoping, I was about ready to give up. As a last ditch effort I decided to use the find command on the entire local hard drive:

find / -name *.css*

This command will search the entire file system for any file whose name contains the string ".css." And it turned out to be the winner. The command yielded a ton of useless results, many of which came from application documentation. But in the end a Coda cache file turned up in:

/private/var/tmp/501

Of all places!

Moreover, this file had a time stamp very near the time of the disappearing data. So I made a copy of it (okay, I made, like, four copies of it) and uploaded it to the server. The next day my sweetie confirmed: I'd found the file! The day was saved!

So remember, people: Stay calm, and always try find before giving up the ghost. And for poops sake, make a backup!

Whew! That was close!

Twitter: No, I Fully Admit, I Don't Get It

The buzz around Twitter is, frankly, reaching a pitched and utterly annoying frenzy. Some of the latest stuff I've read, though, has inspired me to add my voice to the throngs. Yes, that would be you people.

Now let me start by saying I don't use Twitter. I don't even have an account. And this leads me to my first beef about Twitter: the barrier to entry. "Come on!" you say, "All you need is an email address and a password." Yes, This is true. But in a world where a user such as myself already has about 80 trillion user accounts, and about 20 trillion of those are in now-defunct, out-of-style, unused social networks, one starts to think a bit more carefully about signing up for anything at all anymore. I mean, Jesus, I still get email from Friendster. Fucking Friendster! And don't even get me started on the whole online dating thing. Suffice to say, I've been doing this for a while now, and I've gotten gun-shy.

Twitter

But the other, bigger, more hidden barrier to entry — the one no one talks about much when they talk about Twitter — is the fact that to Twitter "properly" takes a certain kind of work. It's not like starting a blog; you can't just start Tweeting in a vacuum and hope to get anywhere. No, Twitter requires effort and strategy. Effort in the following of other Twitter users and, eventually, strategy in being followed by other Twitterers. It's not that I mind work — I certainly do my fair share of it — but the goal of Twitter work seems to be following and/or being followed. And I've never been much of a pack animal.

A friend of mine, who has also been reading about, but so far refrained from joining, Twitter, recently remarked (in a Facebook status update, no less):

"I've been reading about this for the past couple days and it seems to me what Twitter does is take educated and mobile people who would form a kind of elite regardless of the technology of the day, and offers them another way to seperate [sic] themselves from the masses while at the same time allowing them to assert that they are in fact very well-connected."

This describes a feeling I've had for some time about Twitter, but have been unable to put into words. Twitter has an air of exclusivity that I find off-putting. Defensive article titles like, "Twitter Quitters Just Don't Get It" don't do much to ameliorate that feeling. And so, something that at it's heart is perfectly benign, and potentially even useful or entertaining — an extremely micro micro-blogging platform with a small per-post character limit — has become something that fosters a certain sense of resentment from those of us who choose not to partake of its offerings. If there's been a Twitter backlash, it's probably largely due to the defensive posture of its users. And I believe it's partly this posture that my friend is talking about.

Facebook

It seems to me that the other part of my friend's argument — and the other part of my hesitance at signing up — is context. Like I said, I'm kinda burnt out on the whole social networking thing. But I recently joined Facebook just the same, and I've stuck around. And the reason I can stomach Facebook is context. When you sign up for Facebook you immediately have a context, and that context is your friends. What better context could there be? Everyone wants to stay connected with friends, and Facebook handles this better than any social network I've used so far. I think Twitter's lack of context, while certainly being part of its charm, is another barrier to entry for many. For the technologically savvy (which I consider myself to be), and for those inclined to experiment with social networks in general (which I no longer consider myself to be so much), the lack of context is far less vexing. And those seem to be just the sorts of people using Twitter — the elite my friend is referring to. They seem to have figured out a way to make Twitter genuinely useful. For them. But by outward appearances, Twitter's context seems to be less about staying connected and more about appearing clever amongst a group of peers.

Tweetie: A Twitter Client

To those elite Twitter lovers though, I say bully for you. You get on that Twitter client-of-the-day (I must admit, some of the client apps look beautiful enough to make me want to join purely from an interest in interface design) and you tweet your little hearts out. I bear no grudge against this. I just personally have no desire to be any more connected than I already am. I don't see how Twitter will be useful or enjoyable for me. I don't get Twitter, and I'm pretty sure I just don't really want to.

And bully for me too. 'Cause guess what? I don't get Flickr either. Or MySpace. Or feed readers. In fact, there's a whole lot of stuff I don't get.

And all the snide little articles in the world aren't going to change my mind.

Mom-Friendly PhotoBooth Post

Hello, and happy Mother's Day!

My mom recently switched over to the Mac platform, and she wanted to take a photo for me. I told her she could use the built-in iSight camera and PhotoBooth on her MacBook Pro to take the shot, but she couldn't figure out how to do it.

No problem, Mom. Let me see if I can help you out.

My guess is that you're still a little unfamiliar with where to find applications on the Mac. This is pretty typical of switchers. All your applications are in a folder aptly named "Applications" at the top level of your hard drive. That's the silvery-gray thing on your Desktop. It's probably called "Macintosh HD."

Your Hard Drive: Double-Click to Open

Open it up by double-clicking it.

A window should open with a folder inside it called "Applications." Open that as well with a double-click.

Hard Drive Items

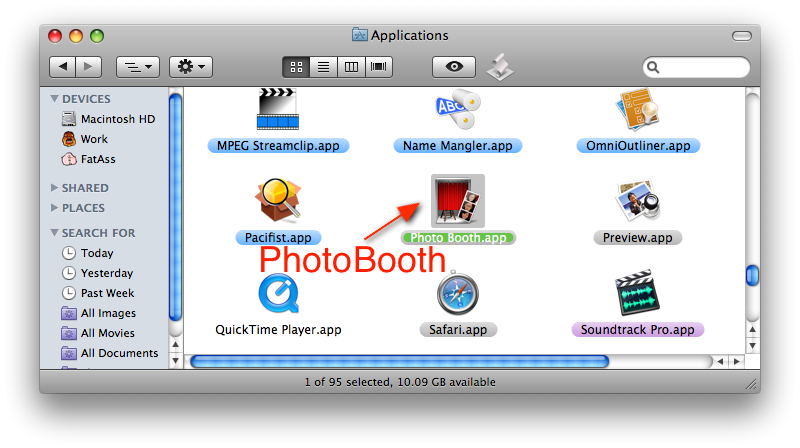
Now you should see a fairly lengthy list of items. These are all your applications. Some items in this list are the actual, executable applications themselves. Some are folders that contain the applications. Sometimes it's hard to tell the difference. Fortunatly, PhotoBooth is easy: Scroll down until you see the item named "PhotoBooth," and — yup, you got it — double-click it to open it.

Applications

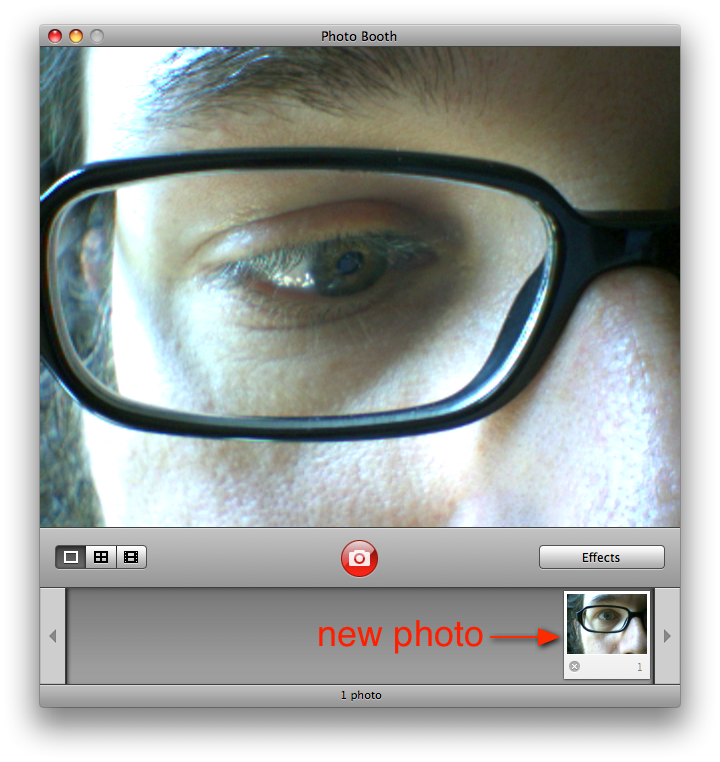
You should now be staring at an interface, at the center of which should appear your very own face. This is because the camera is now active and PhotoBooth is showing you what it sees. Since the camera is located at the top center edge of the computer display screen, it sees you.

PhotBooth: Photo Mode

To take a picture, simply press the red button. A short countdown will occur, a flash and then, voila! A picture will appear at the bottom of the  PhotoBooth interface. To look at the picture, simply click it once and it will appear in the main frame of the application window.

PhotBooth: View Mode

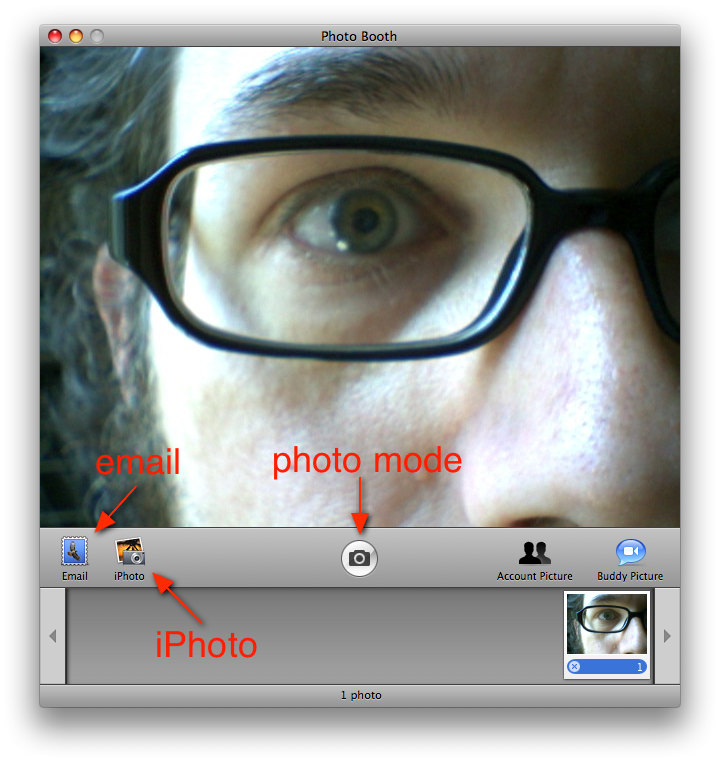
From this viewing mode you can email the picture by pressing the "Email" button on the left hand side of the tool bar towards the bottom of the application window.

PhotoBooth: View Mode

To switch back to photo mode, press the round camera button in the center of the tool bar and continue taking photos to your heart's content. Photos can also be dragged directly from the strip of shots at the bottom of the window to anywhere you'd want to put them: the Desktop, an email, wherever. You can also arrange them in iPhoto if you want, by pressing the iPhoto button. But I'll leave it for you to explore beyond that.

Hopefully this will help you out, Mom. If not we can go over it next time we see each other.

Enjoy your Mac!

Finder Burn Folders, Data Loss and Recovery

Burn Folders are special folders you can create in the Mac OS X Finder for burning data to optical media — CDs and DVDs. But the way they're implemented can be confusing, and that confusion can lead to data loss. Fortunately, there are ways to recover.

Burn Folder

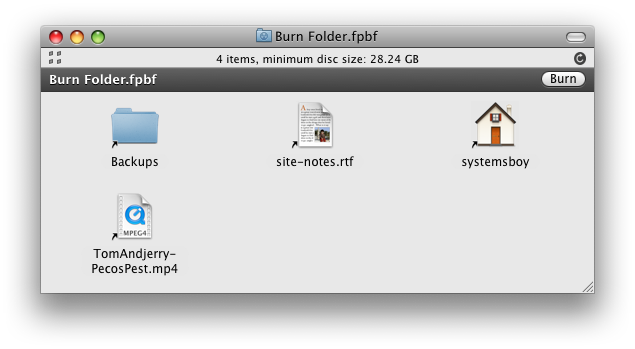
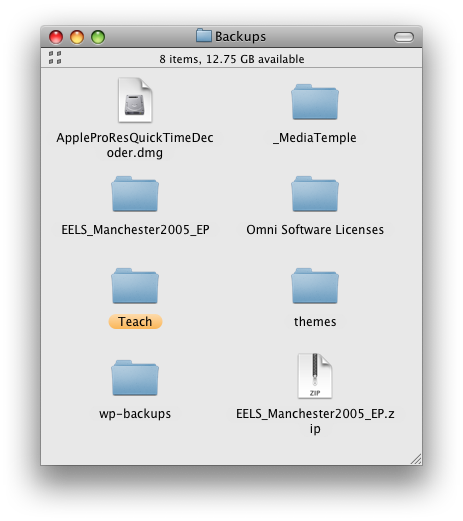
Creating a Burn Folder is easy; simply choose "New Burn Folder" from the Finder's File menu. This will create "Burn Folder.fpbf" on the Desktop, from which you can burn data to an optical disc. Dragging items to this folder will create aliases to those items rather than actually copying the data. This saves time and prevents the unnecessary duplication of data. Unfortunately, unless you know that Burn Folders are populated with aliases, and you know exactly how those aliases work, it can also lead to some confusion, and this confusion can get you in to trouble.

Inside a Burn Folder: Aliases

To wit: Let's say I create my Burn Folder. I start dragging files to it. Some folders too. Finally I finish and go to burn my disc, but I'm told that I have too much data in my Burn Folder, and that I need to remove some in order to make it fit on my media. Great. So I open up my Burn Folder. Inside are some smallish files, and a folder called "Backups" that holds the bulk of my intended burn data. So I open up Backups and start trashing files. Eventually the Burn Folder becomes small enough to fit on my optical disc. I burn the disc and then empty the Trash.

Subtle Signs: The Missing Gray Banner and Alias Arrows

Later I return to my Backups folder to find that when I emptied the Trash it deleted the actual data from Backups. Wait, what? How did that happen?

Well, if you recall, everything in my Burn Folder is an alias. Actually, that's not quite accurate. Everything at the top level of my Burn Folder is an alias. This means that when I opened the alias to the Backups folder it opened the actual Backups folder. And so, once in this folder, when I began deleting files I was deleting the actual data.

Dude. That is so not cool.

See, the way I see it there are a few problems with how all this works. First and foremost, the Finder is for people who aren't particularly concerned with how the Finder works, and Burn Folders should be geared towards the same folks. These folks may or may not know exactly how an alias works either, or even why it exists. But this lack of knowledge should never, ever lead to data loss under ordinary use-cases, particularly those in which the user is actually trying to make a fucking backup. Ever. Period.

Second, this method violates two preexisting paradigms, one of which belongs to Apple themselves, and the other of which has been around since the beginning of burning optical media. This first method to which I refer is Apple's Panther Finder. In Panther (and yes, this is just one more reason to loathe Tiger) the Finder would copy the data to the Burn Folder. Yes, this would take more time and create redundant data. But it also protected that data from deletion and was a much closer analog of what was actually going on: I put data in a Burn Folder, and now that data — not pointers to the data — is there in that Burn Folder. What we have now is confusing — some items in the folder are aliases, and some aren't — and, once again, can lead to data loss. And, as we all know by now, that's, uh, what's the word? Right. Bad.

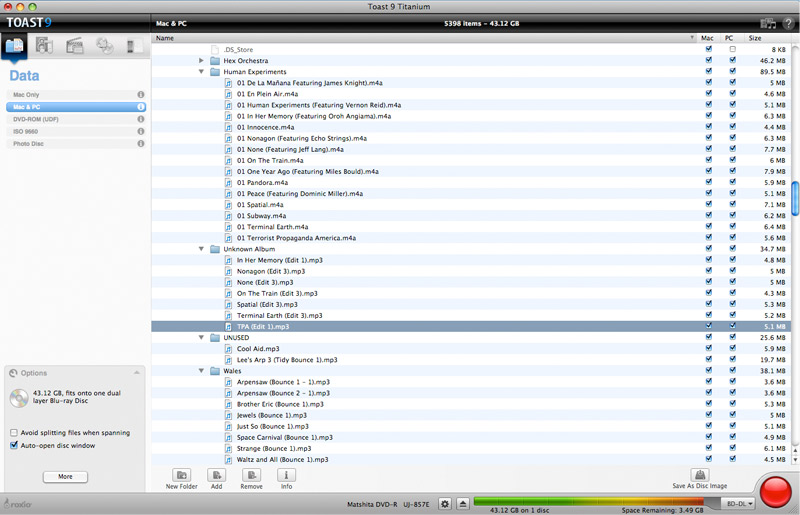
The other method I refer to comes from a little application called Toast. For forever and a day, Toast has simply pointed to the referenced data on disc, but has lacked any ability to actually affect that data. And why would it? Toast is not a file manager, it's a disc burning utility, and you can't delete data from your disc burning utility. One of the problems with the current method is that it puts data burning and file management in the same application when they probably should be separated. This is why burning data from the Finder has always seemed aberrant to me. It's just the wrong application for the job.

Toast: It Won't Delete Your Data

The knowledge of these preexisting methods can further confuse even the tech-savviest. In fact, when the aforementioned scenario actually happened to someone I know, it took a great deal of time for me just to suss out what had occurred. It just shouldn't be possible.

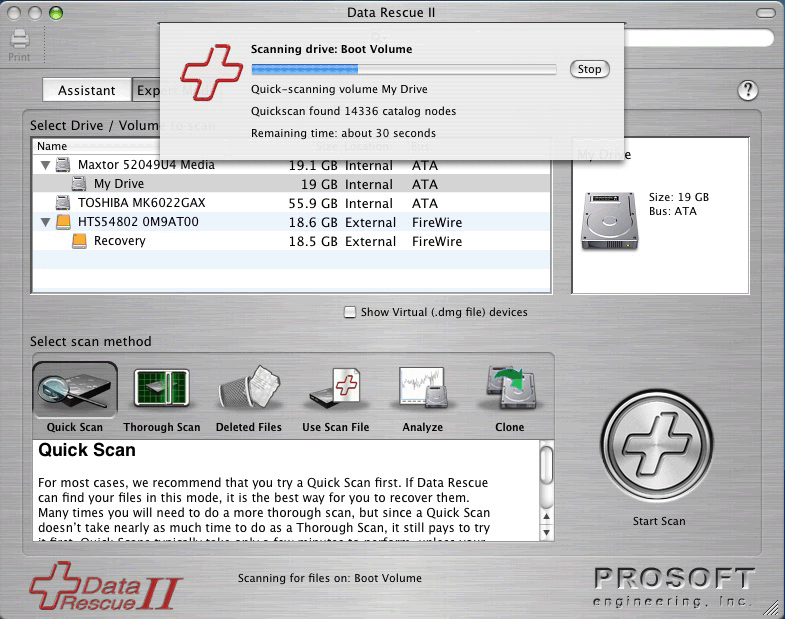
The upside to all of this is that in the wake of this calamity I've had the tremendous (mis)fortune of testing the latest crop of data recovery programs. Some time ago a client of mine had deleted some data, and back then there was only one contender for retrieving deleted files. The field seems to have matured, however, and now there are several. Disk Doctors Mac Data Recovery gets some good press, though I only kicked its tires myself. VirtualLab's Data Recovery also seemed to fare well in some cursory tests. There are even a handful of others out there of unknown quality and distinction. But for our calamity we turned to the oldest app I can recall in the field, the one I'd looked at for my client lo those many years ago: Data Rescue II, by ProSoft Engineering.

Data Rescue II: My Hero!

Should you ever have to undertake such a project, there are a few things you should know. First and foremost: the less you use the disk from which you want to recover data, the better your chances at recovery. See, erasing a file doesn't actually delete anything, it only marks the file as free for writing to. Writing to the drive increases the probability that deleted data will be overwritten. Once that happens you won't be able to recover the data. So your first step should always be to take the drive out of service, i.e. turn that shit off. And don't turn it back on until you're ready to recover the lost data.

In our case, the disk we were recovering from was a 1TB firewire hard drive. It being an external drive made our chances at recovery better, but its size meant we'd have to wait a while to even see if the data would be recoverable. Fortunately, Data Rescue II allows you to scan your drive in demo mode without purchasing the software. If it finds your files, you can then pay for the software (it costs $99 bucks) and recover the data.

Our scan took about 16 hours. We let it run overnight, and by early the next afternoon Data Rescue had found deleted files. In this process the file names get munged, so there was no way to tell for sure if these were in fact our deleted files, but the number and size seemed about right. We coughed up the dough, recovered the files (to a separate hard drive), and were happy to discover a near 100% recovery. There were a few files that were only partially recovered. These tended to be the oldest of the bunch which, yes, we have backups of. So we're saved! Oh happy day!

I can't help thinking that Apple's Burn Folder approach is fatally flawed. It's just not Mom-friendly. Perhaps it would work better if they made every file in the Burn Folder an alias. But it seems dubious at best to put burn functionality in the Finder without certain safeguards, and these safeguards are already present when the burning mechanism is separate from the file manager. The good news is that if you do happen to lose data by way of emptying the trash there are a number of options these days for recovering that data. And if you're quick and careful about it, your chances of success are pretty good.

Addendum:

For reference, or should the above-mentioned products fail to satisfy, here are some others I heard about but did not try:

Subrosa Software's File Salvage

Stellar Data Recovery's Macintosh Data Recovery

Boomerang Data Recovery Software (which looks suspiciously like the VirtualLab product)