UPDATE: It looks like there's actually a better way to extend an Airport network than the one I've outlined in this article. A few people have written in to tell me that they've had great success using the configuration "wizard" available in the Airport Express Utility. I haven't tried using this myself, but it does look exceedingly easy. So, definitely the thing to try first before you go into the twelve page set of instructions below.
Thanks to all who sent this in. I'll leave the detailed instructions below for anyone who's interested.
Man, I wish I'd known about this sooner.
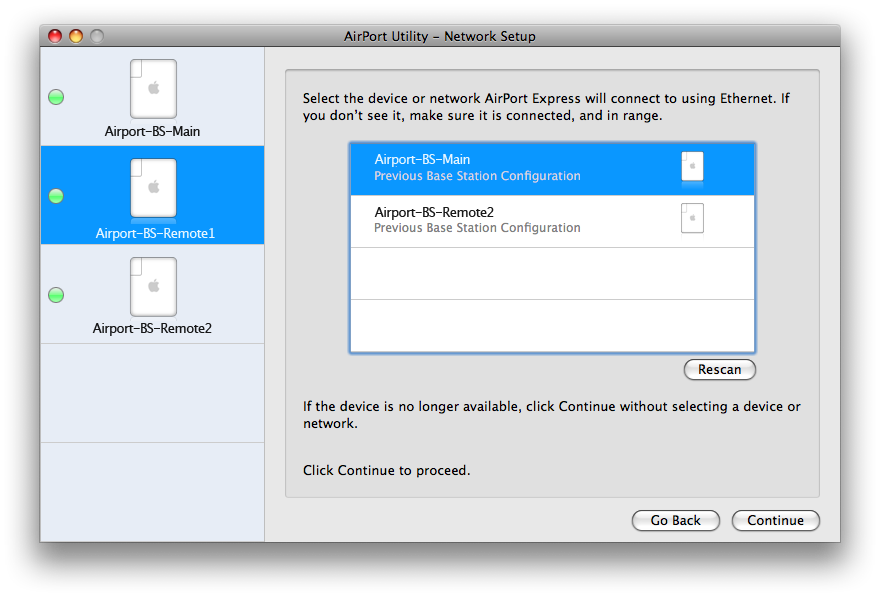
A while back I got a second Airport Express in the hopes of using it to extend my existing wireless network. Doing so was fairly tricky and not anything like I'd expected.
I had initially believed — perhaps naively — that the process would essentially be a matter of joining the new Airport to the existing network the same way you'd add a new computer. This is decidedly not the case. It turns out that, in order to extend an wireless network across multiple Airports, you must set up what is known as a WDS network. Let's take a look at the process, which for me anyway, was fraught with difficulties that this article will hopefully help me (and you) avoid in the future.
Set Up the "Main"
The "Main" WDS Airport is the unit that will host the wireless network. It's the one that's connected to your cable modem, or your router, with an Ethernet cable. You'll connect the "Remote" Airports to the Main wirelessly, allowing them to extend the network. It's important to remember, as you continue with this process, that each new wireless node must be added to the main node in order for it to be seen by the WDS network. Ready? Here we go!
Wired Connection
- The easiest (and Apple-recommended) way to do all this is with a direct, wired connection, so grab yourself an Ethernet cable and connect your computer to the Airport that you want to be the Main unit. This is not absolutely necessary, but it will help to mitigate any problems you might have as you go making changes, since you won't be dependent on a wireless connection. You can skip this if it's easier.
Base Station Settings
- Once connected, open Airport Utility. You should see the Main at the very least.
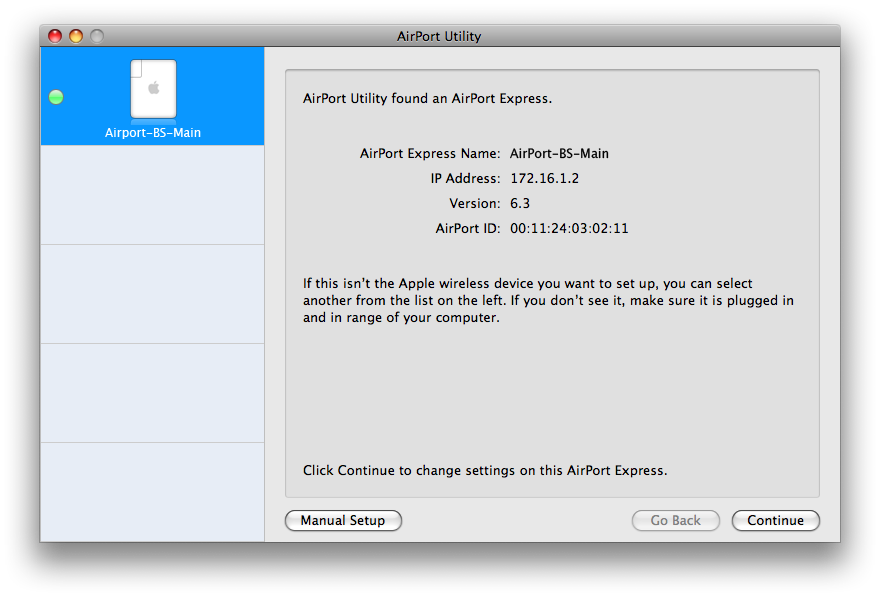
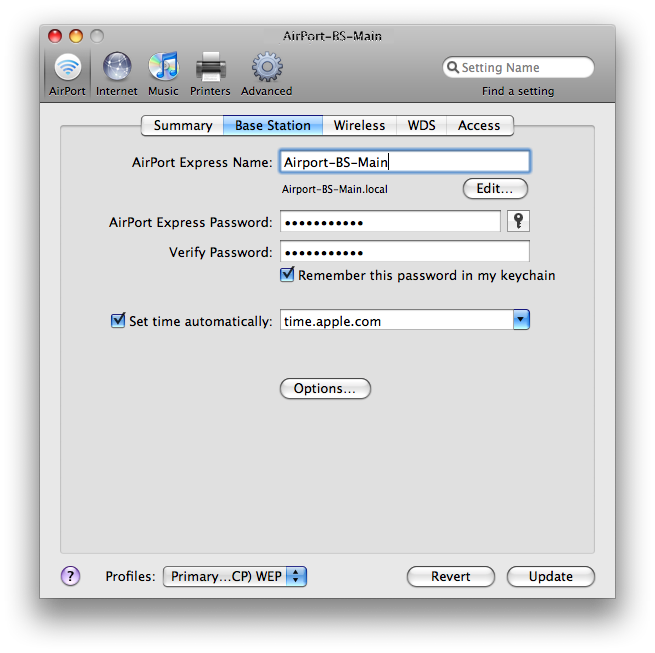
- Double-click the unit to open its configuration window. Begin in the Base Station tab by setting the name and password of the unit.
- The name will be the name of the base station itself, and the password is the one used to log in to and change the unit's settings. I recommend naming it something like "Airport-BS-Main" for easy identification. As always, make the password memorable and secure.
Wireless Settings
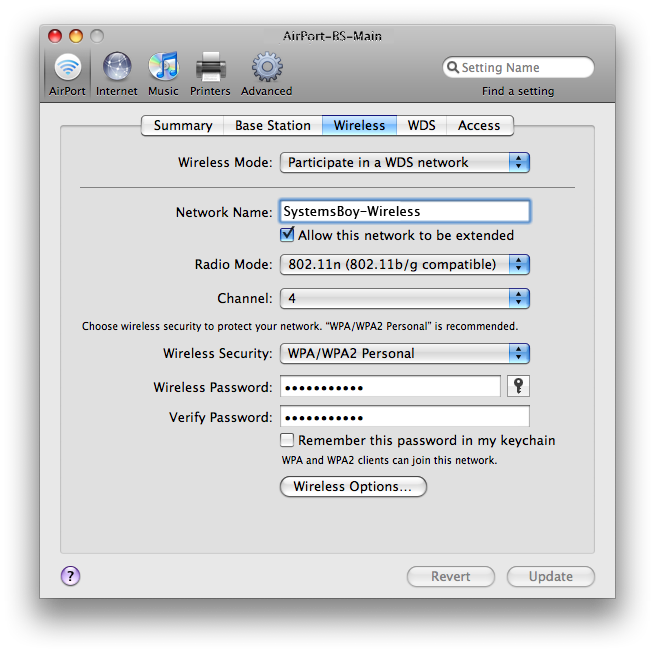
- Under the Wireless tab, set the Wireless Mode to "Participate in a WDS Network." This is the key, really, to the whole shebang.
- It's also important to check the "Allow this network to be extended" checkbox.
- Here you'll also want to give the network a name. This is the name you'll use when joining the wireless network from your computer, so choose wisely and for the ages. I like clear nomenclature, so I went with "SystemsBoy-Wireless." Clever, huh?
- Set your encryption method. The Airport recommends WPA/WPA2 Personal, which I like too. Secure and compatible.
- Choose a channel, or use the default. It's all good unless you're in a super-crowded area, in which case trial and error is your friend.
- Finally, be sure to set your wireless network's password. This is the one used for joining the network from your computer. Two names, two passwords. I know it's confusing. But you're smart. You'll figure it out.
WDS Settings
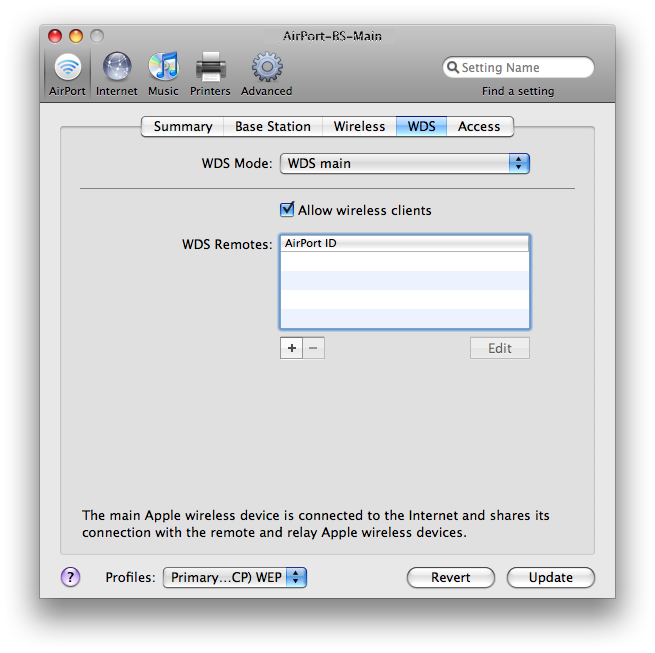
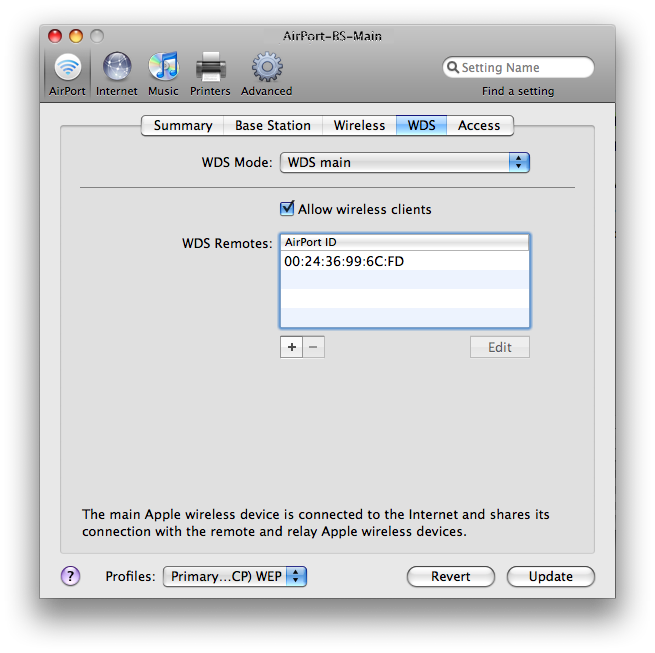
- Under the WDS Settings tab the Main WDS Airport's WDS Mode should be set to "WDS main."
- "Allow wireless clients" should be checked.
- You'll add your WDS Remotes later, once we've plugged in the other Airport in the next section.
Update and Test
- Once all this is set up, hit the "Update" button.
- The Airport will go and make the settings you just configured, which will require it to reboot.
- After the reboot, remove the Ethernet cable connect between the Airport and your computer, and (re)connect the Airport to the network/router.
- If all went well, you should see the classic green light on flashing on the Airport unit. You should also be able to connect to the Airport network wirelessly. If you don't or can't, reboot the unit again for good measure. Make sure you give it enough time before trying to connect to it. Five minutes should be more than enough.
- If, after all this, you still don't see the green light, you'll need to troubleshoot your connection in Airport Utility, which is beyond the scope of this article. But it's important to get the Main unit working as a wireless base station before proceeding. Everything depends on it. So get it working using the above settings.
Troubleshooting Tips
- Occasionally, after a reboot, the Airport will not be visible in Airport Utility. Simply restarting Airport Utility will sometimes fix this, so be sure to try it if you can't get connected.
- For whatever reason, this process took a few tries for me. So remember, a direct, wired Ethernet connection will aid in troubleshooting. This is recommended by Apple, and I concur.
- Don't forget, if need be, you can completely reset the Airport back to factory defaults and start from scratch using the super-secret reset button on the top of the device.
Set Up the "Remote(s)"
The Airport(s) you use to extend your wireless network are referred to, in WDS parlance, as "Remotes." With WDS Remotes you'll be able to join your wireless network — the same one you set up on the Main, with the same network name and password — from well beyond the reach of the Main. Remotes should, obviously, be placed within signal reach of the main, but far enough away to actually extend the reach of the network.
Wired Connection
- As before, this will all be a lot easier if you connect to the WDS Remote Base Station using an Ethernet cable. Be sure you're Remote has power, then connect with Airport Utility.
Base Station Settings
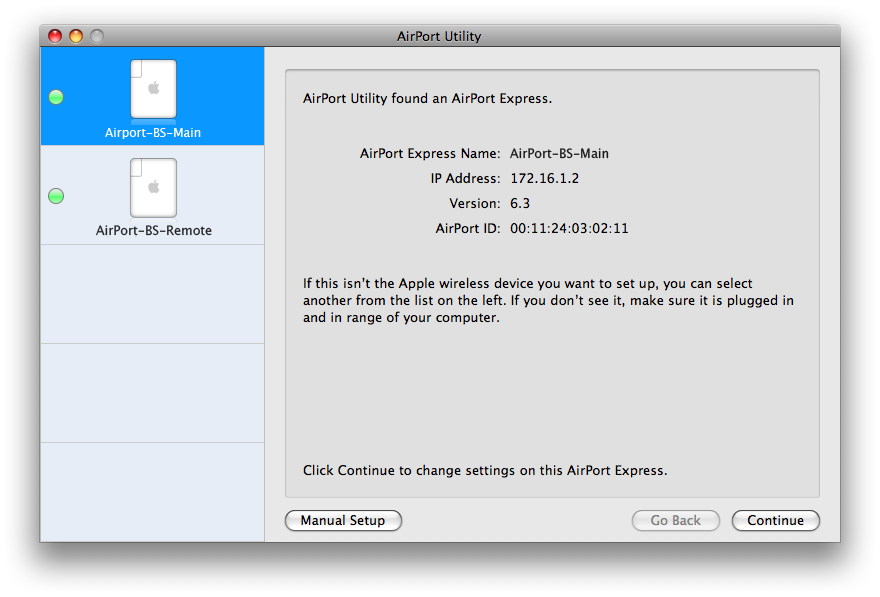
- With Airport Utility opened, you should still see Main, as well as the newly added, unconfigured Remote.
- Double-click the Remote unit to open its configuration window. Begin in the Base Station tab by setting the name and password of the unit.
- As before, the name will be the name of the base station itself, and the password is the one used to log in to and change the unit's settings. I called this one "Airport-BS-Remote" for easy identification.
Wireless Settings
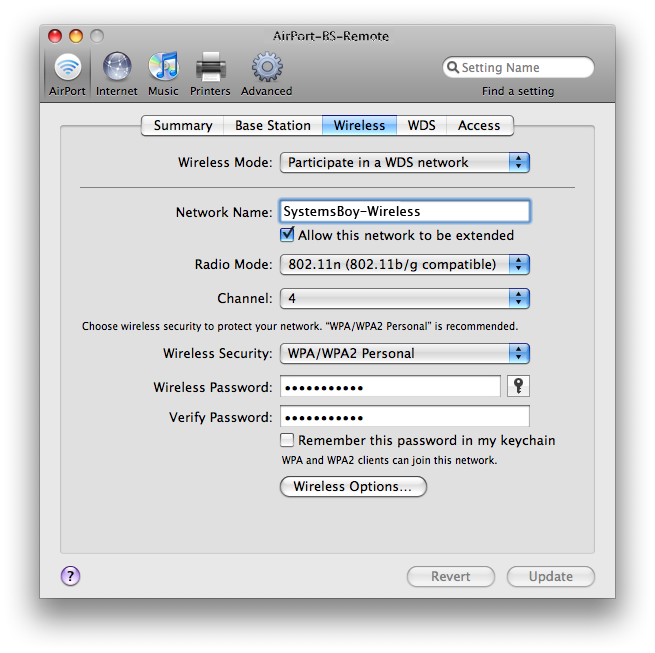
- Under the Wireless tab, as before, set the Wireless Mode to "Participate in a WDS Network."
- Here too, check the "Allow this network to be extended" checkbox.
- For the Network Name you should enter the same name you entered for your Main — in my case, "SystemsBoy-Wireless." Remember: different Base Station; same wireless network.
- Your encryption method for the Remote should also match that of the Main.
- The channel can be whatever you want it to be.
- And, finally, the wireless network's password should match that of the Main Base Station.
WDS Settings
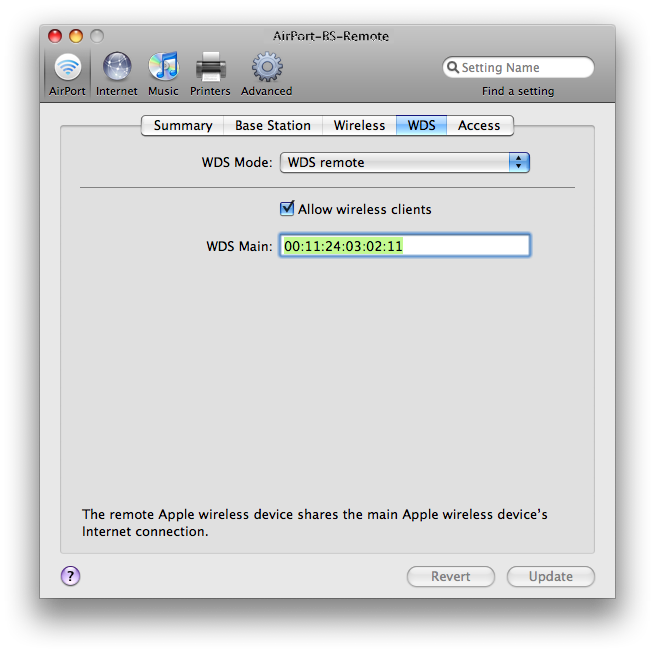
- Under the WDS Settings tab the Remote WDS Airport's WDS Mode should, not surprisingly, be set to "WDS remote."
- "Allow wireless clients" should be checked.
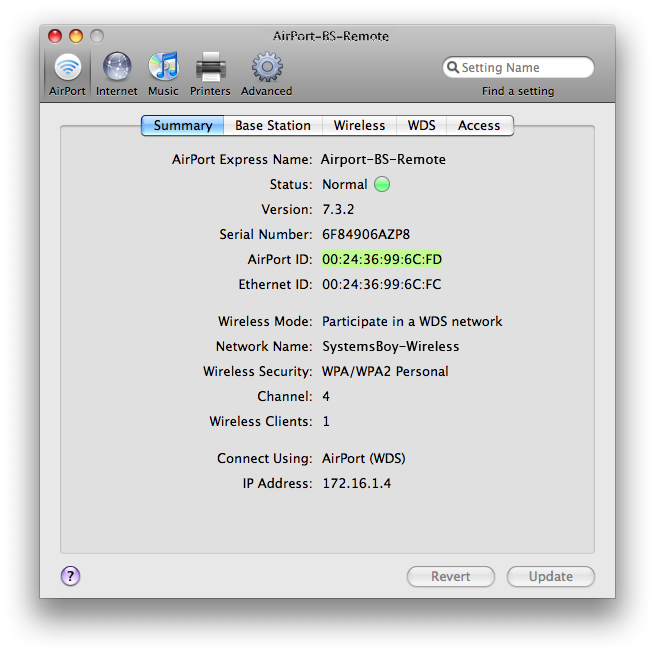
- And in the last box, labeled "WDS Main," you should the MAC (hardware) address of your WDS Main Airport. This can be found under the Summary tab of the configuration window. Each Base Station has two MAC addresses, actually: an "AirPort ID" and an "Ethernet ID." You want the Airport ID.
Add the Remote to the Main
- Now here's where it gets a bit tricky. Both the Remote and the Main need to be aware of each other. So, now that your Main is configured, you should be able to see it in Airport Utility and open its configuration window. Open it so that both the Main and Remote configuration windows are open.
- Go to the Remote's summary window and copy its Airport ID to the clipboard.
- Now go to the Main's WDS tab and hit the little plus sign to add a remote and paste the Airport ID number into the field.
Finish
- With both Airports' roles now configured, and with each aware of the other, you should be good to go. Hit the "Update" button on the Main, wait a minute, and then hit on the Remote (so that the Main reboots first)
- Wait for them to reboot.
- Once rebooted the Remote should have a green light under the Status field of its Summary tab and should have no errors. If it complains about something, make sure the Main is working well over wireless, then give the Remote another reboot. If this still doesn't work, move on to troubleshooting.
- Once everything seems to be functioning without error, place the Remote Base Station in its intended physical location.
- Pat yourself on the back! You've just extended your Airport wireless network!
Make no mistake, extending your Airport network is a big, fat, sloppy pain in the booty. It's also extraordinarily handy in many cases where a single Airport just isn't cutting it.

