Drives Die

So we had yet another calamity in the Systems Boy household last week: A hard drive failure in a four year old, 15" PowerBook. Oddly, a workmate had the exact same thing happen to him within days of our catastrophe. In fact, there's been all manner of hardware failure in recent days. I know that drives are prone to dying after a number of years, but geez! It sure seems like lately there's been a steady shit stream aimed squarely at the tech fan. Makes me ponder the more cosmic aspect of this biz.

[Gazes dreamily off into space for a moment. Then abruptly snaps to.]

The trigger for this failure, ironically, was our attempt to make a backup. (Oh, technology gods, thou art a riot!) See, our original goal was to update the OS to Leopard, but with all the craziness going on these days we decided to clone the drive before we proceeded with said update. But in the course of cloning, it would appear in retrospect, we hit a bad block and triggered the first of what would be many, many disk errors. Unable to pull a backup, we began our descent into drive repair hell in our latest heroic attempt to salvage that ever-important thing contained on and lost from drives: the data.

File-Level Attempts

Our first try was with Disk Utility, which consistently reported, in all red text, that it could neither verify nor repair the file system. Right. On to attempt number two.

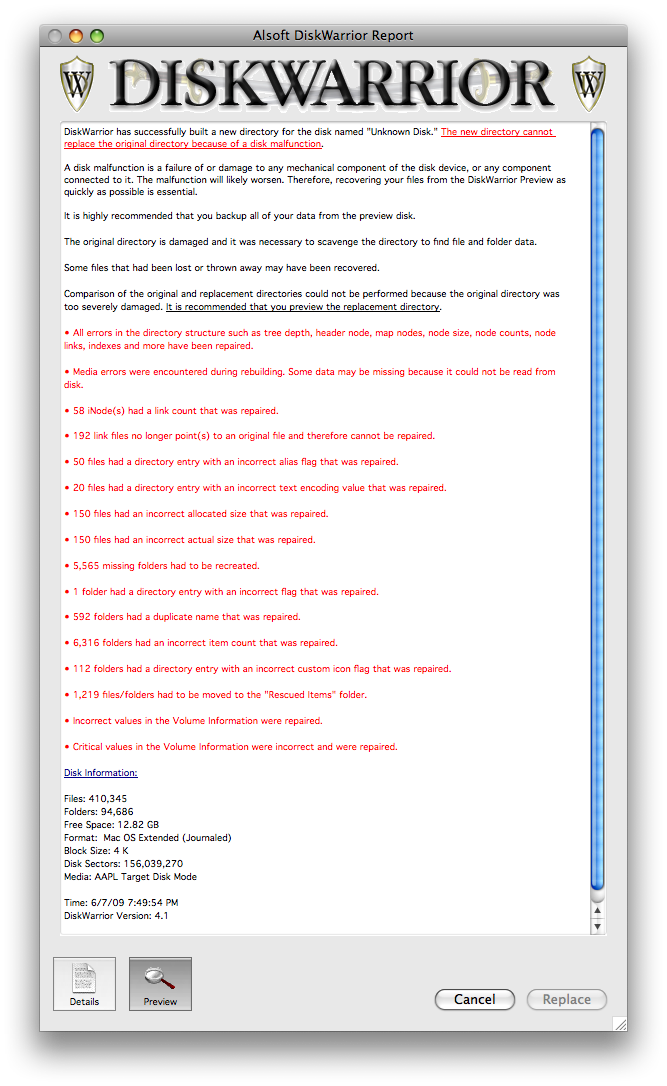
Disk Warrior is my go-to utility for any sort of file system damage that Disk Utility is unable to repair. I've rarely seen a disk that one of these two apps couldn't fix. Today would be one of those rare days. After mounting the drive on a known good system using Target Disk Mode, we let Disk Warrior perform its initial scan of the drive. What we found was decidedly ugly. Disk Warrior told us that it was unable to replace the borked directory with its shiny new, replacement directory because of a "disk malfunction."

That's when we knew the drive was fried.

Disk Warrior Report: Bad News

When a hard drive has problems, 99% of the time those problems are directory related. That is, the hard drive contains data about the files on disk — where they belong, how many there are, how the disk is partitioned and so on. And usually, when there is a problem with a drive, it is because this information has been corrupted somehow. These days there are numerous utilities that can easily and accurately repair these sorts of problems, Apple's included Disk Utility among them. Sometimes the damage is too extensive, though, so we turn to something a bit more drastic, like Disk Warrior. Disk Warrior forgoes the repair, and instead scans the disk and creates a brand-spankin' new directory, replacing the broken one with its new one once you've made sure everything is cool, and perhaps made a backup. Now, when Disk Warrior is unable to do this it's indicative of a much more serious problem. When this happens it is very likely that the drive hardware is beginning to fail.

Time for a new drive.

What Disk Warrior does in these instances is it shows you the best picture it can muster of the drive's contents in a read-only preview, and then advises you to backup as much as you can before total failure. So that's what we did. You're never sure how much time you have in these situations, so we went through folder by folder trying to locate and backup the most important files first. With each successive copy the drive became slower and slower. Luckily, we were able to pull the most recent, most important files. Most everything else was backed up or able to be easily reconstructed.

Block-Level Attempts

Once we had gotten the most important stuff we decided to see what else we could get. I tried running some rsync commands and got some stuff that way, but not much, and it was taking forever. Once I'd given up trying things at the file level, I decided to make my last ditch effort with a well-worn but powerful little UNIX command called, simply, dd. (No, it does not stand for "Drives Die," though maybe it should.)

The dd command reads data from a disk at the block level and copies it from standard input to standard output which can then be written to a file of your choosing. I use dd by running it on the /dev entry of the drive in question and writing the output to a disk image file (DMG):

sudo dd bs=512 if=/dev/disk3s3 of=/Volumes/Work/LastDitch-DD-01.dmg conv=noerror,sync

The good thing about dd is that you can instruct it to skip damaged sections of the disk. That's what the "noerror" option is for. The downside to dd is that it wants to read the entire disk, and that makes it very slow. In this instance I was not able to rescue any data, mainly because, as I soon discovered from my dd runs, the disk was just too far gone. I did learn some interesting strategies for using dd to recover data though.

The first thing you can try if dd is running slowly is to increase the block size. This is how much data dd will consider before moving to the next read. The default is 512 bytes. I've read upping that to 51200 will sometimes yield speedier results:

sudo dd bs=51200 if=/dev/disk3s3 of=/Volumes/Work/LastDitch-DD-02.dmg conv=noerror,sync

In my case it did not, primarily, I believe, because there was a problem in the beginning of the drive, and dd was having trouble moving past that spot. So another thing you can tell dd to do is to skip a certain portion of the drive, say the first 2 GBs:

sudo dd bs=51200 if=/dev/disk3s3 skip=2000000 of=/Volumes/Work/LastDitch-DD-03.dmg conv=noerror,sync

Finally, you can also tell dd to only write in 1 GB chunks, using the count option:

sudo dd bs=51200 if=/dev/disk3s3 count=1000000 skip=2000000 of=/Volumes/Work/LastDitch-DD-03.dmg conv=noerror,sync

I was getting some good results after having skipped the first 2 GBs — apparently they were really damaged — so I decided to write a script that would skip the first 2 GBs and then begin writing out 1 GB chunks of data. It would've looked something like this:

sudo dd bs=51200 if=/dev/disk3s3 count=1000000 skip=2000000 of=/Volumes/Work/LastDitch-DD-Chunck-01.dmg conv=noerror,sync

sudo dd bs=51200 if=/dev/disk3s3 count=1000000 skip=3000000 of=/Volumes/Work/LastDitch-DD-Chunck-02.dmg conv=noerror,sync

sudo dd bs=51200 if=/dev/disk3s3 count=1000000 skip=4000000 of=/Volumes/Work/LastDitch-DD-Chunck-03.dmg conv=noerror,sync

...

Etc, etc, up to the 40 GBs needed to scour the drive. I never got to write the script, though, because the last dd command seized up and the drive began making the clicking, knocking and whirring sounds of its agonized and tortured death. It was quickly dying. We could do no more.

At this point, mainly for my own edification, I decided to see what could be done outside the confines of my home office. I decided to get a quote from Drive Savers.

Hardware-Level Attempt

Drive Savers, perhaps wisely, does not list prices for their services on their website. To get an estimate you have to give them a call. When I called them I was greeted by a very friendly and helpful service person — yes, person — which was really nice. The last thing you want to deal with when you're having a mechanical failure is a machine. The person on the other end of the line asked me a few basic questions to gauge what state the drive was currently in, things like what attempts I had made to rescue the data, would the drive mount, and the like. After entering this info into her systems she directed me the "Tips, Techniques and Solutions" page on their website (very useful — love the drive sound audio samples), stressing above all that in order to have the best chance of recovery at this point the drive should not be powered on again. She also offered up some information about the company and what they do: For one, they started with Mac data recovery and are an all-Mac shop, which surprised me a little. She also pointed me to information on the Drive Savers clean room, a vital part of data recovery at the hardware level. She then took my email and contact info and gave me both a written and verbal estimate of how much I could expect to spend should I decide to go ahead and have Drive Savers attempt to save my data (I don't think they'll actually save the drive). All in all it was a very pleasant and informative experience. Normally I am loathe to use the phone for business, but Drive Savers really seems to know what they're doing, at least when it comes to pre-sales customer service, and that counts for a lot in my book.

This is, of course, all prep for the fact that, if you do want to make the attempt at data recovery, you'll be expected to drop a significant amount of money. This is hardly surprising. Those clean rooms don't look particularly cheap to build or maintain. And if data recovery at the hardware level is anything like it is at the software level, it is a laborious and time consuming process. I was given a range of prices ($500-$2700 dollars) and told that the cheapest I could expect to get away with — the economy plan, which isn't as fast as some of the other, more expensive plans — was $500 dollars. But it was likely I'd pay somewhere closer to the upper third of the range, more like $1500 to $2000 dollars. It all depended, of course, on how much data Drive Savers could recover.

I didn't really find these prices particularly surprising. I'd long heard how much such a recovery could cost. That it would be pricey. I was glad that I was not in a situation that required me to fork out this amount of money. I'm glad such a service exists for the odd catastrophe, though I hope never to have to use it. Drive Savers' website offers advice on keeping backups:

"Backup strategies:

* Invest in redundant backup systems

* Establish a structured backup procedure to make copies of all critical data files, using software compatible with the operating system and applications

* Periodically test the backups to verify that data, especially databases and other critical files, are being backed up properly

* Keep at least one verified copy of critical data offsite"

Sage advice, all. Take it from those who know all too well.

The Belly of the Beast

Once we'd decided not to use a hardware data recovery service the only thing left to do was spec out, buy and install a new hard drive. This wasn't terribly difficult, but as is so often the case, there was the odd snag or two.

Before we even bought a drive, I wanted to see how hard it would be to open the PowerBook for servicing. If it was going to be a bear — and some PowerBooks are certainly easier to crack than others — I'd let the fine technicians at Tekserve do the job. So I went in search of manuals and instructions for this particular model of PowerBook. Without too much trouble I was able to locate, at Apple's site, the manual for our 1.67 MHz, 15" Aluminum PowerBook. It contained no instructions for hard drive replacement, which is generally a sign that Apple would rather you not attempt the repair yourself. That got me a little worried.

Finally, however, I found instructions — great instructions, no less — at the venerable — awesome, actually iFixit.com. iFixit, for those of you who don't know, provides step-by-step, illustrated guides on taking apart and performing repairs on Apple hardware. For free. They're amazing. I feel guilty not buying anything from their site. Oh yeah, they also sell parts, tools and service as well. I love them. And from what I could see, the repair would be tedious — lots of screws — and would require a trip to the hardware store — blasted tiny hex screws! — but it would be doable. Still, taking things one step at a time, I thought I'd perform the teardown before buying the drive. Just in case.

And perform I did. Using iFixit's excellent guide, I was able to crack the PowerBook in short order. I was ready to buy a drive.

Buying a Drive

There are two things SysAdmins typically are, particularly when it comes to technology: cheap and lazy. Hunting for a replacement drive brought both of these qualities in my personality to bear. I was looking for the cheapest replacement I could find, at the location closest to my house, a SysAdmin's dream hunt. The closest proper computer tech shop to me is Tekserve, with Best Buy a close second. Tekserve doesn't list what bare drives they carry, if any. But Best Buy seems to have the goods. But Best Buy is still a good half hour train ride, so I did some physical recon at my nearest Radio Shack, which happens to be right around the corner. They informed me that, though they did not have any bare drives in stock, they did have portable USB drive on sale. Drives from which I could pull and the internal component and install it in the now drive-less PowerBook. In fact, they had a 160 GB Iomega Prestige for less than a bare drive would have run me at Best Buy — a mere $75 clams post-sales-tax. Not bad. I took it.

I'd like to pause here and see if anyone can guess why this didn't work out for me. You have pretty much all the data you need in this article to figure it out. But don't feel bad if you can't. The good lord knows I surely didn't. I'll wait a minute... Pretend there's Jeopardy countdown music playing... Aaand...

Okay. Did you guess it?

I got the drive home, popped it out of its case and went to put it in the open PowerBook. But it didn't fit. (Have you guessed it yet?) Here's the thing: PowerBooks use 2.5" ATA drives (Parallel ATA, or PATA), but drives in today's externals are all now SATA (Serial ATA) drives. Blast!

Oh well. At least it was cheap.

Another quick look at the web revealed that all the bare drives at Best Buy were SATA as well. Blast again!

The nearest ATA drive I could find was at J&R, which is all the way downtown, almost at the very tippy-tip of Manhattan — far. So that's where we went.

Once we got back, we installed the drive and — the very first thing to go right all day — it worked. Perfectly. Things were finally looking up.

Once we had installed the drive it was simply a matter of formatting it, installing the latest version of Leopard (which is all we ever wanted to do in the first place) and copying over the rescued and reconstructed data. Oh, did I mention that the reason the client wanted Leopard was for Time Machine? Yup. Backups. Great timing. So we set up Time Machine as well. All that went exceedingly smoothly and our repair is, at last, complete. Whew! What an ordeal!

But, man, did I ever learn a lot.

The Life and Death of Hard Drives

So yes, drives die. How they die, though, is almost as important as how they lived, and certainly as interesting. It's somewhat comforting to know that this drive, while quite dead indeed, did not die in vain. Rarely have I had the opportunity to learn so much about practical drive recovery. I have that PowerBook drive — specifically its death, in fact — to thank for my lesson.

Delivery

There's a commercial that depicts a school system as run by the courier companies. I forget what the commercial is for. In it a narrator asks, "What if the schools were run by courier companies?" A child is late. The lead delivery guy calls his agents in the field. And within minutes, the child is found and delivered to the school. The implication is that the courier companies are models of super-efficiency and organization.
Funny, but this has never been my experience.
For me, home delivery is an agonizingly worrisome affair. First I make my order, tentatively, gingerly, nervously. I'm then given either a range of dates, or an exact date, depending on my shipping method, when to expect my package. What follows is that, more often than not, on some day within that stated range, after returning home from work, I receive a notice on my door informing that an attempt has been made to deliver my package. From here on out I face an often major quandary.
On the notice it usually says that a signature is required for me to actually receive the package. This is New York, after all. It also states, now, a range of times when the courier will make a subsequent delivery attempt on the next business day. This is generally a range of about 4-8 hours, and those hours almost always occur during a period in which I will be at work. There is no way to negotiate this. If I am to receive a package via courier service, I must be home. I have missed days of work waiting for packages to be delivered. It's harrowing.
Today I just happen to have the day off by virtue of my regular work schedule. And I just happen to be waiting for my iPhone 3GS to be delivered by FedEx. I'm nervous as a squirrel on crack, and so I keep obsessively checking the my tracking number on FedEx's website, over and over again, for some sign that something's gone wrong. I have not showered, nor have I moved my bowels for fear that I might miss the delivery. I am trapped in my apartment afraid to do much of anything. I've been waiting since 8 AM. It's noon.
On my order tracking page I am given certain information about my shipment. Most important to me is the information regarding its whereabouts and the history thereof. Last night my package was in Pennsylvania. Then it was in New Jersey. This morning it made its way to The Bronx. And then, at 8:20 AM, was put on the truck for delivery. And so it's stayed for nearly 4 hours.
At my order tracking page, with which I'm becoming quite familiar by now, I also see that FedEx has certain information about me. They have my address, of course. But they also have my phone number. I wonder if they have my email.
The tracking page also links to an "E-mail notifications" page, where you can actually set your account up to send emails about the status of your package to up to 5 addresses. You can have them email you about a problem with delivery, after the fact, when it's to late to correct the problem; or they can email you when the package has been delivered, the one time I don't need an email because the damn thing is in my hand; or they'll email you detailed tracking info, which is already available at the tracking page I've been reloading all morning. Unfortunately, none of these notifications are useful to me.
See, what I need is the one piece of information that is conspicuously absent from my tracking page. What I want to know is where my package is once it's on the truck. And, perhaps more importantly, I'd like to know when the driver is in my neighborhood, so that I can be ready for the delivery attempt within a more reasonable time frame.
Why is it that the most vital information is impossible to obtain?
I once had an experience in which I'd arranged to pick a package up from a UPS facility, as the driver refused to leave it at my door and I couldn't miss work. But due to a communications snafu (or perhaps blind incompetence, I don't know) when I arrived at the UPS building I was informed that my package was out for delivery. The nice people at the UPS facility tried their best to contact that driver and inform him of the situation, but they seemed unable to do so. Even UPS seems hard pressed to find your package once it's out on the truck. And they're in radio communication with the drivers.
If I, as a SysAdmin, were so hard to reach, I would be out of a job. Somehow, people always manage to get ahold of me when they need me. Such is the state of global communications these days.
I really don't see why FedEx or UPS or DHL — hell, all of them — can't implement a better notification system. They have methods to determine the exact time the package was delivered. They have my phone number. And the general availability of GPS should make locating the driver at any given time a snap. Is it too much to ask that an automatic text notification (or method of my choosing) be sent to my cell phone when the driver is within a certain range of my address?
This, after all, is the crucial moment for me, and I suspect for lots of folks. This is the time we have to be here, home and ready to answer the door. Why is it the blackout time when it comes to communication?
Shit! Was that the doorbell? Gotta go!

There's a commercial that depicts a school system as run by the courier companies. I forget what the commercial is for. In it a narrator asks, "What if the schools were run by courier companies?" A child is late. The lead delivery guy calls his agents in the field. And within minutes, the child is found and delivered to the school. The implication is that the courier companies are models of super-efficiency and organization.

Funny, but this has never been my experience.

For me, home delivery is an agonizingly worrisome affair. First I make my order, tentatively, gingerly, nervously. I'm then given either a range of dates, or an exact date, depending on my shipping method, when to expect my package. What follows is that, more often than not, on some day within that stated range, after returning home from work, I receive a notice on my door informing that an attempt has been made to deliver my package. From here on out I face an often major quandary.

On the notice it usually says that a signature is required for me to actually receive the package. This is New York, after all. It also states, now, a range of times when the courier will make a subsequent delivery attempt on the next business day. This is generally a range of about 4-8 hours, and those hours almost always occur during a period in which I will be at work. There is no way to negotiate this. If I am to receive a package via courier service, I must be home. I have missed days of work waiting for packages to be delivered. It's harrowing.

Today I just happen to have the day off by virtue of my regular work schedule. And I just happen to be waiting for my iPhone 3GS to be delivered by FedEx. I'm nervous as a squirrel on crack, and so I keep obsessively checking the my tracking number on FedEx's website, over and over again, for some sign that something's gone wrong. I have not showered, nor have I moved my bowels for fear that I might miss the delivery. I am trapped in my apartment afraid to do much of anything. I've been waiting since 8 AM. It's noon.

On my order tracking page I am given certain information about my shipment. Most important to me is the information regarding its whereabouts and the history thereof. Last night my package was in Pennsylvania. Then it was in New Jersey. This morning it made its way to The Bronx. And then, at 8:20 AM, was put on the truck for delivery. And so it's stayed for nearly 4 hours.

At my order tracking page, with which I'm becoming quite familiar by now, I also see that FedEx has certain information about me. They have my address, of course. But they also have my phone number. I wonder if they have my email.

The tracking page also links to an "E-mail notifications" page, where you can actually set your account up to send emails about the status of your package to up to 5 addresses. You can have them email you about a problem with delivery, after the fact, when it's to late to correct the problem; or they can email you when the package has been delivered, the one time I don't need an email because the damn thing is in my hand; or they'll email you detailed tracking info, which is already available at the tracking page I've been reloading all morning. Unfortunately, none of these notifications are useful to me.

See, what I need is the one piece of information that is conspicuously absent from my tracking page. What I want to know is where my package is once it's on the truck. And, perhaps more importantly, I'd like to know when the driver is in my neighborhood, so that I can be ready for the delivery attempt within a more reasonable time frame.

Why is it that the most vital information is impossible to obtain?

I once had an experience in which I'd arranged to pick a package up from a UPS facility, as the driver refused to leave it at my door and I couldn't miss work. But due to a communications snafu (or perhaps blind incompetence, I don't know) when I arrived at the UPS building I was informed that my package was out for delivery. The nice people at the UPS facility tried their best to contact that driver and inform him of the situation, but they seemed unable to do so. Even UPS seems hard pressed to find your package once it's out on the truck. And they're in radio communication with the drivers.

If I, as a SysAdmin, were so hard to reach, I would be out of a job. Somehow, people always manage to get ahold of me when they need me. Such is the state of global communications these days.

I really don't see why FedEx or UPS or DHL — hell, all of them — can't implement a better notification system. They have methods to determine the exact time the package was delivered. They have my phone number. And the general availability of GPS should make locating the driver at any given time a snap. Is it too much to ask that an automatic text notification (or method of my choosing) be sent to my cell phone when the driver is within a certain range of my address?

This, after all, is the crucial moment for me, and I suspect for lots of folks. This is the time we have to be here, home and ready to answer the door. Why is it the blackout time when it comes to communication?

Shit! Was that the doorbell? Gotta go!

Hudzee

Or is it Hudzee?

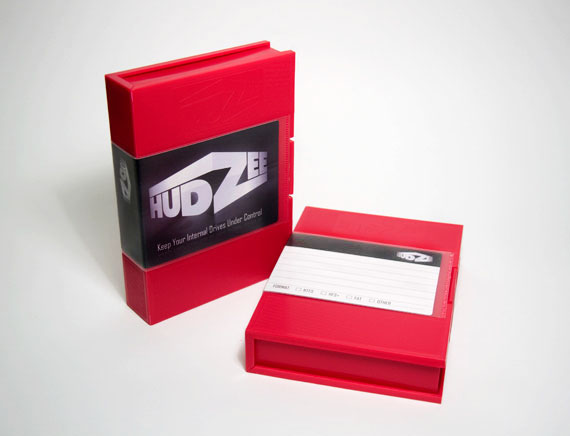
A friend of mine is trying his hand at product creation. Based on his 15+ years of systems experience in the world of commercial video production he's determined a burgeoning need for storage storage: a case for your hard drives.

Hudzee: Pretty and Smart

See, hard drives have become so cheap that they're actually the best per-gigabyte bang for your buck when it comes to data storage. So more and more clients are simply archiving everything to standard, internal ATA hard drives. Once a project's done, pull the drive from the machine or (firewire case) and stick it on a shelf. Many of my friend's clients have stacks of these drives, wrapped in anti-static bags, piled one on top of another on a shelf in some closet somewhere. It's an ugly way to treat your drives, and, moreover, it's not necessarily the safest way either.

Enter Hudzee. (Or is it Hudzee?)

Hudzee is a tape case for your hard drive. Remember tape? Back in the day it's what we stored all our video on. It's also what we used to archive data. It's slow and expensive, but it's very good for archiving. And it's slowly going the way of the dodo. But the thing about tapes is that every tape you bought — whether for data storage or video — came with something no hard drive does: A case. A nice, big, cushioned, stackable, hard, plastic case. Hudzee is just such a beast only sized precisely for your hard drive.

Hudzee: Latchable Goodness

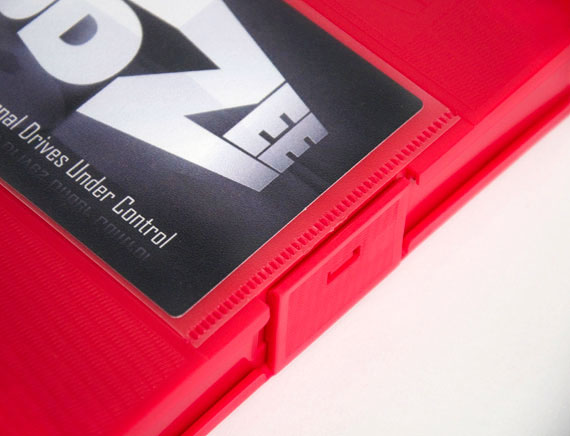
Now I will say, Hudzee's creator is a friend of mine. And I'm obviously motivated by my desire to see him succeed. But I also have to say, I think that Hudzee is a great idea. I've just received my first production unit. The build quality is nice. The materials are solid, and plenty strong to safely hold a standard, 3.5" hard drive, and there is plenty of cushioning inside. A solid, but easy-to-open, latch keeps the case securely shut. My drive feels safe in here. Safer than it's ever felt before.

The other great thing about the Hudzee is that, like tape cases of yore, it features a label card. Finally, you can know what's on that drive without putting it back in the machine. Or, worse, labeling it with tape or some such sticky nastiness. Now a simple glance at the case is all you need.

So if you've got — or will have — a stack of hard drives sitting on a shelf in some back room somewhere, you might consider getting some Hudzee. (Or is it Hudzees?) They're $8 bucks a pop, or $65 bucks for a box of 10. Cheap compared to the price of a hard drive. Absolute chump change compared to the pricelessness of your data.

Order some online today. You know you want to.

Workflow Design

I've long described my professional self as someone who designs workflows. And as I design more of these workflows, I find myself more and more creating — and obsessing over — the interfaces to them. I have no formal training in the field of interface design, but I find it fascinating and I'm definitely an admirer of great workflow and interface design. Over the course of the last few months, in which I've been focused almost entirely on workflows and their interfaces, I've made some observations. These are certainly not earth-shattering revelations, and real interface designers will probably have codified these in some formal way a long time ago. But for me this is all very new, and so I wanted to get down in writing some of my early impressions of the process.

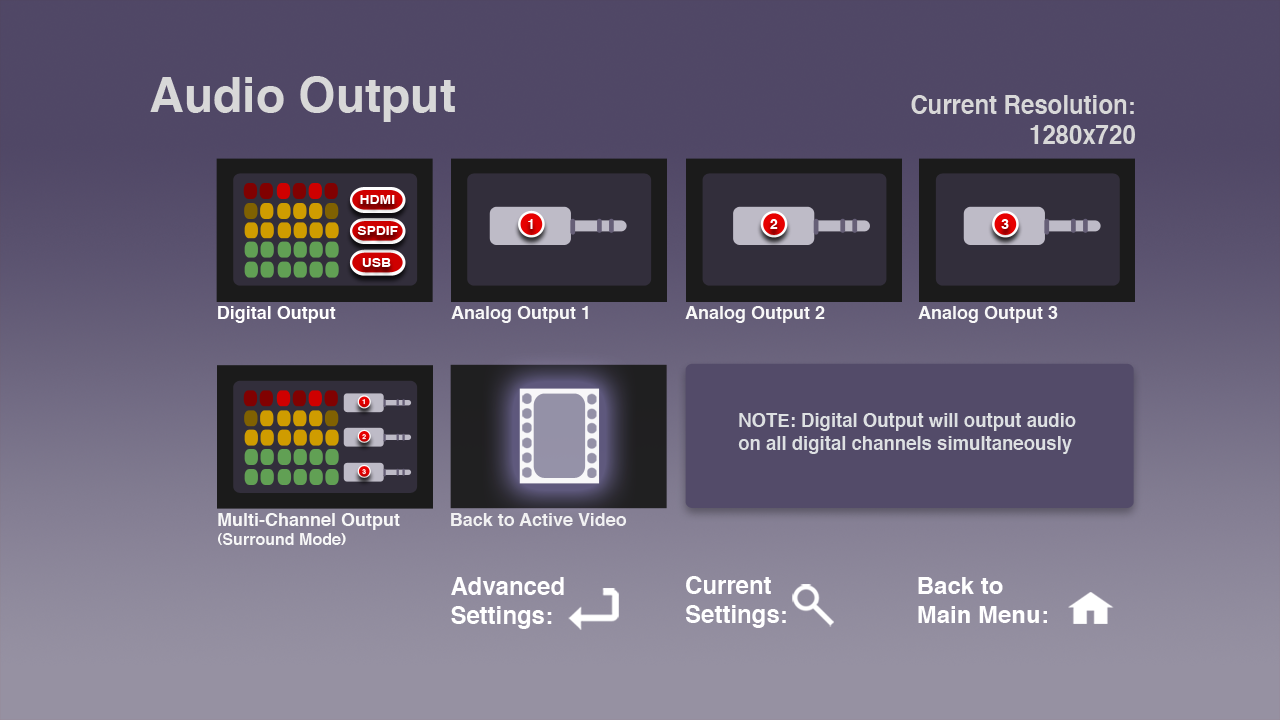
audio-interface

What's a Workflow?

Before I start, let me talk about what I mean when I say "workflow" as the notion goes a bit beyond just interface design. Generally, when I'm designing a workflow, I'm designing the process by which a user will complete a complex task. A workflow often involves a number of steps using a variety of tools, from the web to a remote control to shell scripts. Often I am directly responsible for the design of each of these workflow components, their guts as well as their surfaces; sometimes I find myself working on only one facet of them. But that, in a nutshell, is generally how I think of this concept I'm calling the workflow: a series of steps and tools used for completing a large, complex task.

So, on to some observations.

Keep It Simple

First of all, the simpler and easier you can make a workflow, the better. This is always the case, though simple can be a bit of a relative term. Sometimes you can make something so simple that it fails to meet the user's needs (yes, this has happened to me). Which brings us to my next observation.

Know Your Goals

The first, and often most difficult, but certainly most important aspect of designing a good workflow and the interface to it is knowing exactly what you want to accomplish with the workflow. It is essential to figure this out as early on in the process and as accurately as possible, though some amount of discovery can be a part of the early design process. That said, you really want to nail it down as soon as you can.

Know Your Users and Your Tools

You also need to quickly determine who will use the workflow — and by who I mean, what is the userbase and what is their particular skill set — as well as the context for the workflow, and the most appropriate tools for both the job of creating the workflow and accessing it.

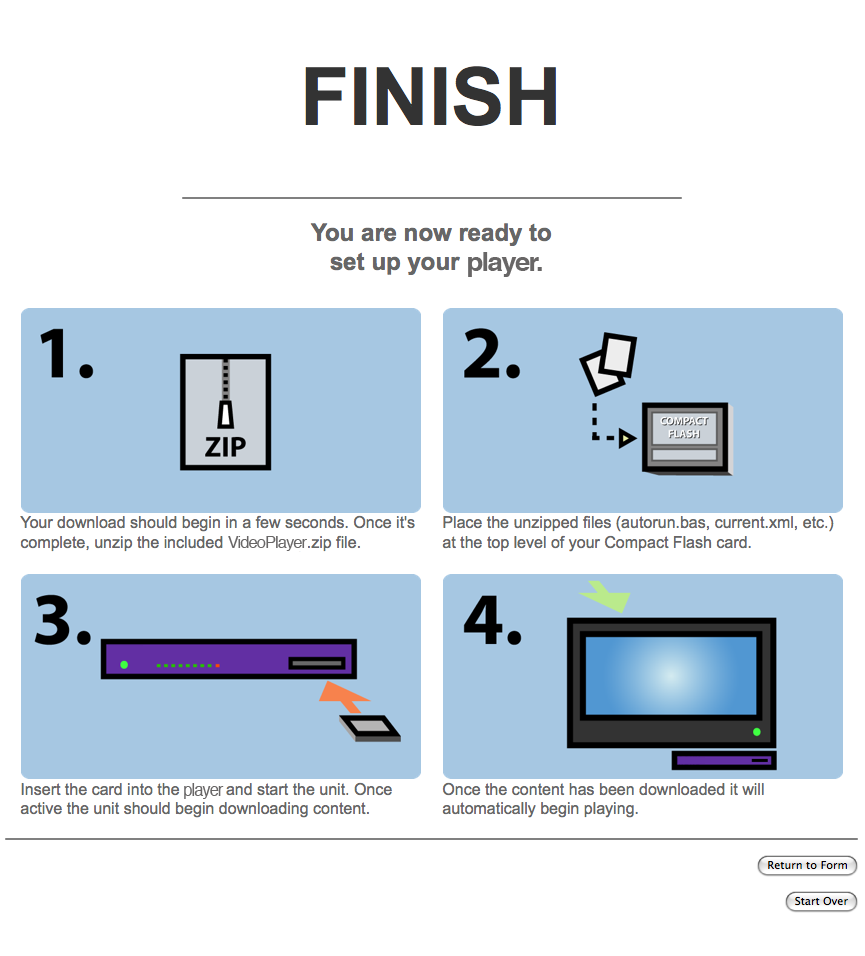
test

Looks Are Important

The way things look and sound is paramount. These communicate everything about the workflow, from how it works to a certain mood. It's weird to think of a workflow having a mood, but it really helps to set a tone. If your workflow is for novice users, for instance, creating a mood that is not intimidating can help a great deal with discoverability. This can be achieved through choice of graphics as well as the use of language. These things are important.

Simplicity Is Hard

While simplicity is always the goal (not one unnecessary click, I always say!) it is also deceptively difficult to achieve. Generally the tools for creating workflows are extremely complex; boiling those tools down to something simple is the challenge of the designer.

Get Out of Your Shell

Testing on real people — preferably the people that will be using the workflow — as often as possible, or near milestones in the project, is crucial. As the designer you tend to lose a great of objectivity when it comes to the project, and the more you can try to see things through the eyes of your end-user the better. There is no better way to do this than to let them use use the workflow. You'll instantly see where your design breaks down, where it succeeds and where it fails. It will test all your assumptions about your workflow and about the way people interact with it. Watch closely and take notes!

This is also a great way to get to know your user (or at least more about them), if you don't already.

Make It Look Easy

Lastly, and perhaps somewhat frustratingly, if (when!) you are successful in making something that is simple and elegant and still functional, people will not understand how difficult that balance was to achieve and will think that your workflow sprang forth from the ether, fully formed. They will think it is native; they will think "it couldn't have been hard." They will say things like, "how hard could it be to add such and such a feature?"

While sometimes maddening, you should take it as a sign that you've done something right.

Extending an Airport Network

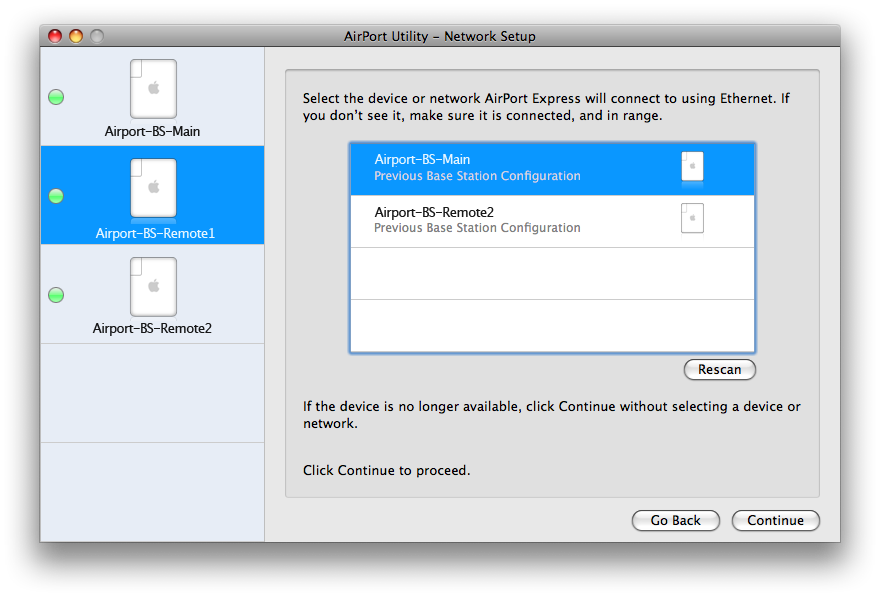
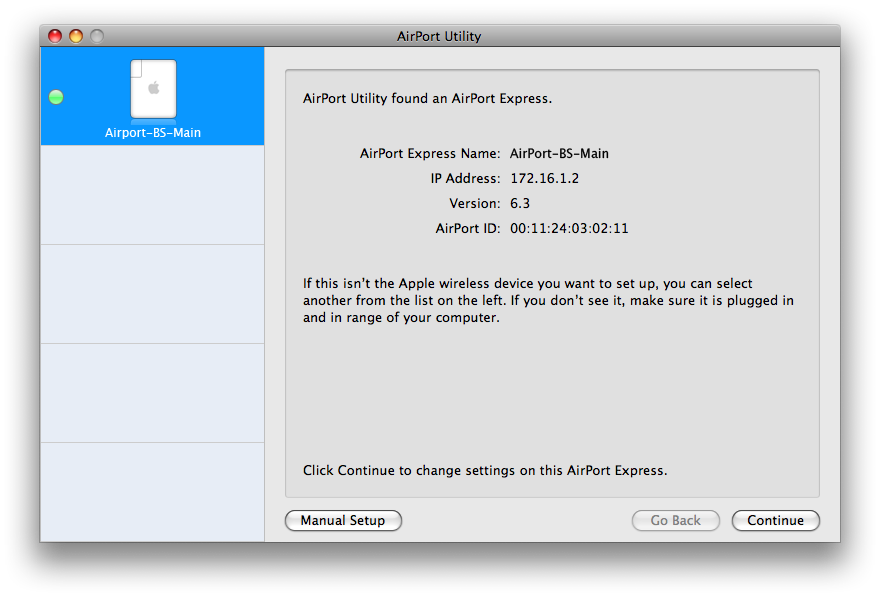
UPDATE: It looks like there's actually a better way to extend an Airport network than the one I've outlined in this article. A few people have written in to tell me that they've had great success using the configuration "wizard" available in the Airport Express Utility. I haven't tried using this myself, but it does look exceedingly easy. So, definitely the thing to try first before you go into the twelve page set of instructions below.

Thanks to all who sent this in. I'll leave the detailed instructions below for anyone who's interested.

Man, I wish I'd known about this sooner.

Airport Utility Wizard: Quite Possibly A Better Way

A while back I got a second Airport Express in the hopes of using it to extend my existing wireless network. Doing so was fairly tricky and not anything like I'd expected.

I had initially believed — perhaps naively — that the process would essentially be a matter of joining the new Airport to the existing network the same way you'd add a new computer. This is decidedly not the case. It turns out that, in order to extend an wireless network across multiple Airports, you must set up what is known as a WDS network. Let's take a look at the process, which for me anyway, was fraught with difficulties that this article will hopefully help me (and you) avoid in the future.

Set Up the "Main"

The "Main" WDS Airport is the unit that will host the wireless network. It's the one that's connected to your cable modem, or your router, with an Ethernet cable. You'll connect the "Remote" Airports to the Main wirelessly, allowing them to extend the network. It's important to remember, as you continue with this process, that each new wireless node must be added to the main node in order for it to be seen by the WDS network. Ready? Here we go!

Wired Connection

  1. The easiest (and Apple-recommended) way to do all this is with a direct, wired connection, so grab yourself an Ethernet cable and connect your computer to the Airport that you want to be the Main unit. This is not absolutely necessary, but it will help to mitigate any problems you might have as you go making changes, since you won't be dependent on a wireless connection. You can skip this if it's easier.

Base Station Settings

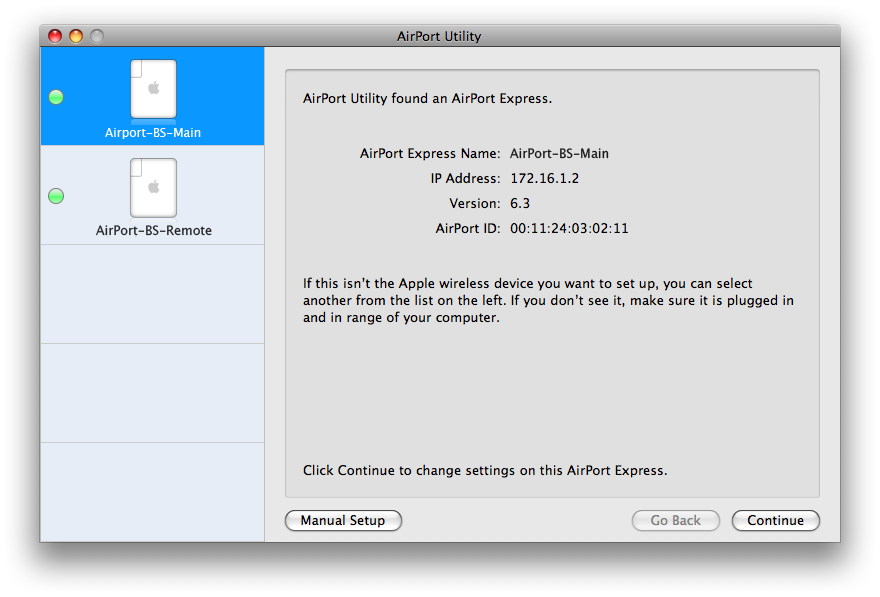
  1. Once connected, open Airport Utility. You should see the Main at the very least.

    Extend Airport: Main Window

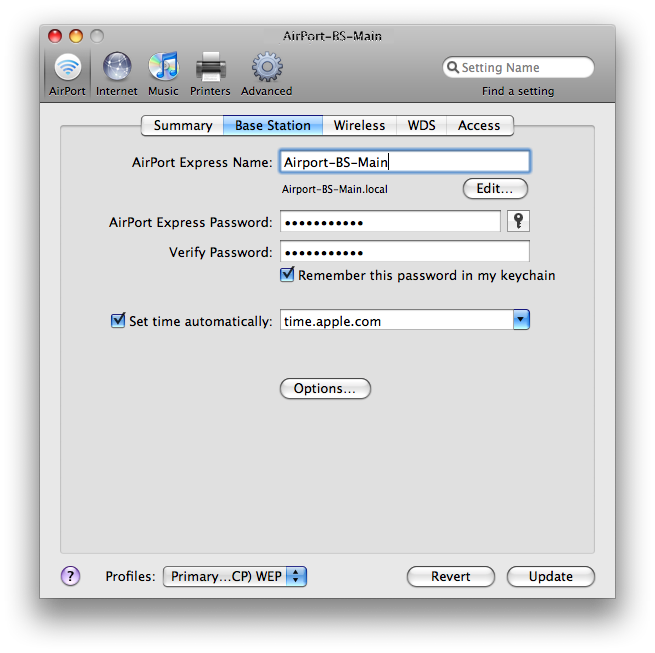
  2. Double-click the unit to open its configuration window. Begin in the Base Station tab by setting the name and password of the unit.
  3. The name will be the name of the base station itself, and the password is the one used to log in to and change the unit's settings. I recommend naming it something like "Airport-BS-Main" for easy identification. As always, make the password memorable and secure.

Extend Airport: Main Base Station Settings

Wireless Settings

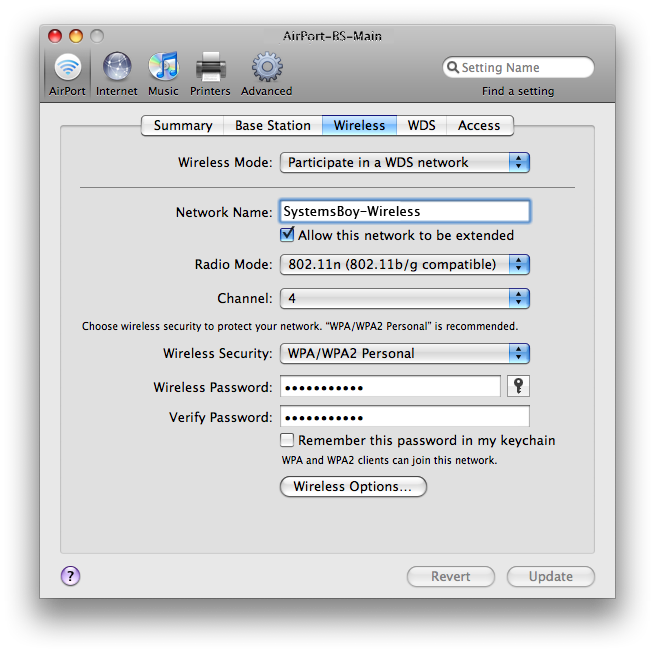
  1. Under the Wireless tab, set the Wireless Mode to "Participate in a WDS Network." This is the key, really, to the whole shebang.
  2. It's also important to check the "Allow this network to be extended" checkbox.
  3. Here you'll also want to give the network a name. This is the name you'll use when joining the wireless network from your computer, so choose wisely and for the ages. I like clear nomenclature, so I went with "SystemsBoy-Wireless." Clever, huh?
  4. Set your encryption method. The Airport recommends WPA/WPA2 Personal, which I like too. Secure and compatible.
  5. Choose a channel, or use the default. It's all good unless you're in a super-crowded area, in which case trial and error is your friend.
  6. Finally, be sure to set your wireless network's password. This is the one used for joining the network from your computer. Two names, two passwords. I know it's confusing. But you're smart. You'll figure it out.

Extend Airport: Main Wireless Settings

WDS Settings

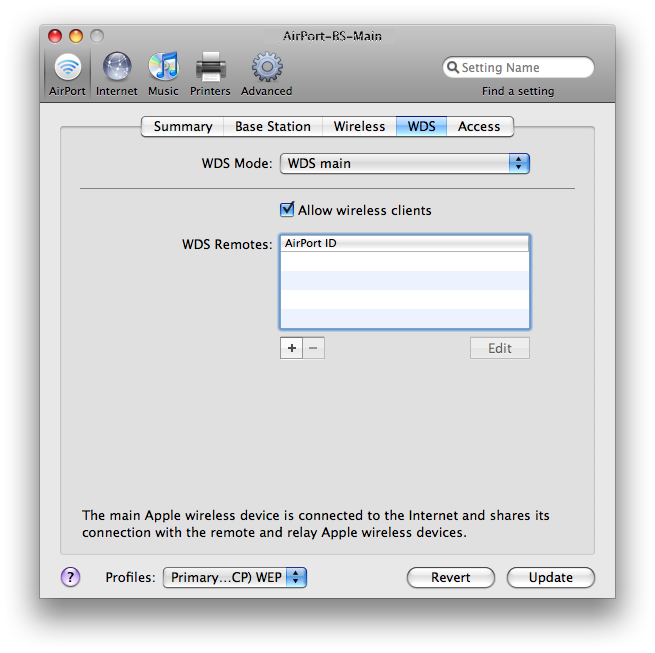
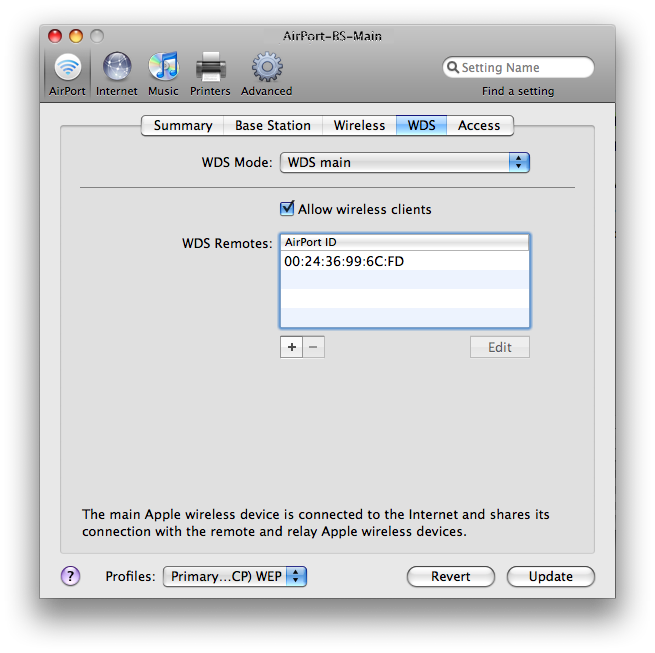
  1. Under the WDS Settings tab the Main WDS Airport's WDS Mode should be set to "WDS main."
  2. "Allow wireless clients" should be checked.
  3. You'll add your WDS Remotes later, once we've plugged in the other Airport in the next section.

Extend Airport: Main WDS Settings

Update and Test

  1. Once all this is set up, hit the "Update" button.
  2. The Airport will go and make the settings you just configured, which will require it to reboot.
  3. After the reboot, remove the Ethernet cable connect between the Airport and your computer, and (re)connect the Airport to the network/router.
  4. If all went well, you should see the classic green light on flashing on the Airport unit. You should also be able to connect to the Airport network wirelessly. If you don't or can't, reboot the unit again for good measure. Make sure you give it enough time before trying to connect to it. Five minutes should be more than enough.
  5. If, after all this, you still don't see the green light, you'll need to troubleshoot your connection in Airport Utility, which is beyond the scope of this article. But it's important to get the Main unit working as a wireless base station before proceeding. Everything depends on it. So get it working using the above settings.

Troubleshooting Tips

  1. Occasionally, after a reboot, the Airport will not be visible in Airport Utility. Simply restarting Airport Utility will sometimes fix this, so be sure to try it if you can't get connected.
  2. For whatever reason, this process took a few tries for me. So remember, a direct, wired Ethernet connection will aid in troubleshooting. This is recommended by Apple, and I concur.
  3. Don't forget, if need be, you can completely reset the Airport back to factory defaults and start from scratch using the super-secret reset button on the top of the device.

Set Up the "Remote(s)"

The Airport(s) you use to extend your wireless network are referred to, in WDS parlance, as "Remotes." With WDS Remotes you'll be able to join your wireless network — the same one you set up on the Main, with the same network name and password — from well beyond the reach of the Main. Remotes should, obviously, be placed within signal reach of the main, but far enough away to actually extend the reach of the network.

Wired Connection

  1. As before, this will all be a lot easier if you connect to the WDS Remote Base Station using an Ethernet cable. Be sure you're Remote has power, then connect with Airport Utility.

Base Station Settings

  1. With Airport Utility opened, you should still see Main, as well as the newly added, unconfigured Remote.
  2. Double-click the Remote unit to open its configuration window. Begin in the Base Station tab by setting the name and password of the unit.
  3. As before, the name will be the name of the base station itself, and the password is the one used to log in to and change the unit's settings. I called this one "Airport-BS-Remote" for easy identification.

Airport Utility: Airport Remote

Wireless Settings

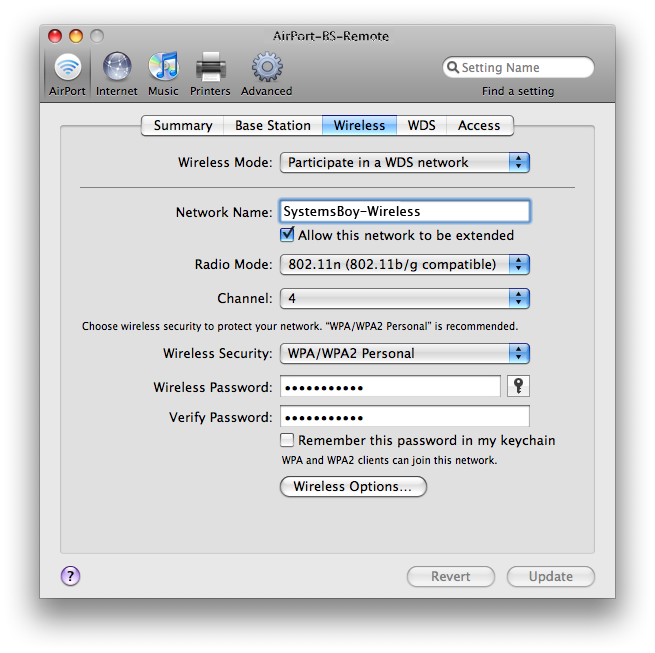
  1. Under the Wireless tab, as before, set the Wireless Mode to "Participate in a WDS Network."
  2. Here too, check the "Allow this network to be extended" checkbox.
  3. For the Network Name you should enter the same name you entered for your Main — in my case, "SystemsBoy-Wireless." Remember: different Base Station; same wireless network.
  4. Your encryption method for the Remote should also match that of the Main.
  5. The channel can be whatever you want it to be.
  6. And, finally, the wireless network's password should match that of the Main Base Station.

Extend Airport: Remote Wireless Settings

WDS Settings

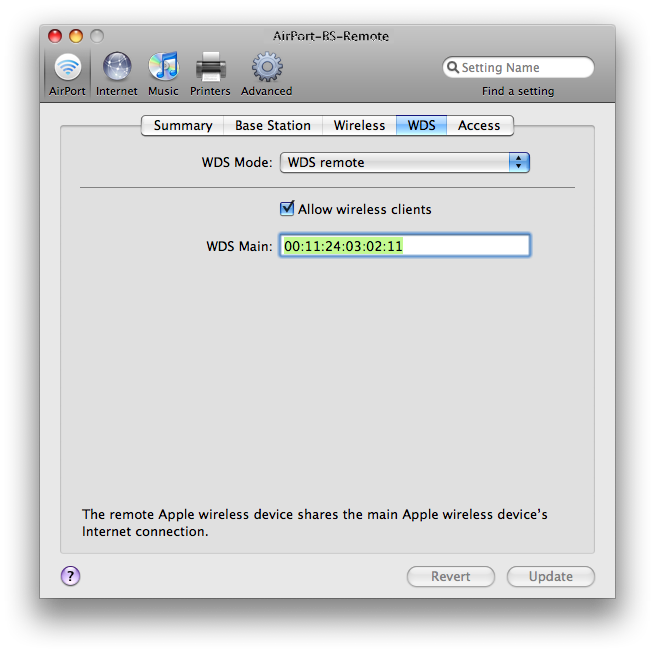
  1. Under the WDS Settings tab the Remote WDS Airport's WDS Mode should, not surprisingly, be set to "WDS remote."
  2. "Allow wireless clients" should be checked.
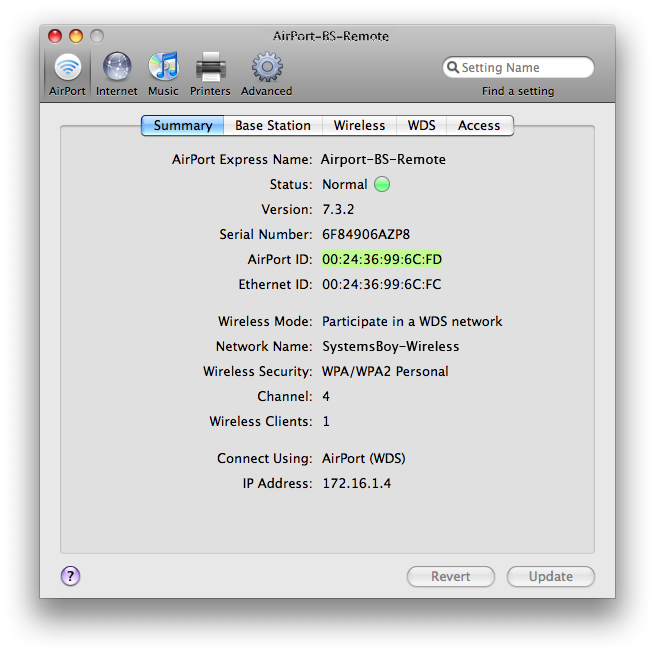
  3. And in the last box, labeled "WDS Main," you should the MAC (hardware) address of your WDS Main Airport. This can be found under the Summary tab of the configuration window. Each Base Station has two MAC addresses, actually: an "AirPort ID" and an "Ethernet ID." You want the Airport ID.

Extend Airport: Remote WDS Settings

Add the Remote to the Main

  1. Now here's where it gets a bit tricky. Both the Remote and the Main need to be aware of each other. So, now that your Main is configured, you should be able to see it in Airport Utility and open its configuration window. Open it so that both the Main and Remote configuration windows are open.
  2. Go to the Remote's summary window and copy its Airport ID to the clipboard.

    Extend Airport: Remote Airport ID

  3. Now go to the Main's WDS tab and hit the little plus sign to add a remote and paste the Airport ID number into the field.

    Extend Airport: Adding Remotes to Main

Finish

  1. With both Airports' roles now configured, and with each aware of the other, you should be good to go. Hit the "Update" button on the Main, wait a minute, and then hit on the Remote (so that the Main reboots first)
  2. Wait for them to reboot.
  3. Once rebooted the Remote should have a green light under the Status field of its Summary tab and should have no errors. If it complains about something, make sure the Main is working well over wireless, then give the Remote another reboot. If this still doesn't work, move on to troubleshooting.
  4. Once everything seems to be functioning without error, place the Remote Base Station in its intended physical location.
  5. Pat yourself on the back! You've just extended your Airport wireless network!

Make no mistake, extending your Airport network is a big, fat, sloppy pain in the booty. It's also extraordinarily handy in many cases where a single Airport just isn't cutting it.