External Network Unification Part 3: Migrating to Joomla

When last we visited this issue I had just gotten the venerable Joomla CMS to authenticate to our LDAP server. I decided to build a replica of our existing CMS, which is based on the Mambo core, and do some testing to see how easy it would be to port to our LDAP-saavy Joomla core. The Joomla site gives instructions for doing this, and frankly it sounded drop-dead simple.

It turns out it is drop-dead simple. The hard part is successfully replicating the existing Mambo site and all its requisite databases and components. To do this, I first copied all the files over to the test server. This is easy of course. Then I had to get the MySQL databases over. This was a bit more challenging. Using the command mysqldump was the way to go, but I encountered numerous errors when attempting this with the standard options. After some research I discovered that I needed to apply the --skip-opt option to the command. My final command looked something like this:

mysqldump --skip-opt -u mambosql -p -B TheDatabase > TheDatabase.bak.sql

I honestly don't remember why the --skip-opt flag was necessary, or even if it was the right approach, only that it seemed to do the trick: the dump completed without errors. So I copied the database over and set everything up on my test server exactly as it was on the original server, putting the Mambo site in the proper web root, and importing the databases on the test system. After some fidgeting — specifically, making sure the Mambo config file was edited to use the new server — I was able to get the test site working. The only problem was (and still is) that the admin pages don't work. No matter what I do, I can 't login and I'm told that my username and password are wrong, though they work on the front end. I suspect a problem with my dump. It's also possible that the admin pages require a different user — one I'm unaware of — than the front-end for access. Since I didn't build the original server, I can't be sure. But whatever.

The next part of this test was to try and port the Mambo install to the Joomla engine with the LDAP hack enabled. This turned out to be fairly straightforward: Install and configure Joomla (v.1.0.8 — later versions do not work with the LDAP hack) to authenticate to LDAP; copy over all the custom Mambo files to the new Joomla site (without overwriting any Joomla stuff); copy the Mambo config file over and edit it for the new site root; trash the "Installation" folder (we won't be needing it); and that was it. My old Mambo site was now running on an LDAP-enabled Joomla engine.

There were some major snags here though. Because I could not get into the admin pages (a problem that persisted even with the new Joomla engine), I could not configure user authentication. I was able to directly access the MySQL database, however, with phpMyAdmin. Here I was able to edit my user account to use LDAP rather than using the password stored in the MySQL database by entering "@LDAP" into the password field. This worked well in fact.

One feature, however — automatic user creation — did not work so well. That is, if a new user logs in — a user that doesn't yet exist in the MySQL database, but does exist on the LDAP server — what the LDAP Hack does is create the new user in the MySQL database with a flag that says, "Get this user's password from the LDAP database." Logging in as a new user on my test Joomla server produced erratic results. I'm assuming that this had something to do with the lack of admin access to the MySQL database.

Still, we've accomplished some things here. For one, we've figured out a method for porting our current Mambo CMS to an LDAP-enabled Joomla engine. Secondly, we've shown, at least in theory, that this system can work with LDAP. The next step will be to try all this out on a copy of our live Mambo CMS on the actual web server. Hopefully, when we do that, access to the admin pages will function normally and the LDAP hack can be configured so that new users are properly added at login. If all goes well, our CMS will be authenticating to LDAP in the next post in this series.

If all goes well.
Sandbox and ACLs or: Why I Want to French Kiss Mikey-San

So I recently had a freelance project that involved my first experience with, among other things, Access Control Lists (which we will, from here on out, refer to as ACLs, 'cause I'm not typing that shit a hundred more times today). Briefly, ACLs allow more fine-grained control over file and folder permissions by defining multiple rules for multiple groups and/or users for any given object. ACLs are exceptionally cool. But they're also incredibly complex.

For my freelance project I was assigned the odious task of setting up a share on a Mac server, and this share would be readable by all, but its contents would not, unless explicitly allowed, be readable by members of a particular group. Let me try to clarify this, 'cause it took me a few days to get my head around it: Essentially we had three groups, which we'll refer to as Artists, Producers and Freelancers. Artists and Producers needed full access to everything on the share (which we'll call Share), and Freelancers needed read access. Freelancers, however, needed to be denied access to all subfolders of Share, including newly created folders. Later, if a member of Freelancers needed access, someone from one of the other groups would grant them access to the folder in question on Share.

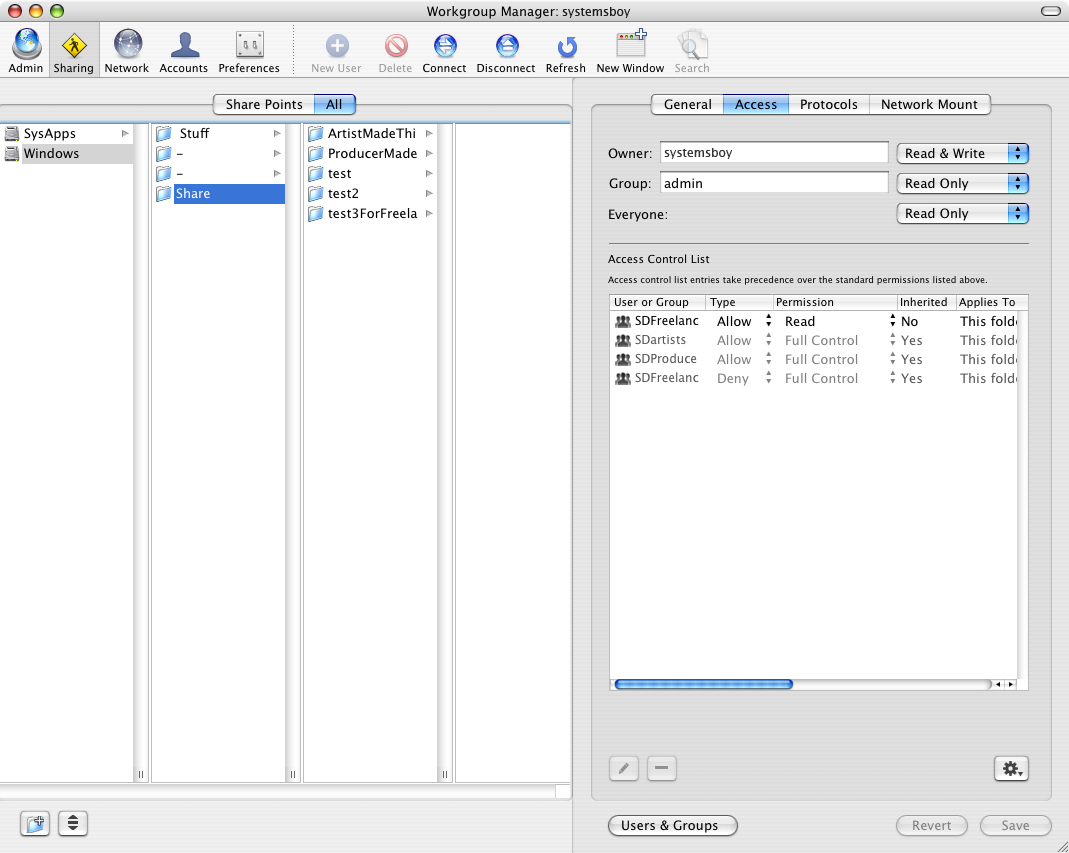
Complicated? You betcha! Impossible? Surprisingly, no. Though, if you try to do this with Apple's Workgroup Manager (which we'll just call WGM) you'll never be able to. The key lies with two concepts: rule ordering and inheritance. See, ACLs are ordered lists, and the first rule in the list wins. Additionally, "deny" rules always trump "allow" rules, with one crucial exception: explicit allow rules trump inherited deny rules. This was the magic that made our little scenario work. I did not see any mention of this in the Mac OS X Server documentation (though it's entirely possible I missed it). And I certainly did not see any way to reorder rules in the WGM application, inherited or not. Rather than from Apple, I got all my info on rule ordering and precedence from my new best-est pal in the whole wide universe, mikey-san of sightless and born.

Enter: Sandbox.

Sandbox is a cool, free, little utility whose sole purpose in life is to enable ACL management on non-server versions of Mac OS X. It even has some pretty informative documentation. Amazingly, however, Sandbox gives you way more and better control over your ACLs than Mac OS X Server's WGM app, particularly with regards to rule ordering. With Sandbox, you can explicitly set a rule as "inherited," and you can explicitly set the order of rules. You can't do either of these things in WGM, which is quite infuriating considering how important ordering is in ACLs.

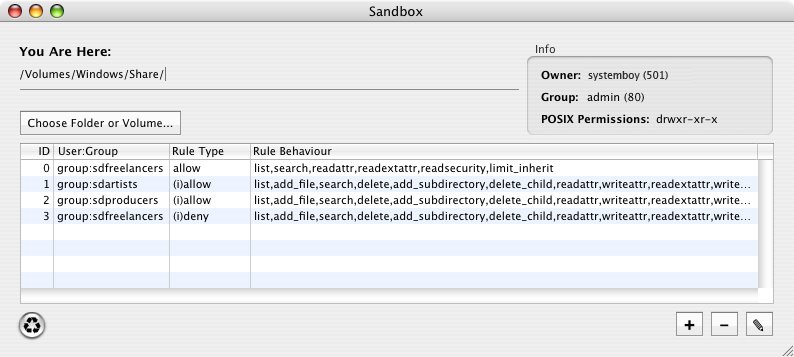
Like the Command-Line: This is How it Looks in Sandbox

(click for larger view)

So, using Sandbox, I created a rule for Share that gave full access to Share for Artists and Producers, and that forced inheritance of these permissions to any subfolders of Share (so Share and its subfolders are always accessible to Artists and Producers). Then I created an "allow" rule which granted Freelancers read permissions on Share, but which did not propagate those permissions to subsequent subfolders (so Share is readable by Freelancers, but none of its subfolders are — if this rule is not propagated, which it's not, there is no rule on subfolders, and POSIX permissions take over, granting "world," and thus Freelancers, read access to subfolders of Share, so we need a deny rule next). Finally, I created a "deny" rule for Freelancers that disallowed them access to Share and any of its subfolders. This rule is inherited and occurs before the "allow" rule (so denial of access is propagated to subfolders of Share, essentially acting like a umask, but does not apply to the actual Share folder). The key here is that, in order for this deny rule to not override the allow rule, it must be inherited (remember, explicit "allow" rules trump inherited "deny" rules), and, once it has been set to "inherited," it must occur before the deny rule. Neither of these astonishing feats can be accomplished with WGM. Both can with Sandbox.

That "Deny" is Out of Order: Here's How it Looks in WGM

(click for larger view)

And that is why I want to French kiss mikey-san. Whoever he is.

UPDATE:

All the above was done on a test machine. (Thanks be to the joys of education work that actually allows me to build test servers!) Putting this plan into practice was one more, extra, added layer of tricky. You see, the share on which we wanted to set this up was already in use by the client. Yup, it was already populated with all manner of data, none of which had any ACLs applied.

The final nail in this coffin was to propagate the ACLs in WGM. But this had to be done such that all subfolders and files had the inherited properties we wanted, but the top-level "Share" had it's original properties. Remember: our top-level Share should be readable by Freelancers, but it's descendants should not, so the top-level permissions are different from all the subfolders and files. Had we simply propagated our "Share" permissions through the entire tree, Freelancers would have read-access to everything, and this was verboten. The trick was to remove the "allow:read" rule from "Share" and then propagate permissions. After the propagation was finished (about 10-15 minutes later — it was a large amount of data) we reapplied the "allow:read" rule to "Share" and all seems cool.

This may seem like an obvious solution, but I wanted to make a note of it as ACLs — at least complex ones like these — seem to befuddle even the most logical minds, and certainly mine. So for thoroughness' sake, there you have it.

Sync Firefox Bookmarks with Google Extension

A few days ago I wrote about a method for publishing iCal calendars sans .Mac. In that vein, here's a quick plug for the Google Browser Sync extension for Firefox. The extension will allow you to save your Firefox cookies, saved passwords, bookmarks, history and tabs and windows — or any combination of these — to Google's servers. For the more security conscious, you can even opt to encrypt this information. The extension will then sync this information with any other Firefox browser that has the plug in installed and configured.


Google Browser Sync: Finally!
(click for larger view)

I've been using this for a few days now, and I'm loving it. For the first time in my life my home and work bookmarks are finally in sync. It's a thing of beauty, and something I've longed for for quite a while. Of course, if you're a Safari user, you're out of luck. But in my opinion, this is just one more reason you should really consider switching to Firefox. While Firefox may be slower than the others — and bear in mind that the Google Browser Sync will slow launch times down just a wee bit while it syncs your info — it's far and away the most full-featured and stable browser I use. It loads virtually everything and never, ever crashes. And now it syncs with itself via Google.

Don't bother getting me a Christmas gift; I have everything I need.

Remote Network (and More!) Management via the Command-Line

There's a lot you can do in the Terminal in Mac OS X. It's often the most expedient method of achieving a given task. But I always get stuck when it comes time to make certain network settings via the command-line. For instance, in the lab all our machines are on Built-In Ethernet, and all are configured manually with IP addresses, subnet masks, routers, DNS servers and search domains. But sometimes we need to make a change. While I suppose it's easy enough to go over to the computer, log in, open the System Preferences, click on the Network pane, and configure it by hand in the GUI, this becomes a problem when you have to interrupt a staff member busily working on whatever tasks staff members tend to busily work on. Also, it doesn't scale: If I have to make a change on all 25 Macs in the lab, the above process becomes tedious and error-prone, and exponentially so as we add systems to the network. When performing such operations on multiple computers, I generally turn to Apple's wonderful Remote Desktop. But ARD (I'm still using version 2.2) lacks the ability to change network settings from the GUI. Fortunately, there is a way.

ARD comes with command-line tools. They're buried deep in the ARD application package, for some reason, making them a serious pain to get at, but they're there and they're handy as hell in situations like the above. You can use these tools to set up virtually anything normally accessible via the System Preferences GUI. Including network settings. There are two main commands for doing this:
systemsetup for making general system settings, and networksetup for making network settings.

Both commands are located in the folder:

/System/Library/CoreServices/RemoteManagement/ARDAgent.app/Contents/Support

You'll need to type the full path to use the commands, or cd into the directory and call them thusly:

./networksetup

Or you can do what I do and add an alias to them in your .bash_profile:

alias networksetup='sudo /System/Library/CoreServices/RemoteManagement/ARDAgent.app/Contents/Support/networksetup'

There are no man pages for these commands, but to get an idea of what they do and how they work, just run them without any arguments and they'll print a list of functions. Or you can run the commands with the -printcommands flag to get an abbreviated list of functions. There is also a PDF reference online. The syntax for these tools is not always straightforward, but by and large looks something like this:

networksetup -option <"network service"> <parameter 1> <parameter 2> <etc...>

For "network service" you'll want to enter the name of the interface as it's called in the preference pane, surrounded by quotes. You also need to run these commands as root. Here's an example that makes network settings (IP address, subnet mask and router, respectively) for Built-In Ethernet:

sudo networksetup -setmanual "Built-In Ethernet" 192.168.1.100 255.255.255.0 192.168.1.1

Here's an example for setting multiple search domains:

sudo networksetup -setsearchdomains "Built-In Ethernet" systemsboy.blog systemsboy.blog.net

Why these tools aren't included in the GUI version of ARD is almost as confounding as the fact that they're buried deep within the guts of the app. The wordy syntax doesn't help either (I'd much prefer typing "en0" to "Built-In Ethernet" any day). But despite being difficult to access, I've found these commands to be unbelievably useful from time to time. And though I certainly do hope to edify TASB readers as to the existence and use of these tools, I must confess, my main reason for this post is as a reminder to myself: I'm always forgetting where the damn things are and what the hell they're called.

So there you have it. Remote network (and more!) management via the command-line.

Please resume admin-ing.

UPDATE:
So a scenario occurred to me which might be a bit tricky with regards to the above information: Say you want to change the router setting for your 25 lab macs. Nothing else, just the router. The obvious way to do this would be to send a networksetup command to all of your Macs via ARD. The problem is that the networksetup command has no way of specifying only the router address, without setting the IP address and subnet mask as well. The only way to set the router address is with the -setmanual flag, and this flag requires that you supply an IP address, subnet mask and router address, respectively:

sudo networksetup -setmanual "Built-In Ethernet" 192.168.1.100 255.255.255.0 192.168.1.1

If you send this command to every Mac in your lab, they'll all end up with the same IP address. This will wreak havoc in numerous ways, the worst of which will be the fact that you now have lost all network contact with said lab Macs and will have to go and reset all the IP addresses by hand on each machine. The solution is to specify the current IP address on each machine, which you could do by sending an IP-specific version of the command to each machine individually. But that sort of defeats the purpose of using ARD in the first place. A better way is to substitute a variable in place of the IP address option in the above command. The variable will get the IP address of the machine it's run on. This is what I use:

ifconfig -m en0 | grep "inet " | awk {'print$2'}

This command sequence will get the IP address for the en0 interface, which is what Built-In Ethernet uses. If your machines are on wireless, you can use en1 in place of en0:

ifconfig -m en1 | grep "inet " | awk {'print$2'}

So, instead of entering the IP address in the networksetup command, we'll enter this command sequenc e in backticks. The command we'd send to our lab Macs would look something like this:

sudo networksetup -setmanual "Built-In Ethernet" `ifconfig -m en0 | grep "inet " | awk {'print$2'}` 255.255.255.0 192.168.1.1

This will set the subnet mask and router address — both of which would generally be consistent across machines on any given network — but will leave the unique IP address of each machine intact. You can try this on your own system first to make sure it works. Open the Network System Preference pane, and then run the command in Terminal. You'll see the changes instantly in the preferences pane, which will even complain that an external source has changed your settings. If all goes well, though, your IP address will remain the same while the other settings are changed. You should now be able to safely change the router address of all your machines using this command in ARD (remember to specify the full command path though). Save that sucker as a "Saved Task" and you can do this any time you need to with ease.

Huzzah!

Publish iCal Calendars on the Internet for Free

Addendum: Aug 21, 2010

I wanted to let folks know that the information in this post is pretty old, and these days there are better options for sharing calendars. Most notably, Google Calendar sharing. The method used in the post you're about to read is a one-way share in which the publishing computer is the only one that can make changes, and all subscribing calendars have read-only access. This is limited, I know, but at the time it was readily available and plenty of functionality for most people who just wanted a free option for calendar sharing from their main machine. Nowadays, though, Google Calendar sharing gives the same level of ease-of-use and true, server-based, two-way calendar syncing, allowing you to edit you calendars from any computer (including iPhones). It truly is superior, and I highly recommend it.

So, if you're still interested in the one-way Box.net method, I leave it up for posterity. Otherwise, Google Calendar sharing is probably the way to go.

Happy calendaring!

Original Post

Ever want to share your iCal calendars on the 'net? Well, I have. Unfortunately, iCal publishing requires a server that runs the WebDAV protocol. Apple's .Mac offers such a service, and .Mac, indeed, uses WebDAV. But .Mac costs money, and I've never seen a compelling enough reason to pay for it. Setting up iCal on a Macintosh server is also fairly easy, but it's an awful lot of trouble to go to and a waste of resources if all you're interested in is sharing your iCal calendars. But today I've discovered an easier — and free — way to do just that.

Box.net offers 1 GB of online file storage for free. The data is accessible via the web, so you can get to it from any connected computer. They have a web interface for accessing you files. On Windows they also have client software that lets you access your data as though it were on a shared volume, right from the Desktop. But on the Mac you can connect to it right from the Finder using the ever-trusty "Connect to Server..." command (or command-k) in the "Go" menu. How is this possible you ask? Because the Mac Finder has WebDAV accessibility built right in. And because box.net shares it's data via the WebDAV protocol.

If you haven't put it together yet, this means you can use your free box.net account to host your iCal calendars. The process would go something like this:

  1. Sign up for a free box.net account. It's easy as pie, and faster than a bat out of hell. Give 'em your email, a password, and you are d-o-n-e, done. (NOTE: Obviously, to share the calendar with others, they'll need the URL and the box.net username and password, so you might want to make sure you set this account up with information you don't mind giving out. Use a second, private account for stuff you want to keep secure.)
  2. To access your box.net account via the Finder, click "Connect to Server..." and type "https://www.box.net/dav" into the URL field of the connection window. (NOTE: Some folks are unable to connect using the "https" protocol. If this fails for you, try it with "http" instead. Either one works for me.) You will be prompted for username (the email you used to register the account) and your box.net password. Enter these and your online data will appear on the Desktop in a volume called "dav" which will be pre-populated with a few default folders.
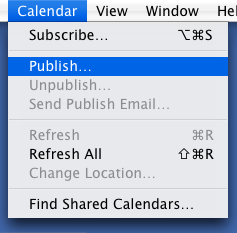
  3. But to publish your iCal calendar, just open iCal, select the calendar you want to share and choose "Publish" from the "Calendar" pulldown menu.

    (click for larger view)

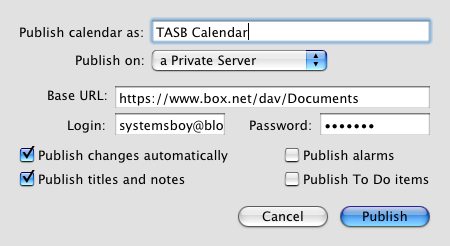
  4. In the dialog box that follows, name your calendar (or keep the existing name if it suits you), for "Publish on:" select "Private Server," enter "https://www.box.net/dav/Documents" for the "Base URL:" and enter your box.net username and password in the "Login:" and "Password:" fields respectively. (NOTE: Here, too, secure http sometimes fails, so if you have trouble try using "http" instead of "https".)
  5. You might also want to check or uncheck some of the checkboxes at the bottom, depending on your needs.
  6. Finally, hit "Publish" to publish the calendar. You'll see your calendar now sports the "I'm Published" icon just to its right.
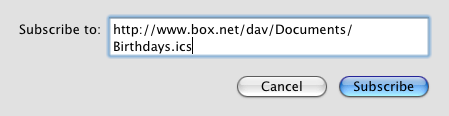
  7. To subscribe to this calendar (say, from another computer), choose "Subscribe" in the"Calendar" pull-down menu.
  8. In the URL field enter:

    "http://www.box.net/dav/Documents/YourCalendar.ics"

    (where "YourCalendar" is the name of the calendar you just published).

    (click for larger view)

    Be careful NOT to enter "https" here. Just use the "http" protocol to subscribe. Enter your box.net username and password at the prompt and you'll suddenly find yourself subscribed to your own calendar.

    (click for larger view)

  9. A final note: Updates to the calendar take some time. Hitting refresh too often (like every minute or so) on a subscribed calendar will generate an error. Just wait and let iCal do it's thing and it will keep everthing up to date. No pun intended.

I'm not sure if many people will find this useful. But to me it seems like a good way to share you iCal calendars, either between remote locations (like work and home) or between groups of people, like friends, family or members of an organization. And hey, it's completely free. How cool is that?

UPDATE 1:

A lot of people have written in with great suggestions, alternatives to and variations on this process, including a page for similarly configuring Sunbird. Please read the comments for more useful information.

UPDATE 2:

I have added a note to the publishing instructions in this article regarding the use of "https". In a nutshell, both publishing and subscribing sometimes fail because of problems with secure http. This is something I receive a lot of comments about and I just wanted to clear things up. If you are having trouble either publishing or subscribing, try doing so using "http" instead of "https". While somewhat less secure, it tends to be far more reliable.