Firefox 3.1b3 Beta Features Tear-Off Tabs

I've been using the latest Firefox Beta pretty much exclusively now for about a week. It's been surprisingly stable and a bit faster as well.

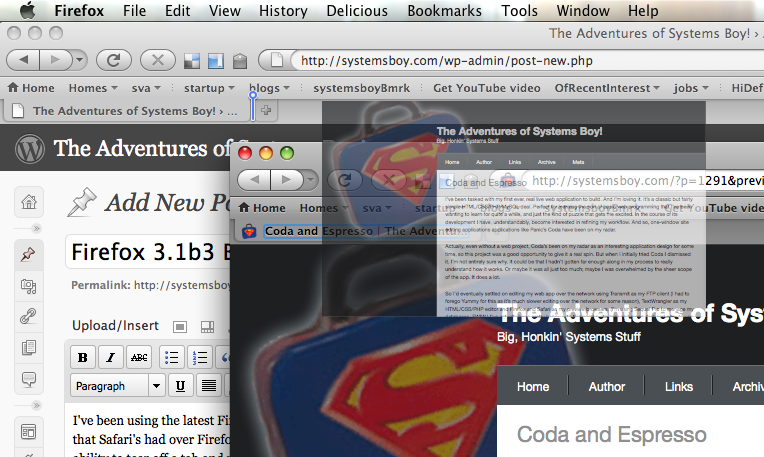
Firefox Beta 3.1

But it also has a surprising new feature: tear-off tabs. This is something that Safari's had over Firefox for some time, and it's something I've actually longed for. It's often very convenient to be able to tear off a tab into its own window.

Firefox Beta 3.1: Tear-Off Tabs! Yay!

And better still is the ability to tear off a tab and put it into the tab bar of another window. Finally! This is awesome!

UPDATE:

Another minor, but still cool, new feature of Firefox 3.1 is that middle-clicking a tab in a window with only a single tab open will actually close the tab and, thus, the window. Previously, middle-click did nothing in such a circumstance.

Design vs. Data

There's a fascinating discussion that ties nicely into into my recent post on workflows, that's recently picked up since Doug Bowman decided to leave Google. Mr. Bowman is a designer, and has had some issues regarding Google's priorities. The general takeaway from all this has been that Google places engineers' data and statistics above the aesthetic sensibilities of the designer.

While I don't work at Google, and I certainly don't know the actual priority Google places on design, I've certainly had my gripes about their products in the past. And the main gripe therein generally revolves around design. Google's applications — particularly their web apps such as Gmail — do function wonderfully. Gmail, in fact, works in ways that I've begun to find superior to desktop apps, even ones designed by Apple. The problem is, Google's apps look like ass.

Yes, I have switched almost entirely to Gmail. Why? Because, frankly, it works better for me. It scales beautifully and offers features that no other client does without me ever having to manage it locally. Why, then, am I just making this move now, after years of doing it the Desktop way? Well, partly because Google's apps look like ass. And if it's email we're talking about, that's an ass I have to look at all frickin' day long.

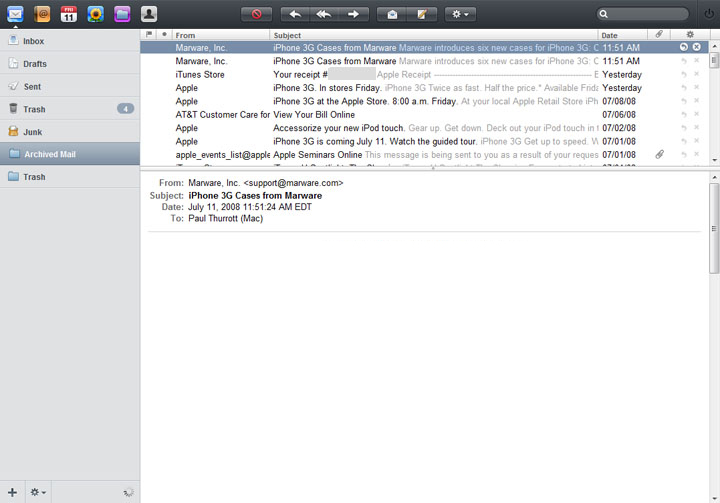
I should say, Gmail has gotten appreciably better over time. But it still lacks anything even remotely resembling the charm of an Apple-designed desktop application. Or even the panache of many websites, Apple's MobileMe among them.

Apple's MobileMe Mail

I understand the approach they're taking — blue links, black text, efficiency and clarity. And that's great. But — and I hate that I'm even saying this — it's so very Web 1.0. Seriously. It's time to get over it.

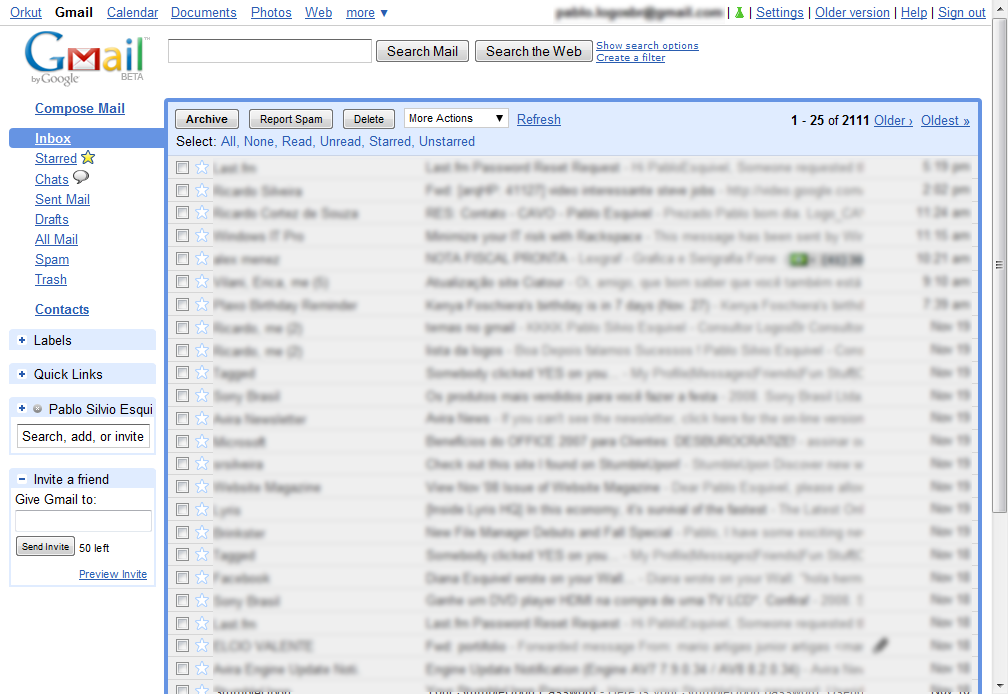
Gmail's Latest Default Theme

I don't advocate Gmail aping Apple's mail clients by any means. But I do wish they'd pay a bit more attention to design. Or, if they are paying attention to design, do it better. The comparison here is stark. Google's mail app looks like it came out of 1997. Which, in fact, it did. How is it that the best, most amazing mail client you can get for free looks like Windows 2000? It's sad. Big, clunky, grayscale buttons; gray lists of black text; a blue border around the conversations list? This could look better, guys. I'm sure of it.

But why does all this matter? Well, I'm of an opinion, frankly, that the way things look is a part of your environment, and ugly things contribute to an ugly environment. And that ultimately hurts usability. I think that if Google were to make attempts to improve the design of Gmail — and I'm not just talking about themes here — they would discover numerous ways to improve the usability along the way. And that would make users happy. And that's good for everyone.

Apple is, in fact, a great example of the triumph of design in usability as well as corporate success. Their computers since the clear-plastic, fruit-flavored iMacs have made everyone else look antiquated and backwards. This has thrust their image ahead of their competitors and has ultimately gained them marketshare.

I've said it before, and I'll say it again. The way things look is important. It speaks volumes. Google's been immensely successful, and deservedly so. They make great stuff. But if they want to be even more successful they should really start taking design seriously. It's a niche they're leaving wide open for companies who do.

iMovie 8

As promised at the announcement of iLife '09, I've been poking at the new iMovie. It's an interesting beast, like nothing I've ever seen. And I agree with many of the comments floating around about it. One thing that's been noted is that, because iMovie 8 is completely unlike traditional professional NLEs, the learning curve is greater for folks who are used to typical, timeline-based editing systems. I'd say that's about right. But, while it would be extremely difficult to do the sort of editing I normally do — very precise, layered cuts editing — iMovie offers such a completely different paradigm to video editing that it actually changes the way I think about and approach editing. And I have a sneaking suspicion I'll use it to create something very different than what I've made in the past.

iMovie 8: Icon

No Save

John Gruber recently wrote about what he calls "Untitled Document Syndrome," the phenomenon wherein a user opens an application and begins working in a new, untitled document before ever saving it. He specifically cites the iLife suite as being one in which the saving of documents is handled automatically, rather than foisting the burden on the user:

"Everything on your computer is ultimately saved somewhere in the file system. But that doesn’t mean that you want to handle the actual filing by hand for everything. You don’t really want to know a lot of things about the specific technical details of how your data is saved, or if you did, you’d write your own app."

Gruber talks in particular about iPhoto and iTunes being applications that remove the need for the user to really think much about where their files are. But iPhoto and iTunes are cataloging applications. You don't ever really create documents in either of these apps. In fact, it could be argued that the entire point of iPhoto and iTunes is to remove the filesystem from the equation. They are aggregators, of a sort. The approach becomes much more novel in an application that is document based, an application like, say, iMovie. Certainly one of the things that heralds just how radical iMovie 8 is is the fact that there is no "Save." It simply doesn't exist.
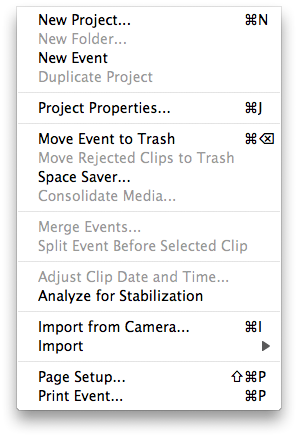
imovie8-nosave

This is the direct antithesis of Final Cut, in which you can work for hours having never saved your project. This can be a real problem in FCP, as capture scratch folders get named for the project the media was captured from. So the first thing I always tell my students is that they must name and save their project when they create it. This is something I often overlook myself, creating projects with media folders called "untitled project" all over the place. It's getting a bit annoying. iMovie 8 is further evidence that Apple is far more willing — or perhaps more interested in — innovating at the consumer level than they are at the pro level. When was the last time we've seen such thought given to a pro application? When was the last time someone tried to actually make pro editing easier and more intuitive, rather than just adding features. (The answer is with the introduction of Motion, several years ago. But that's another story.)

Interface Layout

But the lack of Save is only the beginning. Along with opening and saving documents, iMovie 8 eschews the traditional multi-track timeline editor found in most non-linear suites. The timeline has been the mainstay of NLEs for ten or so years now, and removing it is jarring to someone who's been using one for those ten years. In fact, my first question was, "Just how am I supposed to edit without a timeline?"

iMovie 8: Blank Slate

Actually, iMovie 8 is not as radically different from Final Cut Pro as it first appears. By default, the application is divided into four main quadrants. The upper left quadrant contains your Project, which could best be described as, yes, a timeline. The lower left quadrant is labeled the "Event Library," but it's really just an iMovie-centric representation of your files on disk (it can even be toggled into a mode that shows a more traditional view of the filesystem, should you desire it).
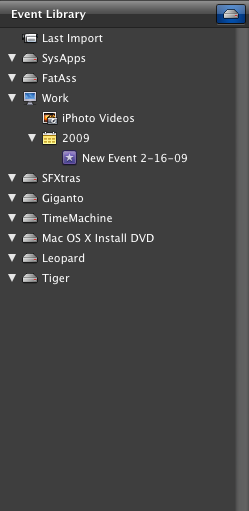
iMovie 8: Event Library Expanded

The lower right quadrant is where you keep all the source material for a given project, just like in FCP's Browser. And finally, the upper right quadrant is a viewer window for watching either individual media or edited clips, as well as for cropping clips (like a combination of Final Cut's Viewer and Canvas windows). If you hit the magic toggle button you can even swap the locations of the Events and Projects sections.
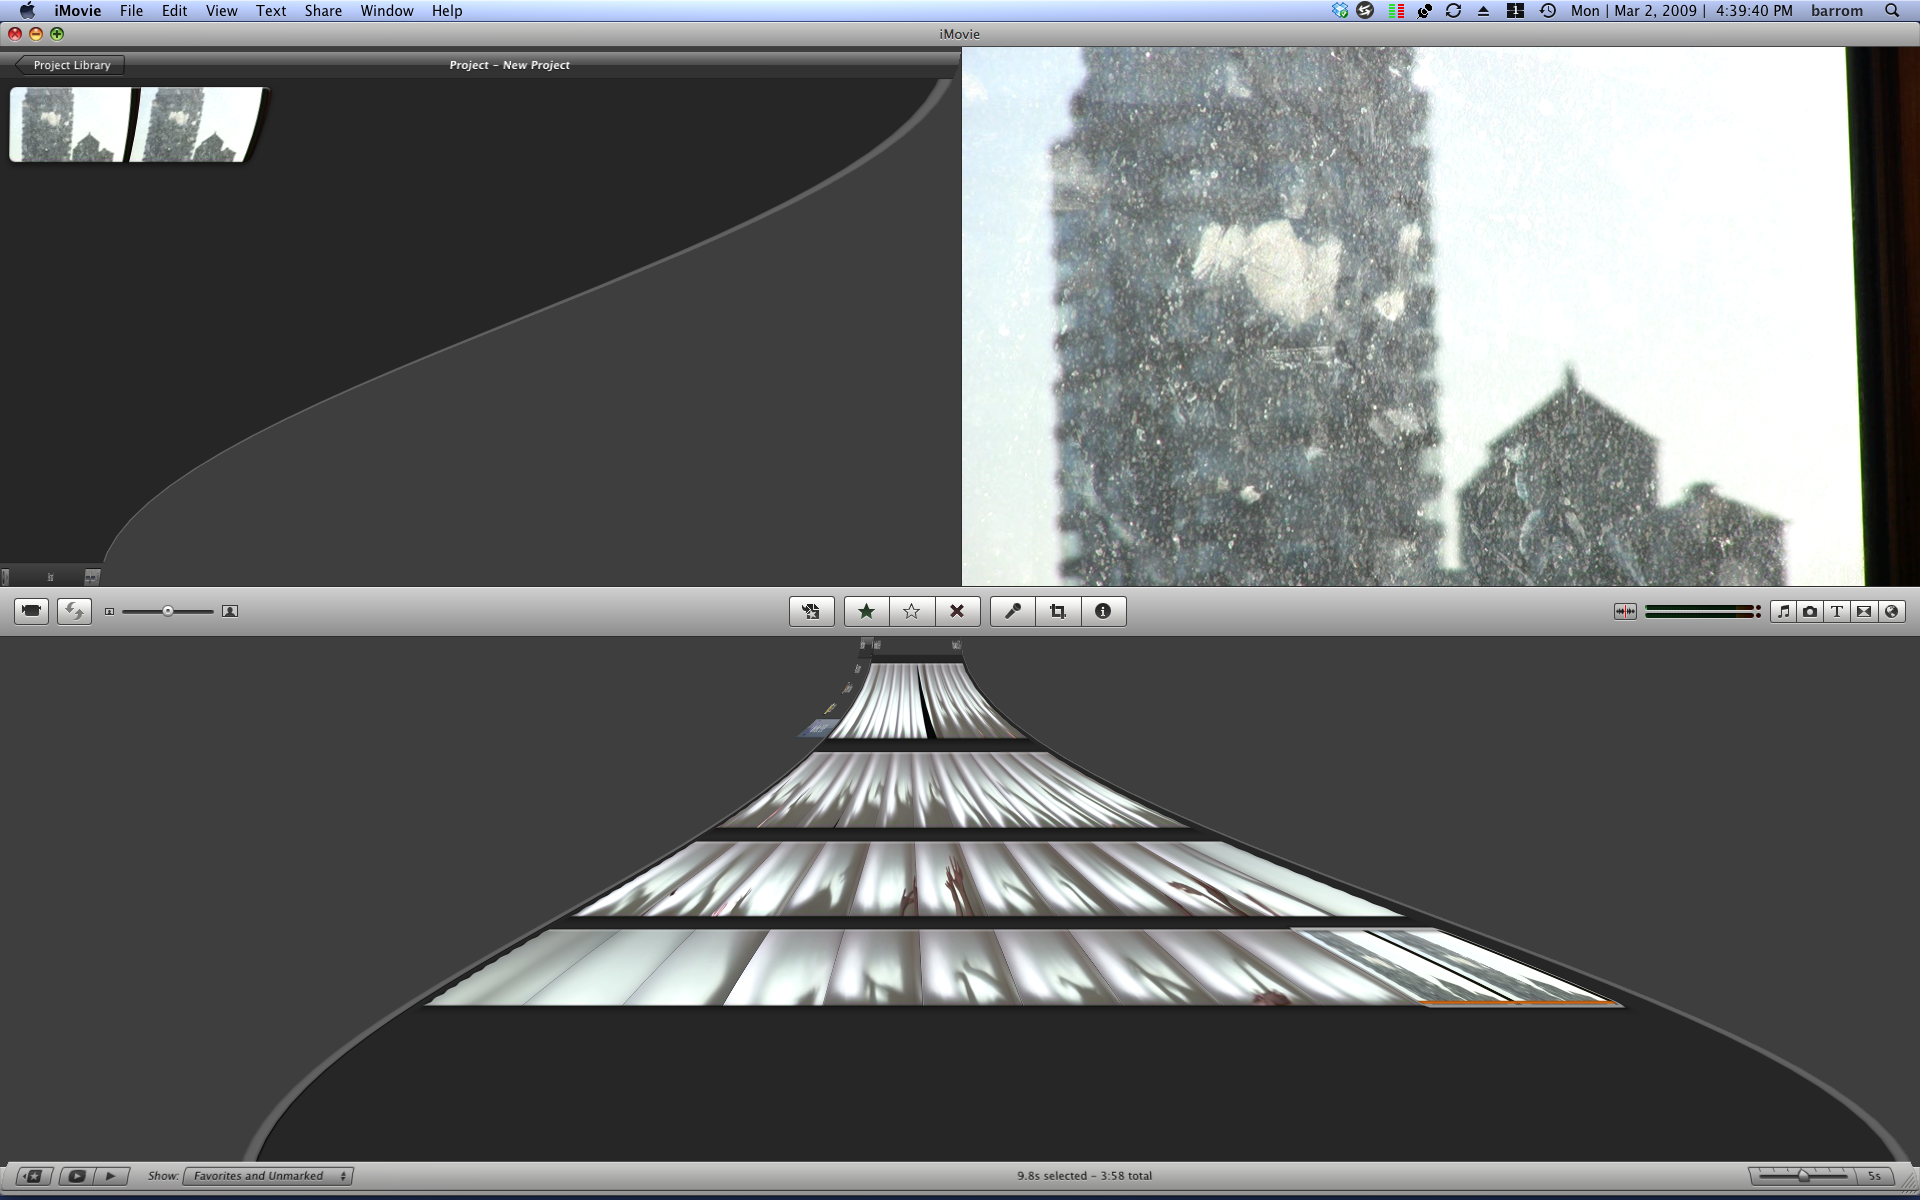
iMovie 8: Toggle Windows

Doing so arranges the application in a way that very closely resembles the default layout of Final Cut Pro, except without all the ugliness (Final Cut looks like iMovie's ugly sister). That simple act, actually put me much more at ease in the program.
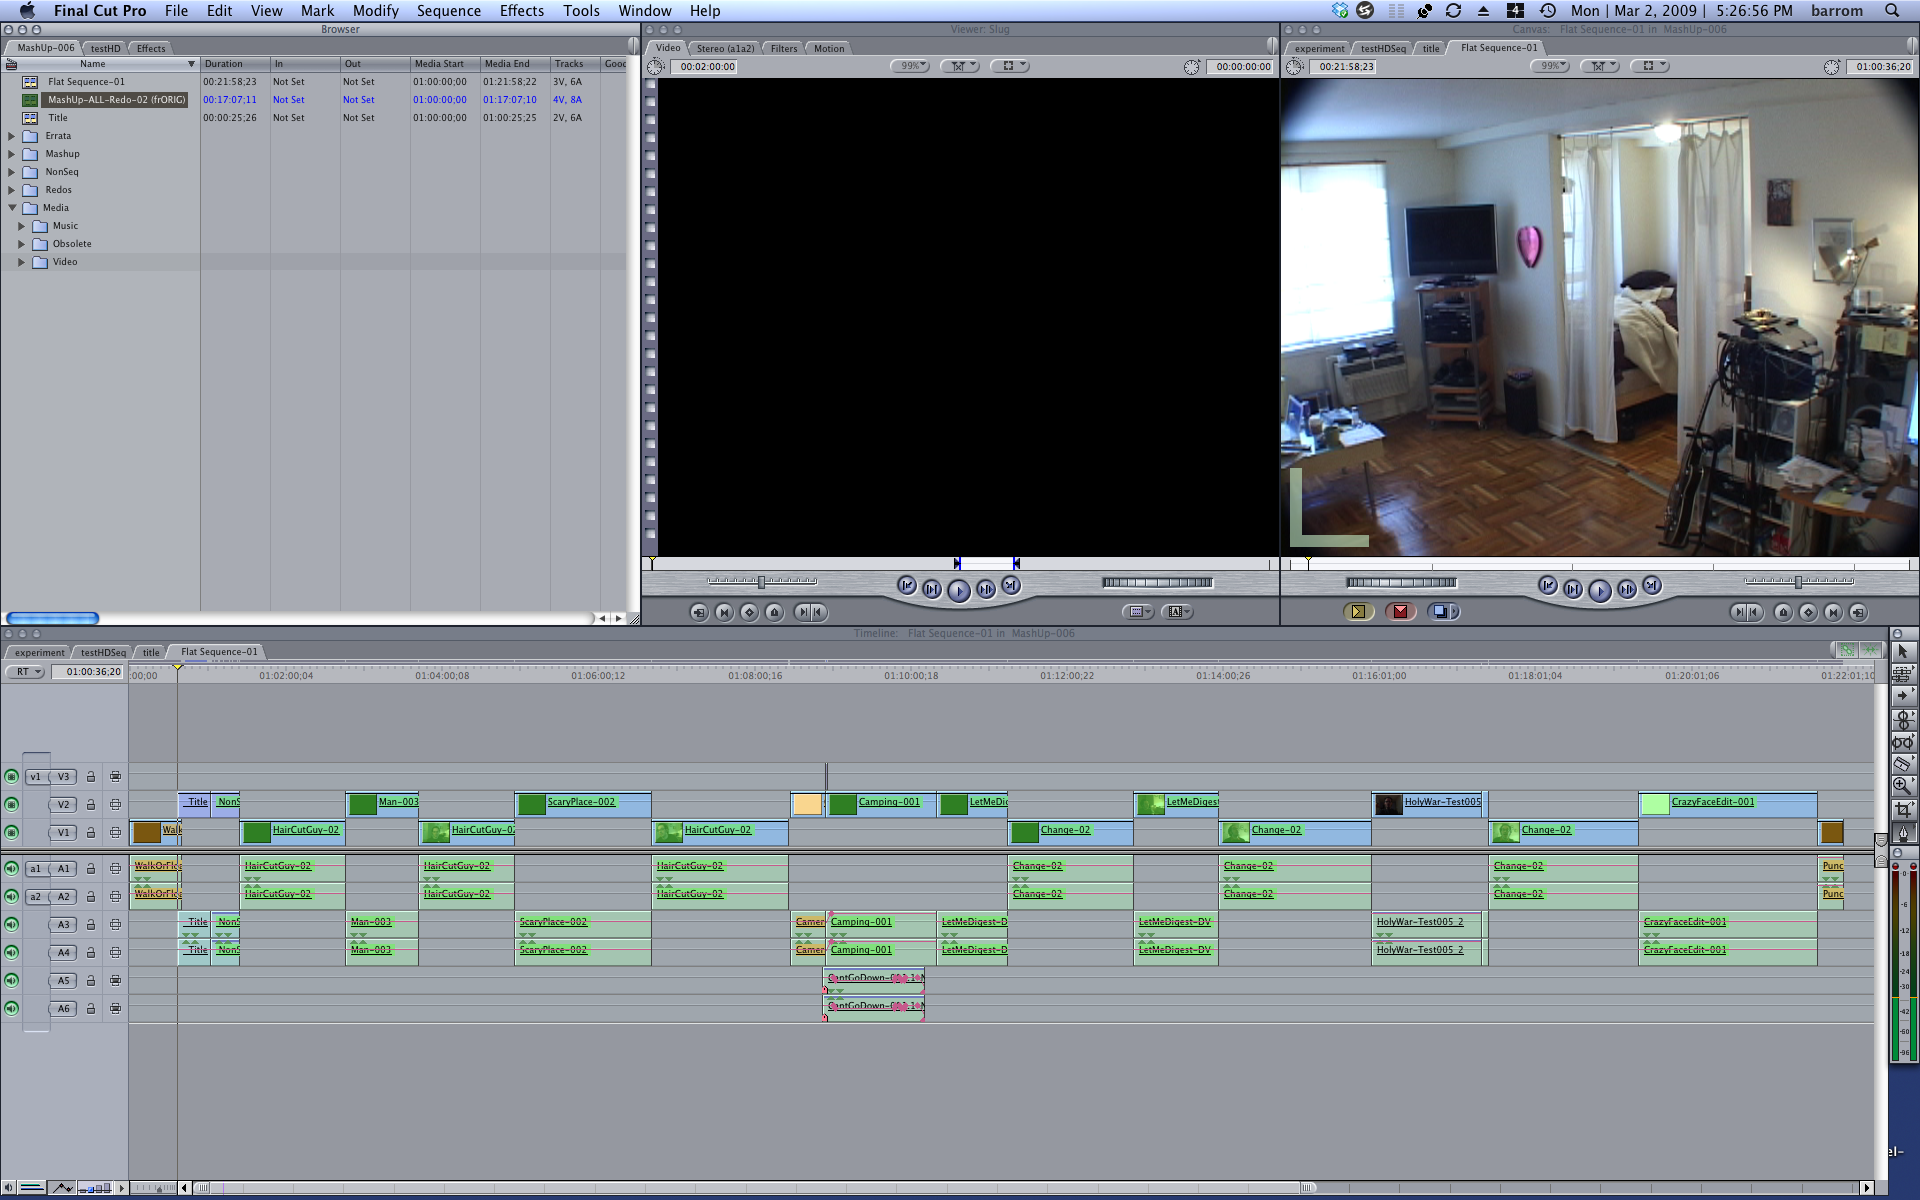
Final Cut Pro: Window Layout

Basic Usage

To get started in iMovie you'll want to make a New Project. New Project creation is the only time you'll ever be asked to — or have need to — save anything, so don't get used to it. And iMovie keeps the location of your projects close to the vest. Suffice to say, they'll be saved somewhere sensible. (Oh, alright! They're stored in your Movie folder in your home account. Happy now?)
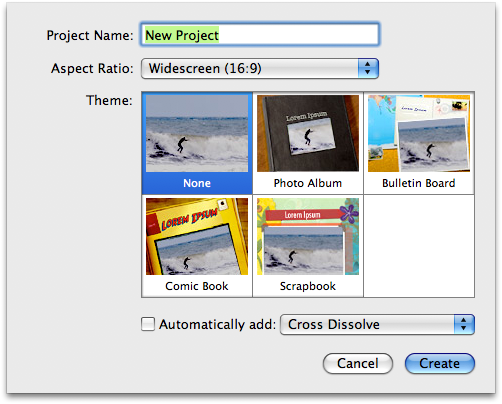
iMovie 8: New Project

To populate the app, iMovie 8 will find any media you've stored in your iPhoto (not iTunes) library and present it to you for import from the Event Library, which is a nice touch that we're starting to really see a lot of throughout Apple's applications. If you're in the habit of keeping video clips in iPhoto or one of the other locations automatically searched by iMovie, you'll be ready to roll right out of the box. More traditional means are available from the File menu as well, where you can simply import video and audio files. And, as always, drag-and-drop is available for getting media to into the project. You can, of course, digitize material from supported cameras as well. And here again, unlike in Final Cut Pro, the media goes someplace sensible, and the user is never bothered with the question of where.
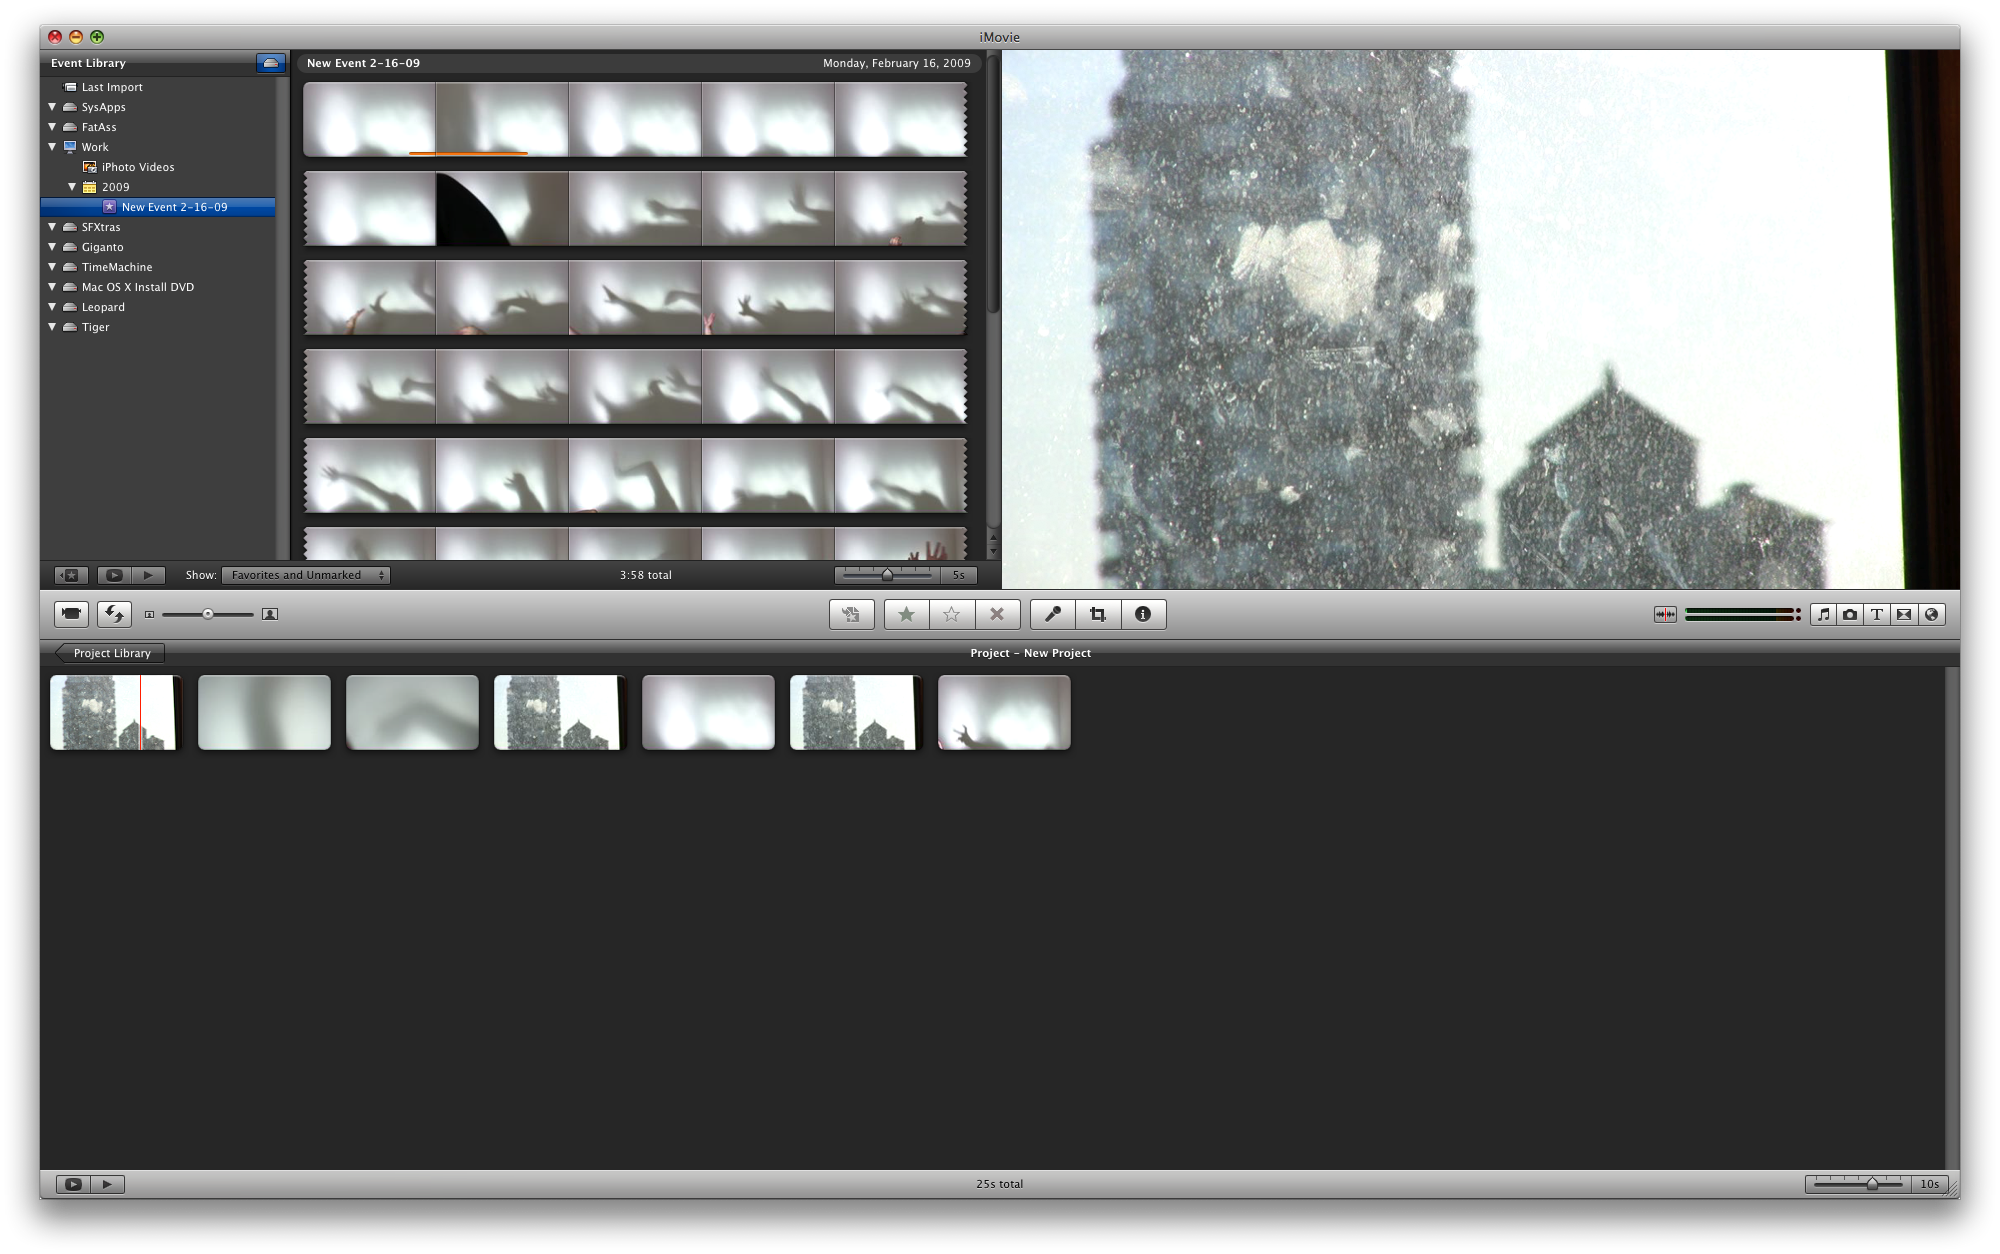
iMovie 8: The Populated Interface

Once you have some media, it's time to begin editing. Rolling over clips with your mouse will scrub through the clip. (I must admit I prefer this to having to click, hold and drag like you do in Final Cut. It's another example of someone really rethinking things in this app in ways that no one has in some time at the pro level. Since when does adding clicks — making things harder — make an application "professional grade?") To put media in your "Project" (timeline) simply drag and drop it from the Event Library. Dragging a clip onto another clip presents you with some sensible insert and/or overwrite options, but otherwise the clips will go in the chronological order you place them in. To grab portions of clips, click and drag on the clip. Handlebars appear that represent the in and out points. Dragging a clip so highlighted will insert only that portion of said clip. Portions of clips that are already in use are underscored with an orange line. Much of this is entirely alien to a Final Cut editor, but it's so intuitive, and in many cases preferable, that I truly wish some of these behaviors would make it into FCP.
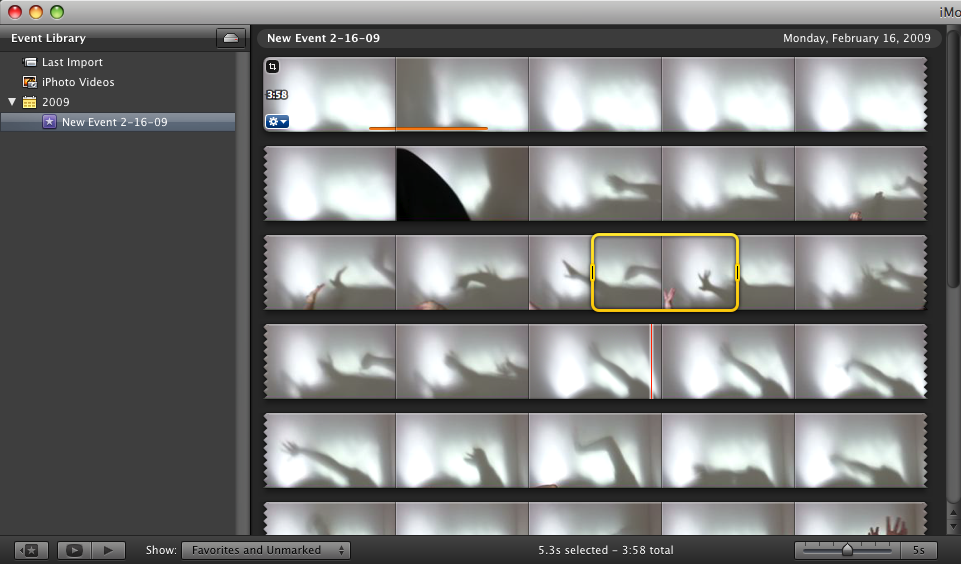
iMovie 8: Trimming

Clicking the little blue widget in the lower left corner a clip also brings up a contextual menu that will allow you to make further clip-specific edits.
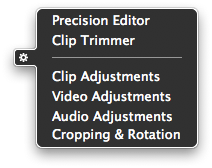
iMovie 8: Contextual Menu

And here you can find the now famed Precision Editor, which I suppose I'd better mention on fear of public flogging. Yes, the precision editor gives you precise control over edits, allowing you to trim down to the frame if need be. I never used the previous version of iMovie, so I can't speak to life before the precision editor, but I can imagine it would be immensely frustrating.
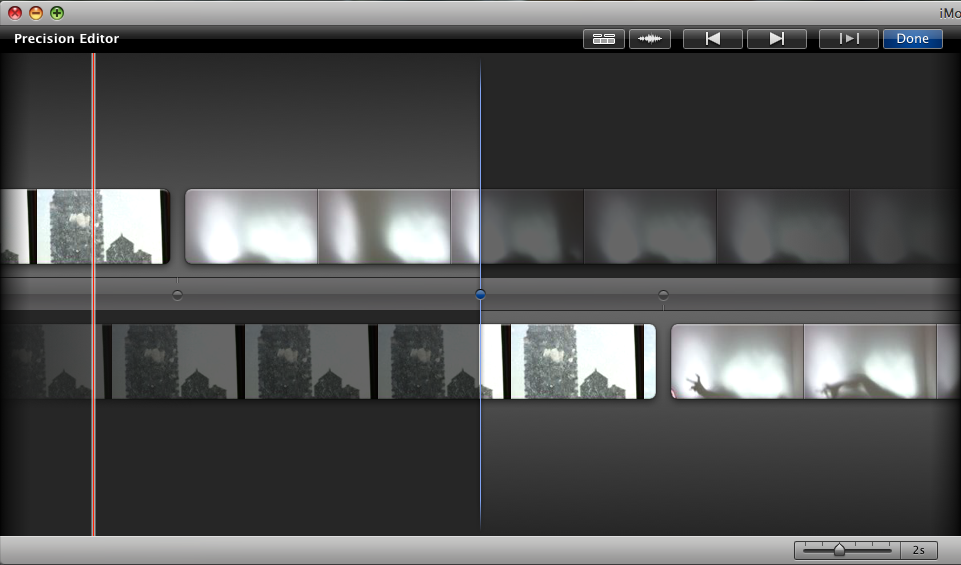
iMovie 8: Precision Editor

Output options for iMovie are good and, like so much about the app, somewhat innovative. The Share menu yields: standard Quicktime export options (good!); Final Cut XML options (awesome!); and a simple "Export Movie" option that allows for easy export to a number of popular formats in a variety of sizes and quality levels (coolio!). There are also options for sharing your movie with other members of the iLife suite, like iDVD for instance.
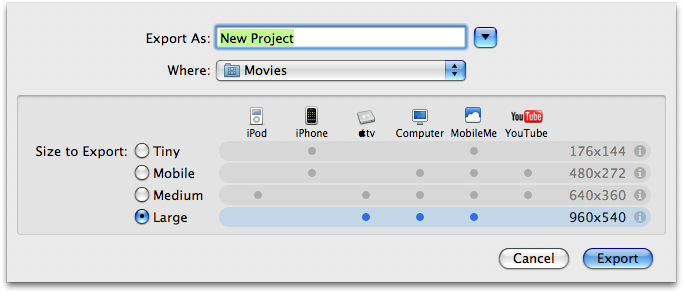
iMovie 8: Export Movie

A Lack of Time

The big difference between iMovie 8 and its Pro brethren, in my mind anyway, is less the lack of timeline as the fact that there seems to be no sense of numeric time anywhere in the editor. There is no visual indicator of time as there is in a Final Cut timeline. This is a decided problem if you need the sort of absolute precision you see on network television, where a 30 second spot must be exactly 30 seconds. For many folks this might not be a big deal. But if you're used to seeing it, it's scary to suddenly have no timecode in your timeline. In fact, the sense of time is almost completely absent in the Project view.

iMovie 8: 2 and 4 Second Clips

Unless you adjust the number of frames per thumbnail in the project browser, a 2 second clip will be the same sized blob as a 4 second clip. This makes it hard to get a sense of the timing of the piece by simply looking at it, and it's probably my biggest problem with the application. Editing is all about time and timing, and iMovie fails to understand this in a big way.

That said, there is something kind of fun about letting go of all that control. You know? In iMovie 8 you're forced to get a sense of the timing of the piece by watching your piece. This, at least for me, allowed for a true shift in focus. Suddenly I found myself much more engaged in the sound and imagery than the timing. And in my own sense of time, rather than that of actual, precise, numeric time. This was somewhat magical. Even though I found myself unable to edit the way I normally do, I gradually found myself editing in new ways, ways I'd never considered before. It's hard to describe, but some sort of mindshift had occurred.

From my vantage point, which is that of a longtime Final Cut Pro user who finds that application getting old and stale, there is much to like about iMovie 8. Most importantly is what it represents, and that is a very fresh approach to video editing. While iMovie 8 may not be the perfect editor, it's so beautiful and so extermely clever and fun to use that I see myself using it for its own sake, and conforming certain projects to its limitations. I can almost see it becoming part of my creative process, at least to some extent. That's no small feat.

For an application to allow an artist to approach his medium with fresh eyes is, in my opinion, quite possibly the highest compliment imaginable. iMovie 8 may just be such an application. If nothing else, it's an extremely fresh, yet entirely discoverable approach to digital video editing. In some ways it's the iPhone of NLEs. I only hope Apple brings some of the same fresh thinking and innovation to the next version of Final Cut Pro and the suite of Pro Apps as well.

Safari 4 Beta Destroyed My Finder

I don't know about anyone else, but after installing the new Beta of Safari 4 my Finder kept dying. Poor beast would lock up. I'd force quit her and she'd never come back to life. The only way I could get her back was to either A) hard reboot with the metal button on the front of my tower (a PPC G5, mind you), or B) SSH in and: sudo killall loginwindow

Safari 4 Beta: The Finder Killer

Bummer.

Since uninstalling it, using the included uninstaller (which also hung after the "Restart" prompt, forcing a hard reboot), the problem has cleared up.

Anyway, this is just my experience, but word to the wise people. Beta means beta.

Oh well. Moving on.

Extending an Airport Network

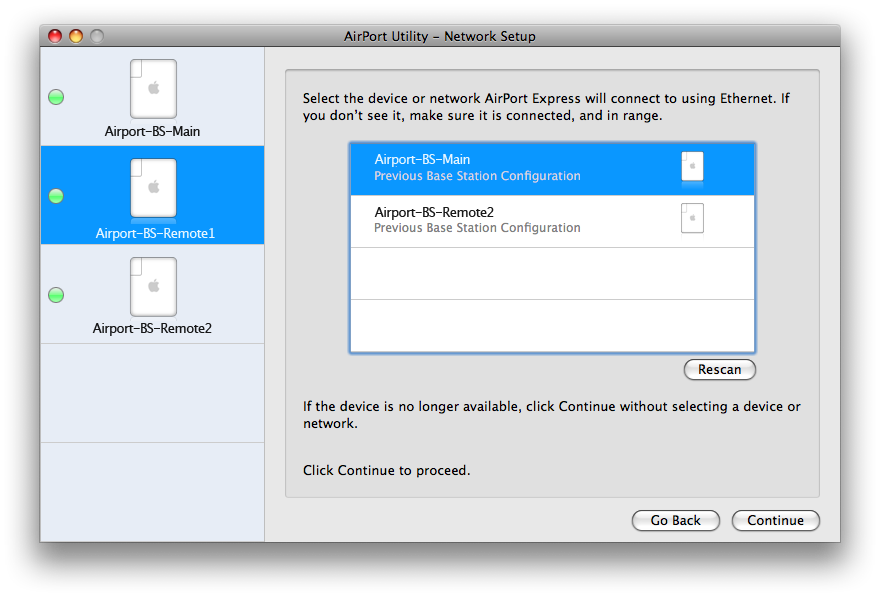
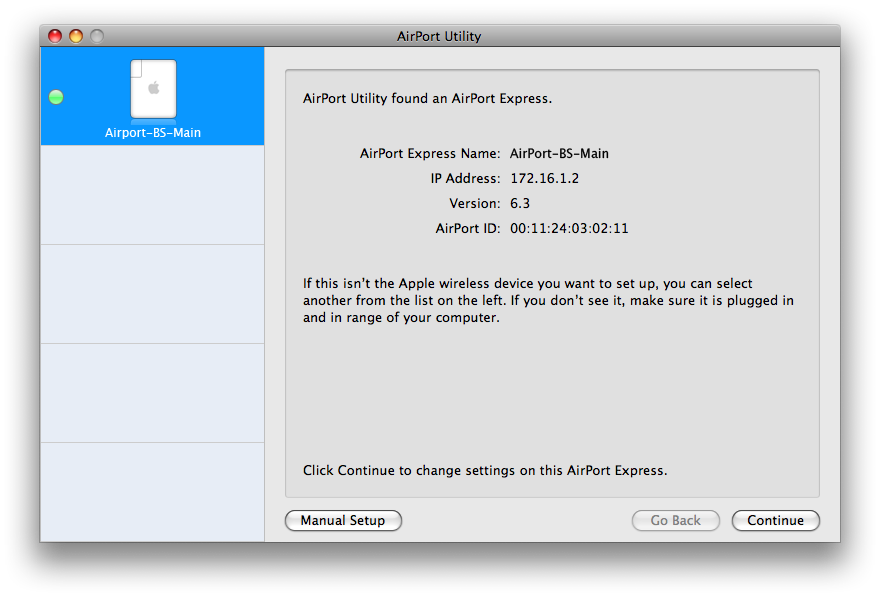
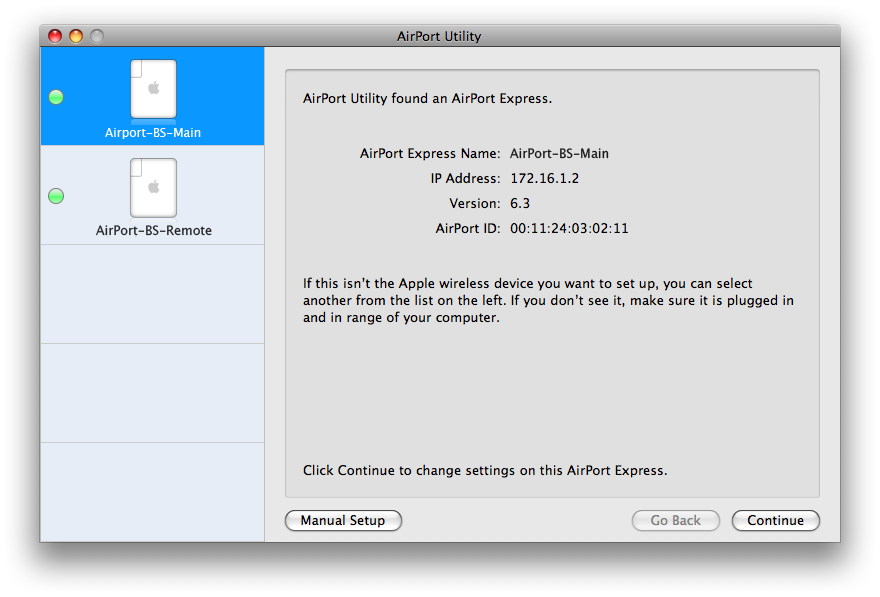
UPDATE: It looks like there's actually a better way to extend an Airport network than the one I've outlined in this article. A few people have written in to tell me that they've had great success using the configuration "wizard" available in the Airport Express Utility. I haven't tried using this myself, but it does look exceedingly easy. So, definitely the thing to try first before you go into the twelve page set of instructions below.

Thanks to all who sent this in. I'll leave the detailed instructions below for anyone who's interested.

Man, I wish I'd known about this sooner.

Airport Utility Wizard: Quite Possibly A Better Way

A while back I got a second Airport Express in the hopes of using it to extend my existing wireless network. Doing so was fairly tricky and not anything like I'd expected.

I had initially believed — perhaps naively — that the process would essentially be a matter of joining the new Airport to the existing network the same way you'd add a new computer. This is decidedly not the case. It turns out that, in order to extend an wireless network across multiple Airports, you must set up what is known as a WDS network. Let's take a look at the process, which for me anyway, was fraught with difficulties that this article will hopefully help me (and you) avoid in the future.

Set Up the "Main"

The "Main" WDS Airport is the unit that will host the wireless network. It's the one that's connected to your cable modem, or your router, with an Ethernet cable. You'll connect the "Remote" Airports to the Main wirelessly, allowing them to extend the network. It's important to remember, as you continue with this process, that each new wireless node must be added to the main node in order for it to be seen by the WDS network. Ready? Here we go!

Wired Connection

  1. The easiest (and Apple-recommended) way to do all this is with a direct, wired connection, so grab yourself an Ethernet cable and connect your computer to the Airport that you want to be the Main unit. This is not absolutely necessary, but it will help to mitigate any problems you might have as you go making changes, since you won't be dependent on a wireless connection. You can skip this if it's easier.

Base Station Settings

  1. Once connected, open Airport Utility. You should see the Main at the very least.

    Extend Airport: Main Window

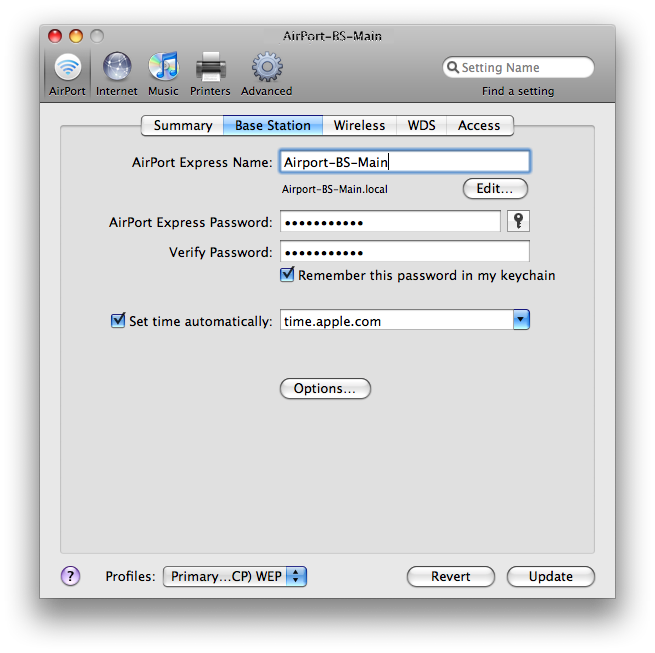
  2. Double-click the unit to open its configuration window. Begin in the Base Station tab by setting the name and password of the unit.
  3. The name will be the name of the base station itself, and the password is the one used to log in to and change the unit's settings. I recommend naming it something like "Airport-BS-Main" for easy identification. As always, make the password memorable and secure.

Extend Airport: Main Base Station Settings

Wireless Settings

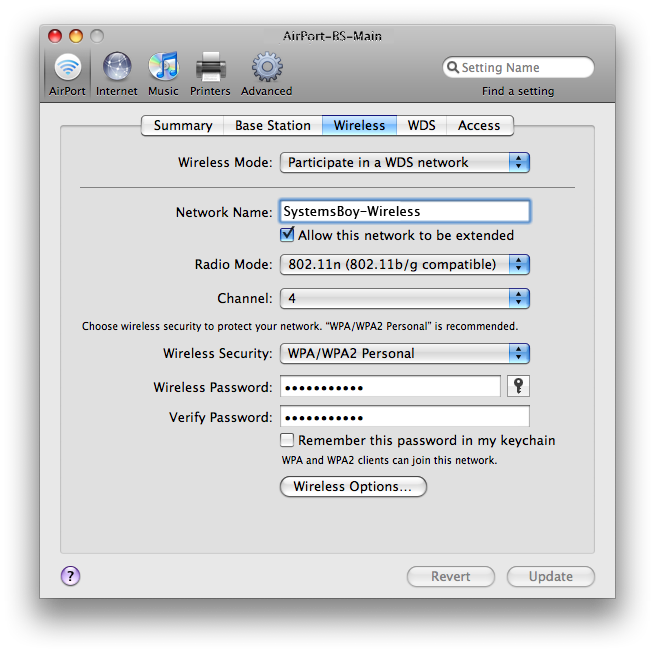
  1. Under the Wireless tab, set the Wireless Mode to "Participate in a WDS Network." This is the key, really, to the whole shebang.
  2. It's also important to check the "Allow this network to be extended" checkbox.
  3. Here you'll also want to give the network a name. This is the name you'll use when joining the wireless network from your computer, so choose wisely and for the ages. I like clear nomenclature, so I went with "SystemsBoy-Wireless." Clever, huh?
  4. Set your encryption method. The Airport recommends WPA/WPA2 Personal, which I like too. Secure and compatible.
  5. Choose a channel, or use the default. It's all good unless you're in a super-crowded area, in which case trial and error is your friend.
  6. Finally, be sure to set your wireless network's password. This is the one used for joining the network from your computer. Two names, two passwords. I know it's confusing. But you're smart. You'll figure it out.

Extend Airport: Main Wireless Settings

WDS Settings

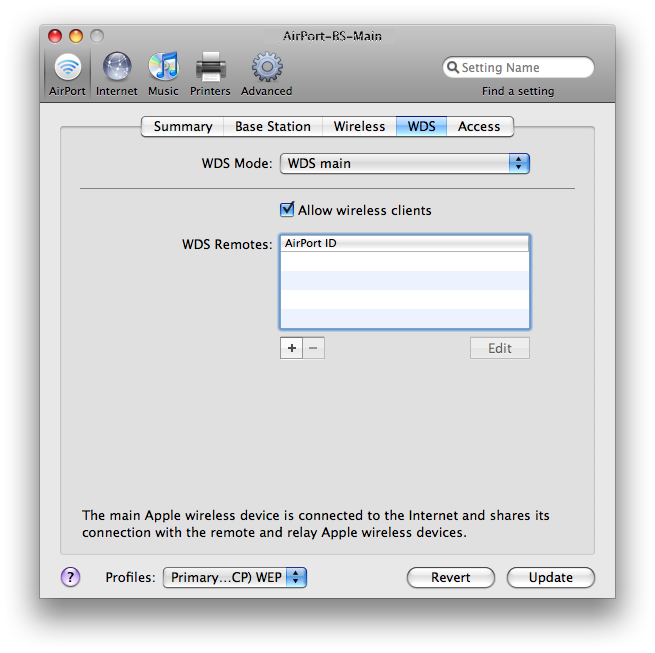
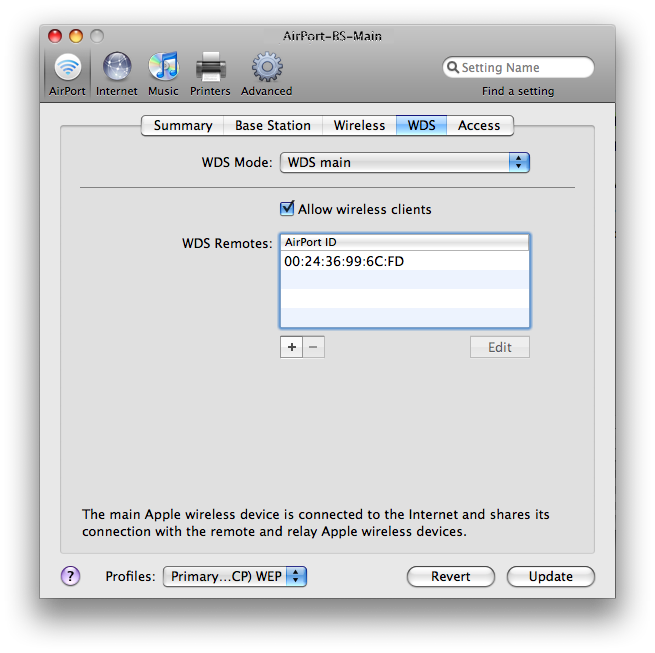
  1. Under the WDS Settings tab the Main WDS Airport's WDS Mode should be set to "WDS main."
  2. "Allow wireless clients" should be checked.
  3. You'll add your WDS Remotes later, once we've plugged in the other Airport in the next section.

Extend Airport: Main WDS Settings

Update and Test

  1. Once all this is set up, hit the "Update" button.
  2. The Airport will go and make the settings you just configured, which will require it to reboot.
  3. After the reboot, remove the Ethernet cable connect between the Airport and your computer, and (re)connect the Airport to the network/router.
  4. If all went well, you should see the classic green light on flashing on the Airport unit. You should also be able to connect to the Airport network wirelessly. If you don't or can't, reboot the unit again for good measure. Make sure you give it enough time before trying to connect to it. Five minutes should be more than enough.
  5. If, after all this, you still don't see the green light, you'll need to troubleshoot your connection in Airport Utility, which is beyond the scope of this article. But it's important to get the Main unit working as a wireless base station before proceeding. Everything depends on it. So get it working using the above settings.

Troubleshooting Tips

  1. Occasionally, after a reboot, the Airport will not be visible in Airport Utility. Simply restarting Airport Utility will sometimes fix this, so be sure to try it if you can't get connected.
  2. For whatever reason, this process took a few tries for me. So remember, a direct, wired Ethernet connection will aid in troubleshooting. This is recommended by Apple, and I concur.
  3. Don't forget, if need be, you can completely reset the Airport back to factory defaults and start from scratch using the super-secret reset button on the top of the device.

Set Up the "Remote(s)"

The Airport(s) you use to extend your wireless network are referred to, in WDS parlance, as "Remotes." With WDS Remotes you'll be able to join your wireless network — the same one you set up on the Main, with the same network name and password — from well beyond the reach of the Main. Remotes should, obviously, be placed within signal reach of the main, but far enough away to actually extend the reach of the network.

Wired Connection

  1. As before, this will all be a lot easier if you connect to the WDS Remote Base Station using an Ethernet cable. Be sure you're Remote has power, then connect with Airport Utility.

Base Station Settings

  1. With Airport Utility opened, you should still see Main, as well as the newly added, unconfigured Remote.
  2. Double-click the Remote unit to open its configuration window. Begin in the Base Station tab by setting the name and password of the unit.
  3. As before, the name will be the name of the base station itself, and the password is the one used to log in to and change the unit's settings. I called this one "Airport-BS-Remote" for easy identification.

Airport Utility: Airport Remote

Wireless Settings

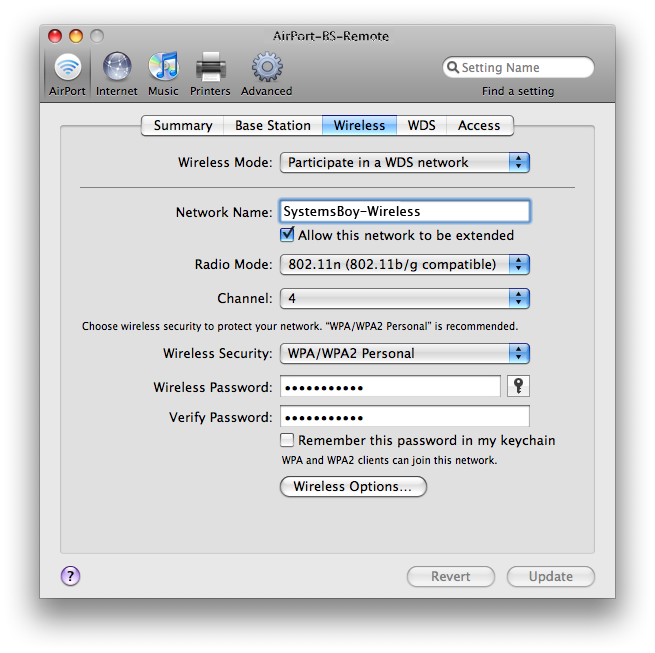
  1. Under the Wireless tab, as before, set the Wireless Mode to "Participate in a WDS Network."
  2. Here too, check the "Allow this network to be extended" checkbox.
  3. For the Network Name you should enter the same name you entered for your Main — in my case, "SystemsBoy-Wireless." Remember: different Base Station; same wireless network.
  4. Your encryption method for the Remote should also match that of the Main.
  5. The channel can be whatever you want it to be.
  6. And, finally, the wireless network's password should match that of the Main Base Station.

Extend Airport: Remote Wireless Settings

WDS Settings

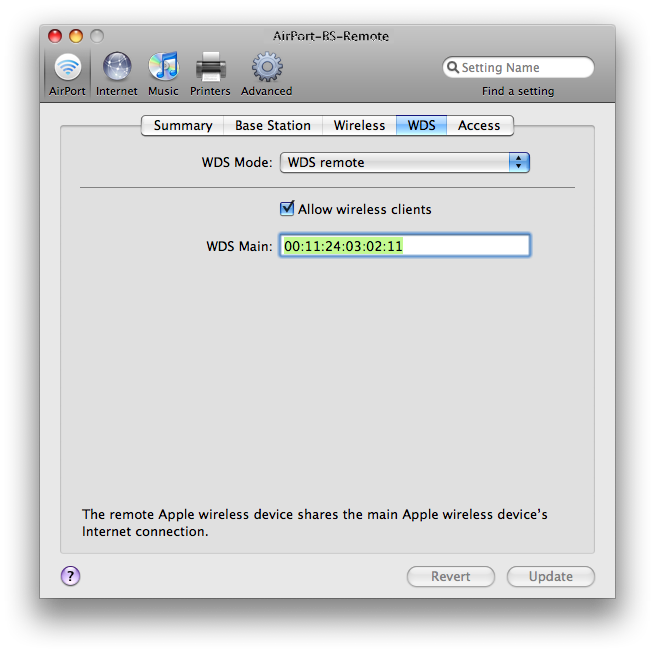
  1. Under the WDS Settings tab the Remote WDS Airport's WDS Mode should, not surprisingly, be set to "WDS remote."
  2. "Allow wireless clients" should be checked.
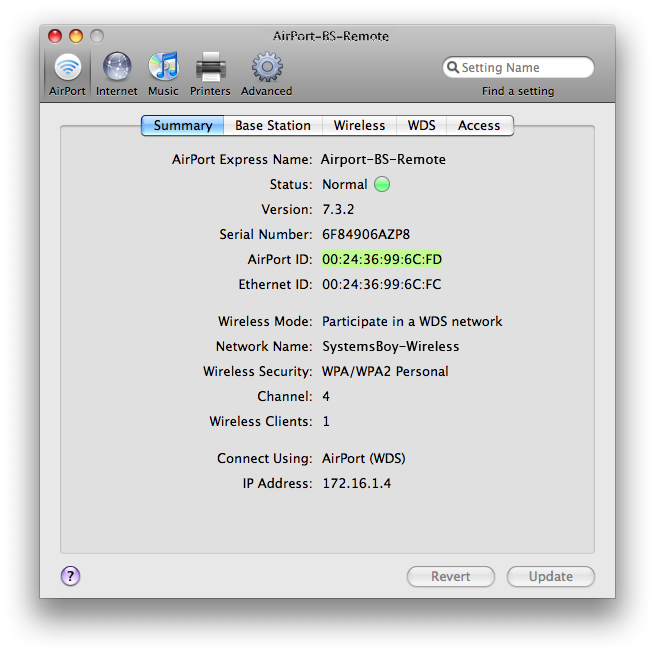
  3. And in the last box, labeled "WDS Main," you should the MAC (hardware) address of your WDS Main Airport. This can be found under the Summary tab of the configuration window. Each Base Station has two MAC addresses, actually: an "AirPort ID" and an "Ethernet ID." You want the Airport ID.

Extend Airport: Remote WDS Settings

Add the Remote to the Main

  1. Now here's where it gets a bit tricky. Both the Remote and the Main need to be aware of each other. So, now that your Main is configured, you should be able to see it in Airport Utility and open its configuration window. Open it so that both the Main and Remote configuration windows are open.
  2. Go to the Remote's summary window and copy its Airport ID to the clipboard.

    Extend Airport: Remote Airport ID

  3. Now go to the Main's WDS tab and hit the little plus sign to add a remote and paste the Airport ID number into the field.

    Extend Airport: Adding Remotes to Main

Finish

  1. With both Airports' roles now configured, and with each aware of the other, you should be good to go. Hit the "Update" button on the Main, wait a minute, and then hit on the Remote (so that the Main reboots first)
  2. Wait for them to reboot.
  3. Once rebooted the Remote should have a green light under the Status field of its Summary tab and should have no errors. If it complains about something, make sure the Main is working well over wireless, then give the Remote another reboot. If this still doesn't work, move on to troubleshooting.
  4. Once everything seems to be functioning without error, place the Remote Base Station in its intended physical location.
  5. Pat yourself on the back! You've just extended your Airport wireless network!

Make no mistake, extending your Airport network is a big, fat, sloppy pain in the booty. It's also extraordinarily handy in many cases where a single Airport just isn't cutting it.