Firefox 3.1b3 Beta Features Tear-Off Tabs

I've been using the latest Firefox Beta pretty much exclusively now for about a week. It's been surprisingly stable and a bit faster as well.

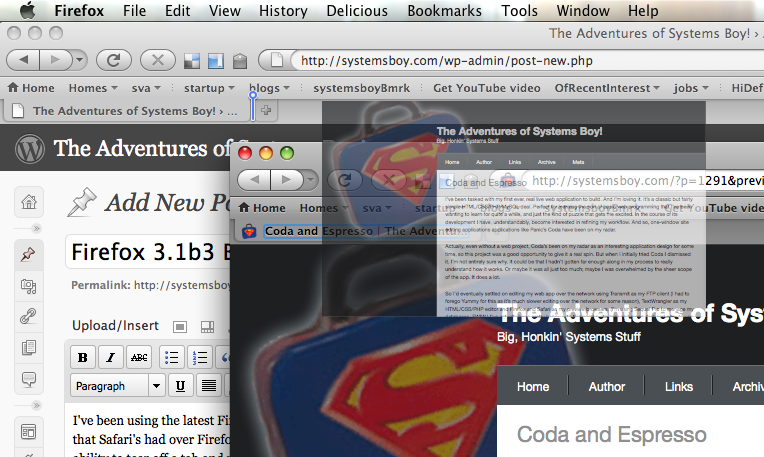
Firefox Beta 3.1

But it also has a surprising new feature: tear-off tabs. This is something that Safari's had over Firefox for some time, and it's something I've actually longed for. It's often very convenient to be able to tear off a tab into its own window.

Firefox Beta 3.1: Tear-Off Tabs! Yay!

And better still is the ability to tear off a tab and put it into the tab bar of another window. Finally! This is awesome!

UPDATE:

Another minor, but still cool, new feature of Firefox 3.1 is that middle-clicking a tab in a window with only a single tab open will actually close the tab and, thus, the window. Previously, middle-click did nothing in such a circumstance.

Design vs. Data

There's a fascinating discussion that ties nicely into into my recent post on workflows, that's recently picked up since Doug Bowman decided to leave Google. Mr. Bowman is a designer, and has had some issues regarding Google's priorities. The general takeaway from all this has been that Google places engineers' data and statistics above the aesthetic sensibilities of the designer.

While I don't work at Google, and I certainly don't know the actual priority Google places on design, I've certainly had my gripes about their products in the past. And the main gripe therein generally revolves around design. Google's applications — particularly their web apps such as Gmail — do function wonderfully. Gmail, in fact, works in ways that I've begun to find superior to desktop apps, even ones designed by Apple. The problem is, Google's apps look like ass.

Yes, I have switched almost entirely to Gmail. Why? Because, frankly, it works better for me. It scales beautifully and offers features that no other client does without me ever having to manage it locally. Why, then, am I just making this move now, after years of doing it the Desktop way? Well, partly because Google's apps look like ass. And if it's email we're talking about, that's an ass I have to look at all frickin' day long.

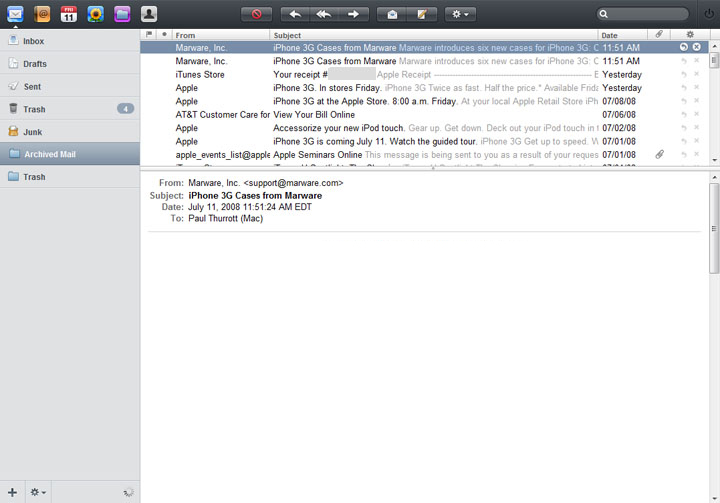
I should say, Gmail has gotten appreciably better over time. But it still lacks anything even remotely resembling the charm of an Apple-designed desktop application. Or even the panache of many websites, Apple's MobileMe among them.

Apple's MobileMe Mail

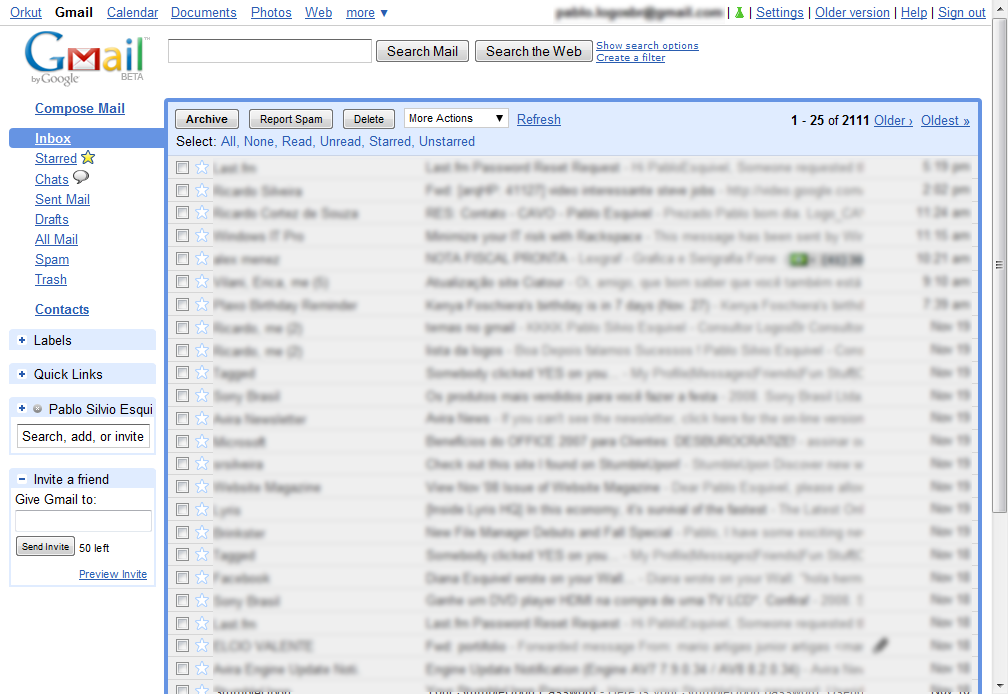
I understand the approach they're taking — blue links, black text, efficiency and clarity. And that's great. But — and I hate that I'm even saying this — it's so very Web 1.0. Seriously. It's time to get over it.

Gmail's Latest Default Theme

I don't advocate Gmail aping Apple's mail clients by any means. But I do wish they'd pay a bit more attention to design. Or, if they are paying attention to design, do it better. The comparison here is stark. Google's mail app looks like it came out of 1997. Which, in fact, it did. How is it that the best, most amazing mail client you can get for free looks like Windows 2000? It's sad. Big, clunky, grayscale buttons; gray lists of black text; a blue border around the conversations list? This could look better, guys. I'm sure of it.

But why does all this matter? Well, I'm of an opinion, frankly, that the way things look is a part of your environment, and ugly things contribute to an ugly environment. And that ultimately hurts usability. I think that if Google were to make attempts to improve the design of Gmail — and I'm not just talking about themes here — they would discover numerous ways to improve the usability along the way. And that would make users happy. And that's good for everyone.

Apple is, in fact, a great example of the triumph of design in usability as well as corporate success. Their computers since the clear-plastic, fruit-flavored iMacs have made everyone else look antiquated and backwards. This has thrust their image ahead of their competitors and has ultimately gained them marketshare.

I've said it before, and I'll say it again. The way things look is important. It speaks volumes. Google's been immensely successful, and deservedly so. They make great stuff. But if they want to be even more successful they should really start taking design seriously. It's a niche they're leaving wide open for companies who do.

The Saga of the New Web Hosting Provider

As I mentioned a while back, I recently switched to a new web hosting provider, Media Temple. I wanted to provide a bit more detail as to why.

About a month-and-a-half ago I was uploading some new content to my personal site, which hosts a fair amount of video and audio for download, on my old web hosting provider, Web Hosting Buzz, when suddenly I was unable to connect to my site, either via FTP or the web. This had happened before, and I was starting to get concerned, so I decided to start a Live Chat session with tech support. After some poking around, the technician was able to determine that my site was available to everyone but me, the owner, and that my uploads had resulted in the blocking of my IP address. Seems they only allow a certain number of connections, and my FTP client (the venerable Yummy FTP) was set beyond their threshold. The tech person I was chatting with helpfully advised me to set the number of concurrent sessions to two or less. I set mine to one. He unblocked my IP address and all was again well with the universe.

Cut to the next day: Wash, rinse, repeat. Same problem, only this time the tech online told me that I was in violation of their acceptable usage policy, and directed me to the Disk Usage Provision section of that policy:

"90% or more of your content on your website must be linked from an HTML or similarly coded web page where all content is freely available to the public. Your website consists of web pages of a standard design, essentially HTML based text and graphics. Downloadable files, media, streaming content or any file which consumes more than 500kb of space must not exceed 10% of your total used disk quota." [Emphasis added]

Yikes!

This time the technician informed me that I had too many files that exceeded 500kb, and that I would need to remove all media that was in violation of this policy. Funny thing was, I'd been in violation for months. Why had no one informed me? Why was this suddenly a problem? I asked the tech. He said it had been their mistake, but that it was my fault for not having read the policy.

Ah, customer service! Ya gotta love it!

In fact, I had read the policy, but I'd kinda glossed over the whole, "You can't actually, feasibly use the total amount of disk space we claim to give you," part. I mean, really. Who would think that a company would offer you 1250GB of storage and then make it practically impossible to use said storage?

Call me naive.

So, after explaining to the technician that their "mistake" had cost me a great deal of time and effort, I asked him how I was to remove the content if my IP was still blocked. He told me he would unblock the IP for 24 hours if I promised to remove the files that violated the policy. During this conversation there was very much a sense that my site was being held hostage, so I didn't want to say anything, but it was at that point that I had decided to switch to a new web hosting provider as soon as I had a backup of my site in hand.

And by gum, that's just what I did.

Media Temple: Killer Icon

I'm currently hosting this site, as well as a few others, on a Media Temple (gs) Grid-Service account. Media Temple is famed for their customer service, which is a big deal considering how rudely I was treated over at WHB. But I've yet to even need MT's customer service. This is mostly due to their phenomenal online KnowledgeBase, which has managed to answer my every question, and believe me, I've had some doozies. Uptime and speed have been acceptable; I've had decent speed — faster than WHB by a smidge perhaps — and only the occasional, short-lived drop-outs, which seems to be about par for the course with consumer-level services. But perhaps best of all, I can't even find MT's acceptable usage policy. They don't seem to place any restrictions on what you can do with your disk space. Sure, there are bandwidth and capacity limits, and the capacity limit is smaller than I had with WHB. But at least now I have a chance of actually hitting it.

It's only been a month. A little early, I realize, to fully endorse Media Temple. But so far, so good.

Today I canceled my Web Hosting Buzz account. Nothing like the taste of sweet, sweet consumer revenge. I just have to wonder, when will companies realize that consumers can and do exercise their freedom of choice? It just doesn't ever pay to treat customers — or, hell, let's call them what they are, people — like shit. There's little I take greater pleasure in than dumping a company that does so.

UPDATE:

Lots of great comments on this post so far. In particular, one reader points out that Media Temple does have a usage policy (I figured!) on their legal page (not in their support pages or KnowledgeBase, which is where I was looking). Of particular interest, said reader points to the following passage:

"75% of customer’s content files stored on Provider’s server must have associated HTML, or PHP files inside the account linking to the content stored on that account."

So, yes, there are some restrictions on the sorts of files that can be stored in your Media Temple account. But I understand this rule. It's there to prevent you from simply using the allotted disk space as storage. Media Temple wants you to use the space to serve websites, not as an online storage repository. Web Hosting Buzz has a similar clause in their policy. But, to be clear, the Web Hosting Buzz policy goes an additional step in limiting the size of the files I can put in my account to a measly 500kb, regardless of whether or not they are linked via HTML, PHP or the like. (For the record, 10% of your files can exceed this limit.) The way I read this is that you can only use your WHB account for serving basic HTML/PHP sites that use mainly text and/or image files, and not particularly large image files at that. And that'd be fine if it were clear from the start, in which case I never would have used them. But, while this policy is buried in an otherwise seemingly reasonable usage policy, WHB boastfully offers 1250GBs of storage on their main page. This is what you see most prominently when you sign up for their service. It's plastered all over their site. But when taking the usage policy into account, it becomes clear that that 1250GBs is pretty impossible to actually use; it would require hundreds of thousands of HTML and image files, more than even the largest websites use. A 1250GB quota suggests, to me anyway, that you can use this space to host decent sized media files like audio and video. But this is clearly not the case. So, yes, I find the offer of a virtually unreachable 1250GB quota misleading. Is WHB intentionally tricking people into purchasing their service in order to make a fast buck? I don't know. And it's very possible that I am misunderstanding something. But my experience certainly made me feel cheated. The second technician I dealt with was neither apologetic about the situation (which was referred to by said technician as a "mistake" on their part for not having caught the overage) nor helpful about a resolution to the problem. I was simply told to remove the problematic files (which would render my website essentially useless) or have my account suspended.

Emotions aside, ultimately the 500kb file size limit is, quite simply, a deal breaker for me. There's no way I can run my other sites with such a restriction in place. So, whether or not WHB is misleading folks, I have no choice but to make changes to my service. Had the WHB tech been a bit more helpful about the situation, a bit more symapthetic, I might have considered upgrading my WHB service to one that could accomodate my needs. Unfortunatley, that's not how things played out.

Thankfully, Media Temple does not seem to have the same sort of restrictions in their usage policy (and, in what is probably a good sign, they do not offer nearly as much disk space, though it's certainly more than enough). But, as I said, the jury's still out. And I'll take, as always, a wait-and-see approach. If I encounter problems, I will take my business elsewhere. But I'm hopeful that, at least for a while, I've found a new home in Media Temple.

UPDATE 2:

I've edited the post for clarity.

Extending an Airport Network

UPDATE: It looks like there's actually a better way to extend an Airport network than the one I've outlined in this article. A few people have written in to tell me that they've had great success using the configuration "wizard" available in the Airport Express Utility. I haven't tried using this myself, but it does look exceedingly easy. So, definitely the thing to try first before you go into the twelve page set of instructions below.

Thanks to all who sent this in. I'll leave the detailed instructions below for anyone who's interested.

Man, I wish I'd known about this sooner.

Airport Utility Wizard: Quite Possibly A Better Way

A while back I got a second Airport Express in the hopes of using it to extend my existing wireless network. Doing so was fairly tricky and not anything like I'd expected.

I had initially believed — perhaps naively — that the process would essentially be a matter of joining the new Airport to the existing network the same way you'd add a new computer. This is decidedly not the case. It turns out that, in order to extend an wireless network across multiple Airports, you must set up what is known as a WDS network. Let's take a look at the process, which for me anyway, was fraught with difficulties that this article will hopefully help me (and you) avoid in the future.

Set Up the "Main"

The "Main" WDS Airport is the unit that will host the wireless network. It's the one that's connected to your cable modem, or your router, with an Ethernet cable. You'll connect the "Remote" Airports to the Main wirelessly, allowing them to extend the network. It's important to remember, as you continue with this process, that each new wireless node must be added to the main node in order for it to be seen by the WDS network. Ready? Here we go!

Wired Connection

  1. The easiest (and Apple-recommended) way to do all this is with a direct, wired connection, so grab yourself an Ethernet cable and connect your computer to the Airport that you want to be the Main unit. This is not absolutely necessary, but it will help to mitigate any problems you might have as you go making changes, since you won't be dependent on a wireless connection. You can skip this if it's easier.

Base Station Settings

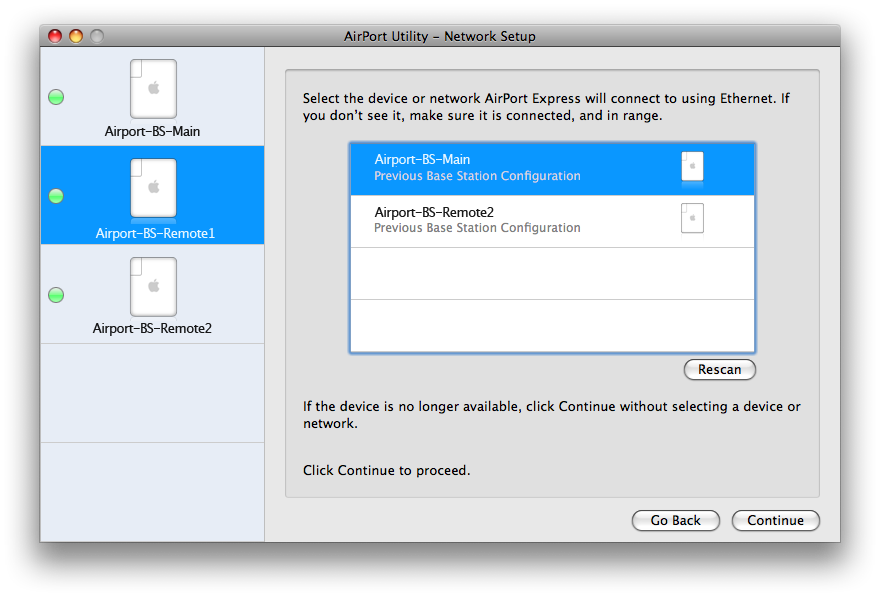
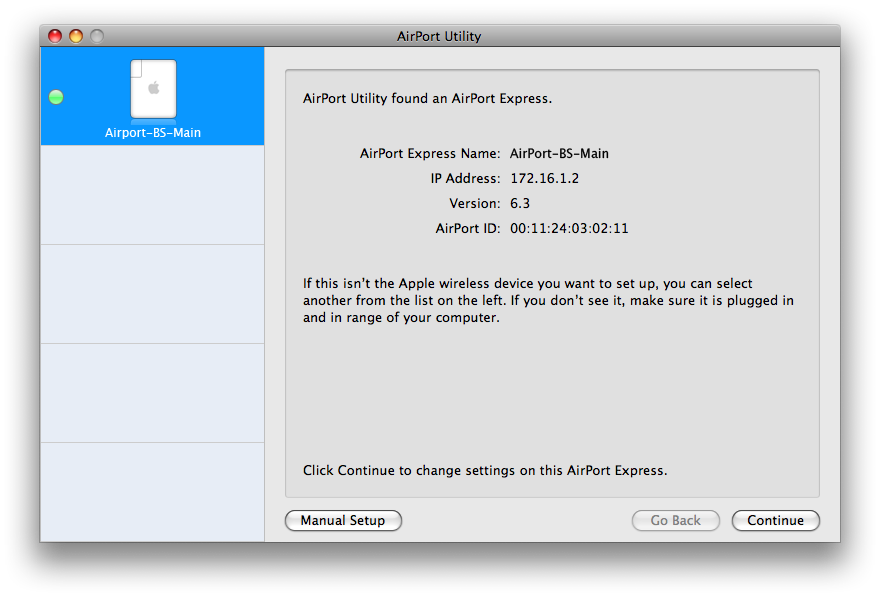
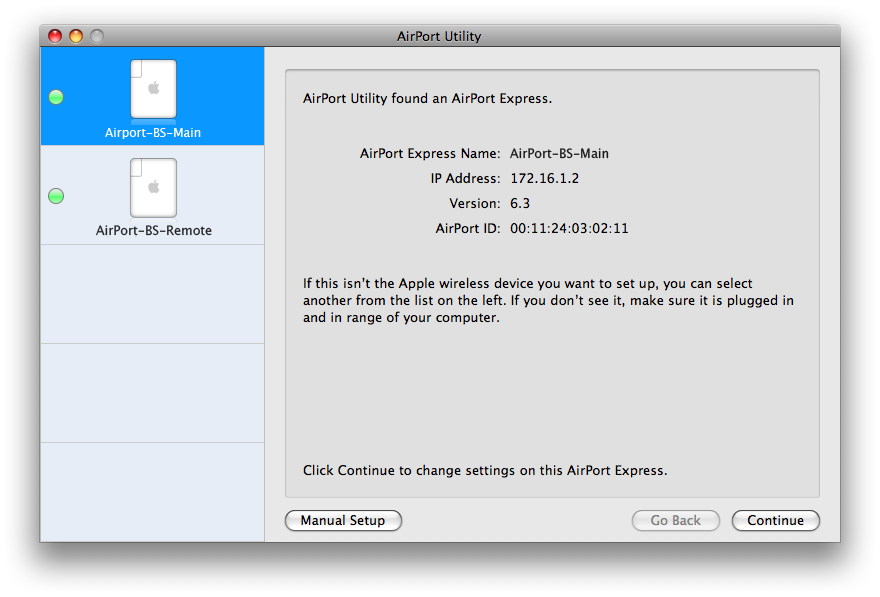
  1. Once connected, open Airport Utility. You should see the Main at the very least.

    Extend Airport: Main Window

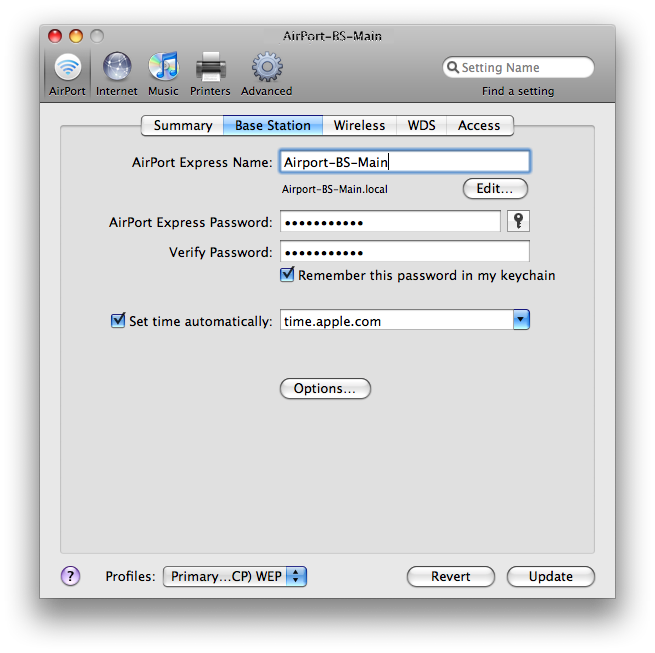
  2. Double-click the unit to open its configuration window. Begin in the Base Station tab by setting the name and password of the unit.
  3. The name will be the name of the base station itself, and the password is the one used to log in to and change the unit's settings. I recommend naming it something like "Airport-BS-Main" for easy identification. As always, make the password memorable and secure.

Extend Airport: Main Base Station Settings

Wireless Settings

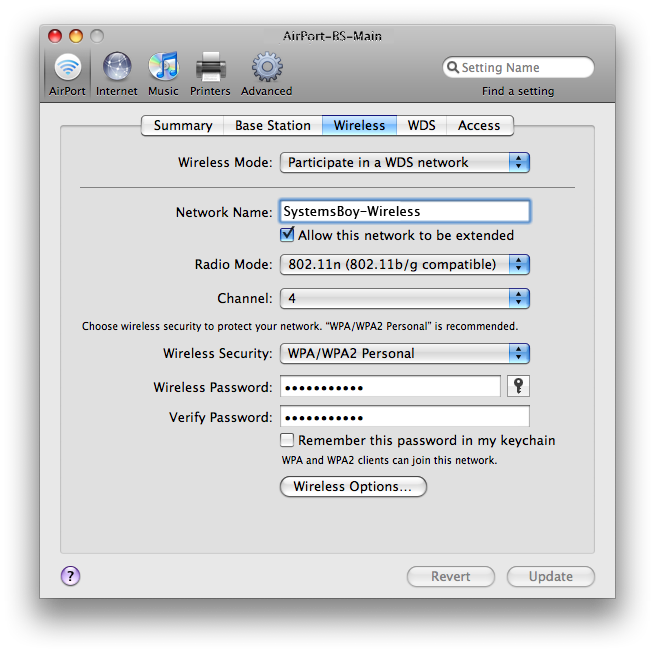
  1. Under the Wireless tab, set the Wireless Mode to "Participate in a WDS Network." This is the key, really, to the whole shebang.
  2. It's also important to check the "Allow this network to be extended" checkbox.
  3. Here you'll also want to give the network a name. This is the name you'll use when joining the wireless network from your computer, so choose wisely and for the ages. I like clear nomenclature, so I went with "SystemsBoy-Wireless." Clever, huh?
  4. Set your encryption method. The Airport recommends WPA/WPA2 Personal, which I like too. Secure and compatible.
  5. Choose a channel, or use the default. It's all good unless you're in a super-crowded area, in which case trial and error is your friend.
  6. Finally, be sure to set your wireless network's password. This is the one used for joining the network from your computer. Two names, two passwords. I know it's confusing. But you're smart. You'll figure it out.

Extend Airport: Main Wireless Settings

WDS Settings

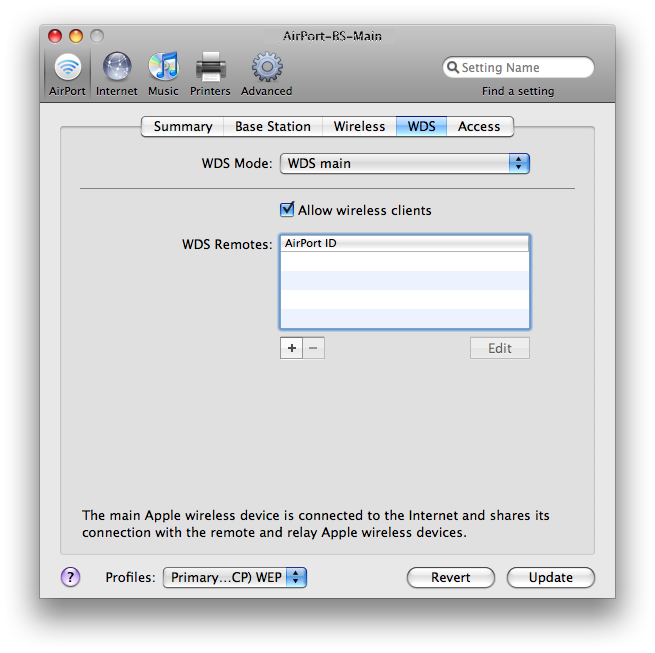
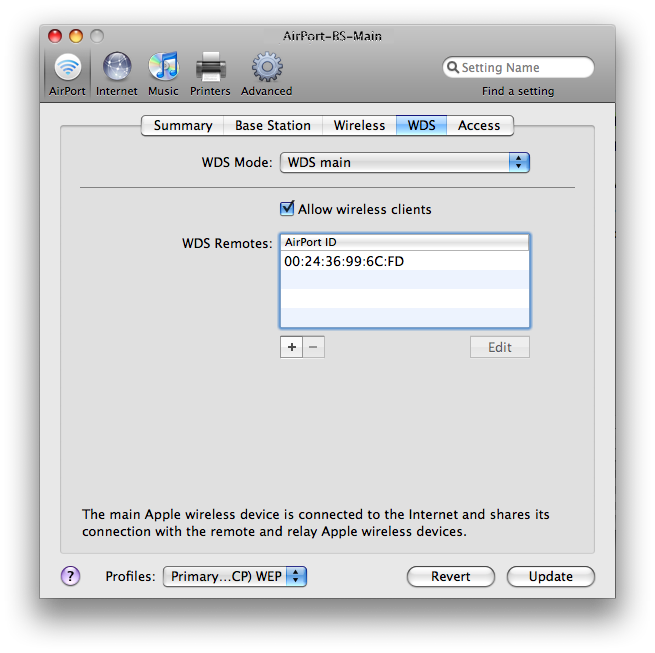
  1. Under the WDS Settings tab the Main WDS Airport's WDS Mode should be set to "WDS main."
  2. "Allow wireless clients" should be checked.
  3. You'll add your WDS Remotes later, once we've plugged in the other Airport in the next section.

Extend Airport: Main WDS Settings

Update and Test

  1. Once all this is set up, hit the "Update" button.
  2. The Airport will go and make the settings you just configured, which will require it to reboot.
  3. After the reboot, remove the Ethernet cable connect between the Airport and your computer, and (re)connect the Airport to the network/router.
  4. If all went well, you should see the classic green light on flashing on the Airport unit. You should also be able to connect to the Airport network wirelessly. If you don't or can't, reboot the unit again for good measure. Make sure you give it enough time before trying to connect to it. Five minutes should be more than enough.
  5. If, after all this, you still don't see the green light, you'll need to troubleshoot your connection in Airport Utility, which is beyond the scope of this article. But it's important to get the Main unit working as a wireless base station before proceeding. Everything depends on it. So get it working using the above settings.

Troubleshooting Tips

  1. Occasionally, after a reboot, the Airport will not be visible in Airport Utility. Simply restarting Airport Utility will sometimes fix this, so be sure to try it if you can't get connected.
  2. For whatever reason, this process took a few tries for me. So remember, a direct, wired Ethernet connection will aid in troubleshooting. This is recommended by Apple, and I concur.
  3. Don't forget, if need be, you can completely reset the Airport back to factory defaults and start from scratch using the super-secret reset button on the top of the device.

Set Up the "Remote(s)"

The Airport(s) you use to extend your wireless network are referred to, in WDS parlance, as "Remotes." With WDS Remotes you'll be able to join your wireless network — the same one you set up on the Main, with the same network name and password — from well beyond the reach of the Main. Remotes should, obviously, be placed within signal reach of the main, but far enough away to actually extend the reach of the network.

Wired Connection

  1. As before, this will all be a lot easier if you connect to the WDS Remote Base Station using an Ethernet cable. Be sure you're Remote has power, then connect with Airport Utility.

Base Station Settings

  1. With Airport Utility opened, you should still see Main, as well as the newly added, unconfigured Remote.
  2. Double-click the Remote unit to open its configuration window. Begin in the Base Station tab by setting the name and password of the unit.
  3. As before, the name will be the name of the base station itself, and the password is the one used to log in to and change the unit's settings. I called this one "Airport-BS-Remote" for easy identification.

Airport Utility: Airport Remote

Wireless Settings

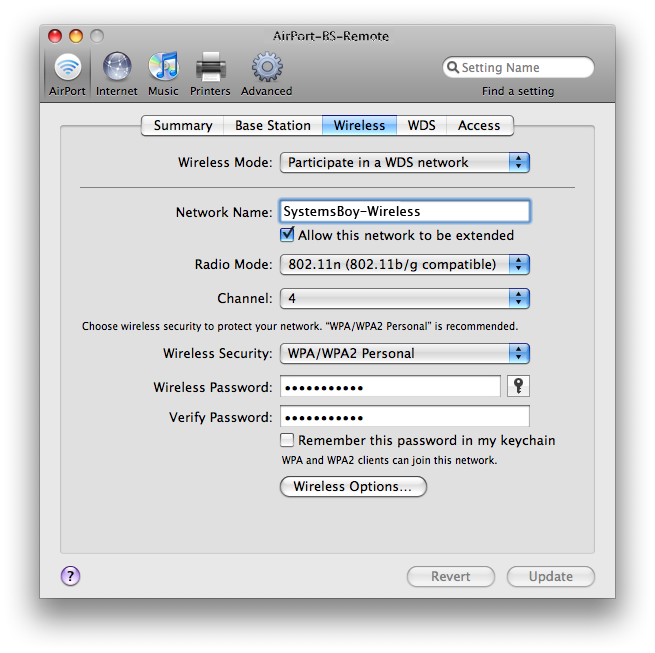
  1. Under the Wireless tab, as before, set the Wireless Mode to "Participate in a WDS Network."
  2. Here too, check the "Allow this network to be extended" checkbox.
  3. For the Network Name you should enter the same name you entered for your Main — in my case, "SystemsBoy-Wireless." Remember: different Base Station; same wireless network.
  4. Your encryption method for the Remote should also match that of the Main.
  5. The channel can be whatever you want it to be.
  6. And, finally, the wireless network's password should match that of the Main Base Station.

Extend Airport: Remote Wireless Settings

WDS Settings

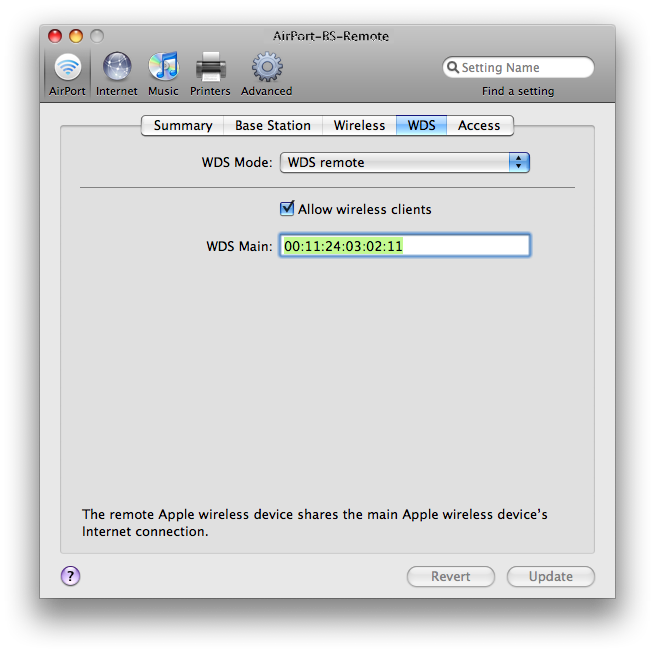
  1. Under the WDS Settings tab the Remote WDS Airport's WDS Mode should, not surprisingly, be set to "WDS remote."
  2. "Allow wireless clients" should be checked.
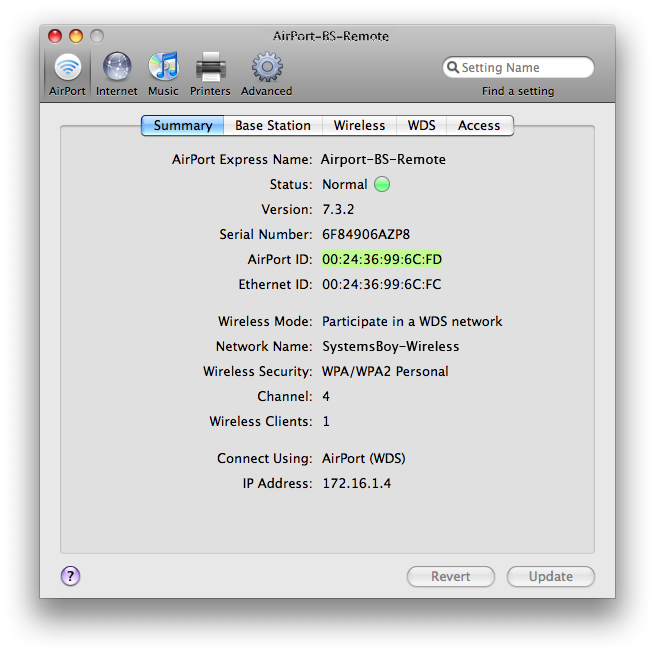
  3. And in the last box, labeled "WDS Main," you should the MAC (hardware) address of your WDS Main Airport. This can be found under the Summary tab of the configuration window. Each Base Station has two MAC addresses, actually: an "AirPort ID" and an "Ethernet ID." You want the Airport ID.

Extend Airport: Remote WDS Settings

Add the Remote to the Main

  1. Now here's where it gets a bit tricky. Both the Remote and the Main need to be aware of each other. So, now that your Main is configured, you should be able to see it in Airport Utility and open its configuration window. Open it so that both the Main and Remote configuration windows are open.
  2. Go to the Remote's summary window and copy its Airport ID to the clipboard.

    Extend Airport: Remote Airport ID

  3. Now go to the Main's WDS tab and hit the little plus sign to add a remote and paste the Airport ID number into the field.

    Extend Airport: Adding Remotes to Main

Finish

  1. With both Airports' roles now configured, and with each aware of the other, you should be good to go. Hit the "Update" button on the Main, wait a minute, and then hit on the Remote (so that the Main reboots first)
  2. Wait for them to reboot.
  3. Once rebooted the Remote should have a green light under the Status field of its Summary tab and should have no errors. If it complains about something, make sure the Main is working well over wireless, then give the Remote another reboot. If this still doesn't work, move on to troubleshooting.
  4. Once everything seems to be functioning without error, place the Remote Base Station in its intended physical location.
  5. Pat yourself on the back! You've just extended your Airport wireless network!

Make no mistake, extending your Airport network is a big, fat, sloppy pain in the booty. It's also extraordinarily handy in many cases where a single Airport just isn't cutting it.

Google's Select All Conversations

In my ongoing adventures to move all my mail to Gmail there have been a few snags. One of them is the fact that Gmail only sucks down POP mail, which one of my many numerous email hosts does not support. The other problem has been one of management.

Gmail is becoming the de facto mail sorter for many folks. It has superior spam filtering, virtually unlimited — or at least more than you'll probably ever need — capacity, it can be searched using Google's legendary algorithms, and it can get mail from from any email account that supports POP, which most do. Aggregating your mail through Gmail has the additional advantage of keeping all your mail online and centrally located, so it can be read from any computer with a browser and an internet connection, and it's always in sync.

I've also come to prefer the Gmail approach to mail management. This basically boils down to one idea: tags instead of filters. So, in Gmail, instead of filing your mail in folders, you use what Google calls "labels," which are just tags, which are in fact text descriptors used to describe an email. The nice thing about labels is that an email can belong to more than one label at a time, giving you all kinds of sorting and viewing options. Good luck trying to do that with folders.

My approach to local mail management of late has been to keep all my mail in my Inbox — or once it's old enough, in an Archive box — and then to sort that mail into various views using Mail.app's Smart Folders. This is basically what Google recommends doing over the folder approach: Don't file, just search. This approach, however, no longer scales well on the Desktop, primarily because my computer is much slower than Google's server at this point, but also because Spotlight's algorithms are not quite as good as Google's.

Aside from the POP limitation, the only thing keeping me from moving entirely to Gmail was the plain fact that there was no way for me to Archive my 2000+ email conversations (which is what Google calls threads) in one fell swoop. So my Inbox sat there, completely full of mail. Unread messages might remain unread long enough that new read mail would pile up and bump them off the main screen and into obscurity. The only solution I could find to this was to go through what would have been hundreds of screens full of emails, hit "Select All" and then "Archive," and then to Archive everything as it came in ever after. Clearly what was needed — and this is true in a lot of online editors, including Wordpress' — was a "Select All" button that allowed you to select every message in the Inbox.

Recently, that option finally appeared. To see it, hit "Select All" in the Inbox view. After doing so, a subtle line of text will appear just below the selection bar:

Hit that and you suddenly, magically, amazingly have access to all your Gmail. Now you can archive it, label it, mark it with a tee — whatever you want. Finally I can keep my Inbox uncluttered. To see the Archived stuff, I just hit "All Mail" and there it is.

With this I think I may be moving entirely to Gmail at long last.